Classic Tile in the Bathroom

If you saw my post about the bathroom inspiration, you'll remember that it was chock full of classic vintage vibes complete with subway tile, marble, and contrast grout. Thus, that's exactly what we went with when we gutted and remodeled the bathroom two years ago.

Subway tile in the bathroom The Gold Hive

I already knew I wanted subway tile, and even considered crackled, textured, and irregular styles before ultimately deciding on these crisp white ones from the Tile Shop (which are currently on sale). But, it's not as simple as just picking the tile. Below I'm sharing our thought process for tile design.

Pattern

Running Bond Offset tile pattern subway in bathroom The Gold Hive

We did a simple running bond pattern throughout. There are actually several ways to lay a subway tile in a subway kinda way. Check out the examples here. Since we were going with a dark grout, I chose a pattern that didn't have as much movement as say the 1/3 offset.

Layout

Subway tile to the ceiling in a shower

I can't stand when tile doesn't go to the ceiling in a shower. I know, it isn't necessary. It can be a waste of money to tile 3 feet above your head where no water will splash, but I really am a sucker for fully tiled showers.

chair rail heigh subway tile in the bathroom

Since I was already going for lots-o-tile in the shower, we decided to surround the rest of the bathroom walls mid-way to a chair rail height. This look helps me to feel like I'm living in The Knick. The medicine cabinet determined how high we would go, since I didn't want it floating above the tile, nor drowning in it. For reference, the tile stops 50" up the wall.

Finishing

bullnose subway tile bathroom The Gold Hive

We nearly did a decorative cap around the top of the chair rail, but ultimately nixed it when we didn't like how it terminated at the edges. So, we did a simple bullnose along the top edge of the same-sized tile as the field tiles. I like that this modernizes some of the other vintagey-vibes in the room. For the base, I went with a baseboard skirting that finishes off the space with just a lil' bit of detail.

base molding tile bathroom dark grout The Gold Hive

Grout

Dark grout on Subway Tile

Contrast was the name of the game with the wall tile, so we did a deep charcoal to make the pattern pop. Also, dark grout doesn't run the risk of looking dingy. Win!

grey marble tile floors in bathroom

The flooring had lots of texture in its marble veining and hexagon shape, so we went with a gray that would neutralize the pattern. We went with Delorean Gray

Accents

For the window ledge and the niche shelves, we installed a few pieces of marble slabs. They are gorgeous and the perfect material for a solid surface to rest our toiletries atop of. Plus, they tie in to the marble floor.

Marble sill and shelves in shower subway tile

There are so many details that go into laying tile and ensuring that you're forever happy with the pattern, but I opted to keep this post pretty simple. If you want the specifics, let me know!

For more on the bathroom renovation progress click here! And to get all of the sources and see the full reveal, click here.

Subway Tile in vintage bathroom

Selecting Paired Art for the Bathroom

There's no doubt that the artwork you pick for your home can make a big difference in the feeling of your space. Choosing the right combination of pieces can be difficult, but luckily there's help!

This post is in partnership with Minted!

Minted sourcing artwork from designers

Even the design-blogger-and-art-school-graduate can have a hard time finding just the right pieces. I struggled for months with sourcing the art for the bathroom walls.

Here's what I was working with:

1. The all-white space with oodles of tile can come off as sterile and cold. The room yearned for artwork that would add some warmth but would maintain the dark moody vibe of the wall's paint color.

2. Since I had two adjacent walls to fill, the art needed to complement each other without being too matchy matchy.

3. We wanted pieces that felt special but not so in-your-face-dramatic that we'd grow tired of them.

I played with some dark landscapes, several abstract shapes, and a few portraits but wasn't in love with any combos. Luckily, my friends at Minted stepped in to help me out. And they can help you, too!

In addition to selling beautiful printed and custom art, Minted has a great team of designers that listen to all of your needs and wishes, and then translate the vision into proposed artwork and a mockup of your space. Their styling services were particularly helpful for me when I was looking for two pieces that would work well together on adjacent walls.

Here's what they proposed for our bathroom after I outlined my wishes:

Minted Gallery Art Option How to Choose Artwork

OPTION 1: Edgy

1. Embrace by R studio
standard format in rich black wood frame

2. Sitting Still by Jennifer Daily
standard format in matte brass frame

Minted Gallery Art Option How to Choose Artwork

OPTION 2: Moody

1. Melting Glacier by Caryn Owen
white border in rich black wood frame

2. Bath by Sue Prue
matted in matte copper frame

Minted Gallery Art Option How to Choose Artwork

OPTION 3: Classic

1. Tahitian Pearl No. 3 by Julia Contacessi
white border in matte brass frame

2. Arches by Ilze Lucero
float mounted in matte brass frame

Minted Gallery Art Option How to Choose Artwork

OPTION 4: Contemporary

1. Imbue by Lindsay Megahed
matted in matte brass frame

2. Black 03 by Catilustre
standard format in matte black frame

Minted Gallery Art Option How to Choose Artwork

OPTION 5: VINTAGE

1. Untitled 2 by Jaime Derringer
float mounted in matte copper frame

2. Human One: Anton by Colin Stuart
standard format in matte black frame

Aren't those combos great? I narrowed the options down to #1, #2, and #5 pretty quickly, but got hung up on the decision for a few days. Sitting Still, in #1 is just so perfectly dark and Human One: Anton in #5 is so striking! I think I need to find a spot for Anton somewhere else in my house.

Minted how to pick artwork

We ultimately went with option 3: moody. I am just so tickled with Bath by Sue Prue! I already love pretty lady artwork so this nude was the perfect addition to the collection. The background feels like it was made for my walls.

Minted art how to pick artwork frames

And that frame! I really don't think I would have ever selected the copper frame, but I'm so glad Minted did the decision making for me. I'm smitten with the warmth it adds to the room and how it brings out the skin tones in the painting.

Minted frames and artwork selection help

It also magically matches my copper tin that I previously planned to replace with a wooden one. Not anymore!

Minted how to pick artwork and work with a designer

Speaking of matching elements, both the warm tones in the frame and deep blues of Bath are seen in Melting Glacier by Caryn Owen. Again, aren't those blue-green-greys perfect for the walls? Minted really knows what they're doing.

Minted how to select paired artwork

The view from the shower is the best for admiring the two prints at the same time. They are different subject matters, by different artists, and in different frames, yet they feel like they are friends.

Minted artwork getting help from a designer

I scanned Minted's website for hours but never would have come up with this art print and frame combo. If you want help from a professional designer, I highly recommend you check out Minted's styling services that start at $75. It includes not only a design plan but also a discount on your art order!

Are you an indecisive design professional, stylist, or home renovation professional like me? The art trade program is a great resource for complimentary design help and discounts on art products for your professional projects.

Minted getting help picking artwork

Happy art hunting! And, don't forget this important art hanging PSA from Emily Henderson.

Labor Day Sales!

I've collected bunches of Labor Day sales so you don't have to! Enjoy this roundup of retailers that are discounting their goodies like woah. After you save some money, please consider donating some of it to folks that could really use the help.

Almost everything in the den is on sale!

Moody Green Room

P.F. Candle Co. has candles up to 30% off this weekend. No code needed! I'm currently enjoying No. 11: Amber & Moss which is $21 for 14oz.

eCarpetGallery has rugs for 50% off + Extra 30% off with the Code: LABOR30. The rug in the den is from these folks.

Etsy is having their first-ever Labor Day Sale! A perfect opportunity to snag some handmade goodies at a discount!

A House in the Hills is offering 10% off and they are sending 15% off the proceeds to Houston Food Bank with code LABORDAY17.

Interior Define discounts their custom chairs and sofas only once a year. And that time is now!

World Market has lots of sales, but you can get another 10% off and free shipping with code LABORDAYDEALS. Including this chunky lamp base that we have in the living room.

Scandinavian Designs has a buy more save more sale on everything including my favorite chair.

The Container Store is selling their Elfa closet system for 25% off! We have this in our master closet and love it.

Minda Living has discounted their site by 15% and they are giving 15% of sales to support the relief efforts for those impacted by Hurricane Harvey. Use code SHARETHELOVE. I have their long ottoman in the den.

Alexis Renée Sassard is donating 50% of the proceeds from sales in her curated capsule shop to the Hurricane Harvey Relief Fund.

Crate&Barrel is 15% off this weekend with code SAVE15.

House of Antique Hardware is discounting their entire site by 25% with code LD1725. This is where I get our push-button light switches.

CB2 has 15% off sales - even on furniture! - with code SAVE15.

Murchison-Hume's plant-based cleaning products are 20% off with code LABORDAY20. My favorite is their hand soap in Original Fig.

Select Blinds is selling our solar shades and everything else for 45% off plus buy three get one free.

Artifact Uprising has discounted their custom photo books and prints by 10% with code LONGWEEKEND. I have several of their books and I'm due to order more.

Artfully Walls is discounting their art prints by 20% off with code LABORDAY2017. This includes one of my favorite artists.

Anthropologie is taking another 40% off sale items.

THINX just released cotton period underwear, and they are giving $5 to the Hurricane Harvey Relief Fund with code HARVEY. Click here to also get $10 off your first pair.

Rejuvenation has 20% off pendants, chandeliers, and dining furniture. Plus, it all ships free with code FREESHIP. I would be happy to own literally anything they sell.

Minted is offering 15% off kid and baby prints with code LABORDAY17.

Article has select pieces of their furniture for 20% off. We all know I'm a big fan of Article.

Society6 art prints are 20% off and ship free this weekend. This includes the ones I put in the den and many others I rounded up here.

Framebridge custom framing is 15% off with code LDW2017. We have several of our favorite memories in frames by these folks.

Artist Tuesday Bassen is taking 20% off with code LABORDAY.

The Vintage Rug Shop is discounted 20% off sitewide with code LABORDAY20. If you aren't following Brittany's blog, you're missing out.

Williams-Sonoma Home is 20% off with code FALL.

AllModern is 20% off with code WAVY including our master bedroom sconces.

Lumens is selling lighting for 40% off this weekend with code LABORDAY17.

Target has deals on home furnishing with code LABORDAY.

West Elm is doing a buy more, save more sale with code HUGESALE.

PBTeen isn't only for teens. Their goodies ship free and are discounted the more you spend with code SAVEMORE.

Light & Dwell is selling their pillows for 20% off with code LABORDAY20.

Tessa Neustadt is offering her photo prints for 40% off with code LABORDAY.


Don't forget to consider supporting Hurricane Harvey victims (or anyone else you want to help) by donating some of your savings!

Finally Deciding on Living Room Chairs

I had been struggling for two years to find the right living room chairs. I put hours into testing seats, photoshopping mock-ups, and browsing styles online, and I even tried a few in the room before returning them. I was dealing with clashing elements in the space that kept dictating what kinds of chairs would be a good fit.

How to pick living room chairs

This post is in partnership with Article!

The blue velvet couch that now lives in the den was previously in the living room. The bright color, the velvet fabric, and the tufting steered me away from any other seating that had those elements. I just didn't want a room full of tufted upholstery or oodles of color. The living room's woodwork has orange tones that kept me from any of the camel colored hues or natural wood hues. Even though I wanted a chair like this, it simply would have been too much.

Living Room Before

We lived with that super clashy teal chair and the wooden dining chair for a couple of years while I hunted for the right ones. These two were leftovers from our old house and they were probably the worst chairs for the space - oy.

I was on the lookout for neutral colors, with simple lines, that were neither bold nor boring. It was a tricky thing to do! I was looking at traditional designs, modern wingbacks, casual cushionsswiveling bases, and so so so many more.

But then, the blue couch and the existing teal chair moved to the den when I transformed that space for the One Room Challenge earlier this year. And my world opened up! I moved the grey sofa into the living room and it instantly neutralized the space. I still plan to replace it with another piece without tufting and a lighter color, but I'm happy to have it for now as it lets the chairs be the center of attention rather than the big couch.

Through the swapping of furniture, I learned that I prefer a simple couch to ground the space, with accent chairs to add the personality. I also came to the realization that I wanted to find ways to make the living room feel more casual. The traditional woodwork, my affinity for velvet (more on that later), and the fact that the space is free of a TV, makes the room feel quite formal. An easy way to make a space feel less formal is to not go super matchy matchy. Some may disagree, but I decided I'd get two accent chairs that didn't match. 

So, I started my search over from scratch and this time I could source pieces that had color, texture, tufting, and leg designs that would complement a future couch. I could also pick two favorites instead of narrowing it down to one!

I'll quit my ramblings and just show you which beauties I picked out from one of my favorite online retailers, Article.

Blue velvet living room chair

Aren't they the bee's knees? 

Blue velvet Matrix chair from Article

Surprise surprise, I got another blue velvet piece! I just love the texture, and so does the cat! We've learned that velvet is the best material for avoiding cat scratches. Mabel does her fair share of scratching on rugs and furniture around the house (and I follow right behind her with a spray bottle attempting to dissuade the behavior). It's super frustrating and I've tried all the tricks to get her to stop, but velvet is by far the best material for holding up to the cat's natural tendencies.

That texture is simply irresistible to me and the cat. She spends HOURS lounging on this chair, it's her new favorite spot.

Blue velvet Matrix Article chair

I fell for the Matrix's color and fabric, but its scale fits the room just as nicely. In my heart of hearts I wanted a big wingback that I could curl up in while wearing a smoking jacket and plaid house shoes as I peruse my collection of leather bound books that are so aplenty that they are only accessible from a library ladder. But, literally none of that applies to my daily life, so I'll have to save that scenario for my dreams. This real life room needed something smaller scale to maintain sight lines to the adjoining dining room, and narrow enough that the walkway wasn't blocked. Matrix is a perfect fit with its compact size.

Forma chair from Article

Now the Forma chair. What a beaut! The fabric texture adds just the right amount of detail without distracting from the pretty shape. With all of the chunky woodwork in the room, I wanted something that had soft curves and sleek legs that added visual lightness and this chair fit the bill.

Forma Article living room chair with gold detail

Check out the back detail! Since the chairs float between two rooms, the backsides are just as important.

How to pick chairs for living room

Ordering chairs online can be worrisome if you don't have the chance to try them out beforehand. Our home's chair critic (Ross) was wary, but he absolutely adores the comfort factor. He's the kind of seating judge that if he says "it's fine" then you're winning. It's a multi-layered evaluation that I don't fully understand myself. But after I found him quietly sitting in the Forma chair for ten minutes, I asked his opinion and without skipping a beat he said, "I love it." Victory! He had the same feelings about Matrix, but he had to wait until the cat got out of that seat before he could indulge.

Styling living room chairs

It's so great to walk into the house with these chairs on the welcoming committee. Now, I need to get a new side table and a new couch to really let these beauties shine.

Be sure to check out the other beautiful chairs from Article, including this perfect caramel wingback, and this one that looks great in blue velvet, too. They also carry lots of other modern furniture pieces, all for a flat shipping fee of $49. Plus, the Article team is just so darn nice!

I wasn't kidding when I said that Mabel loves the Matrix chair. I tried to remove her for the sake of these photos, but she kept jumping back into her spot.

blue velvet living room chair

Tell me, am I pushing it with the blue velvet furniture in my house? Would you do non-matching chairs? Which cat scratching remedies are effective for you? Who is the biggest chair critic in your family? Which Article chairs do you fancy? Share away!

Deciding on A Tank or Tankless Hot Water Heater

A couple of weeks ago, our hot water heater failed. We took a few cold showers, asked for recommendations, and debated tankless or tank options for days.

Hot Water Heater Debate

Our unit was a whopping 26 years old (!) which is triple the life expectancy of today's water heaters. It lived a good life, but just had enough, I suppose. I get it, 2017 has been a rough year. It acquired a leak (maybe tears?) that dripped onto the pilot light, extinguishing the flame. We could relight the light, but the leak had already rusted out pieces of the heater and it got worse day by day.

Tank or Tankless Hot Water Heater

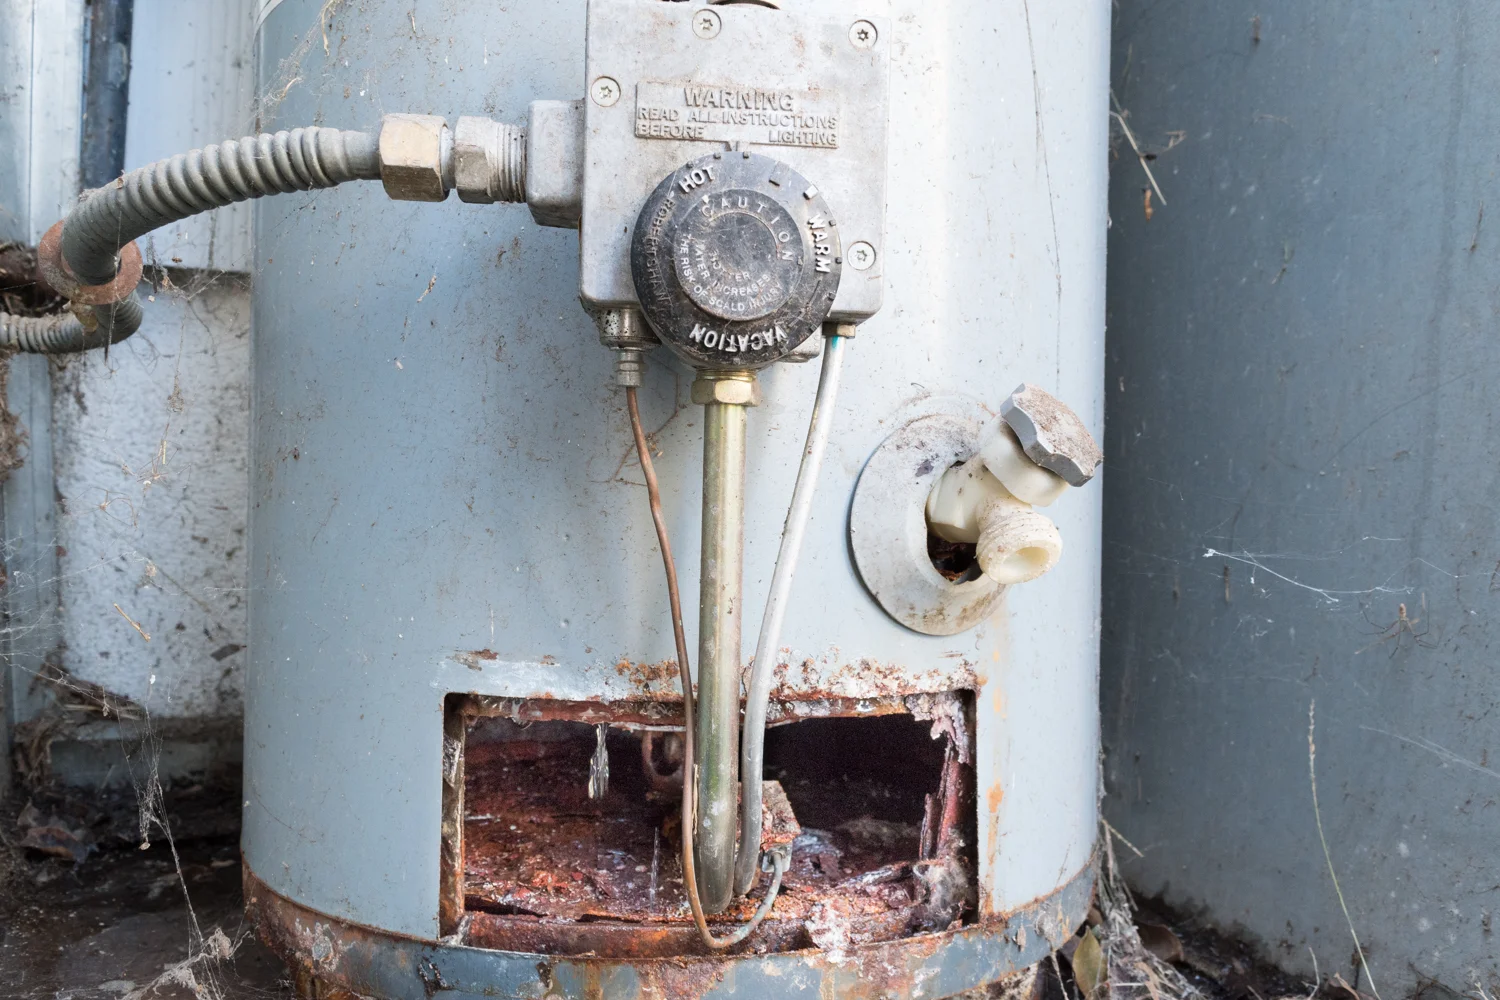
Thus, we needed a new hot water heater. Before I get into shopping for a new one, a brief PSA. Is your heater easily accessible? Do you have experience relighting the pilot? Have you already identified which valve shuts off the gas and which shuts off the water? If not, I recommend you take a look at your unit and get comfortable with how to make adjustments in case of an emergency. Either a cold water emergency or worse - gas or water leak emergency.

And back to shopping for everyone's favorite product. The biggest, and really, the only decision we had to make was if we wanted to go with the tank or tankless option. In short, the tank is your old fashioned giant cylinder hiding in your garage, closet, or backyard. Using either gas or electricity, it keeps oodles of water constantly hot. A tankless option is a small rectangle that sits on the wall patiently waiting for you to ask for hot water. When you open the tap, it turns on and heats the water as it passes through the unit. To decide which we wanted, we broke down the differences and evaluated how they fit our needs.

Size

Tank: These big cylinders filled with 30-60 gallons of water don't do anything for aesthetics. They can eat up valuable real estate in a garage, closet, kitchen, bathroom, etc.
Tankless: They look like what someone in 1980 would imagine a 2020 backpack would look like. Or maybe more like a hand blow dryer in public bathrooms. They're little and mount on the wall instead of sitting on the ground. It's a perfect option for replacing a tank that sat in an ideal spot for anything other than a tank of water.
Our take: Our hot water heater sits outside of our house. It faces our neighbor's driveway and lives in its own hut attached to our exterior wall. It isn't bothering anyone at all, so we had no motivation to downsize.

Demand

Tank: Since the hot water is already heated, you get that hot water pretty much as soon as you turn on the tap. If you use up all of your hot water, you have to wait until the tank reheats itself which is not a fun thing to wait for while you're in the rinse and repeat stage of your shower.
Tankless: Since the water heats up when you ask for it, the unit needs a bit of time to heat up and get up to your preferred temperature. You'd have to keep the tap open and wait until the cold water becomes hot. But, you'll never run out of hot water once it's on so you can rinse and repeat all day long.
Our take: I lack patience and don't like wasting water waiting to get to the scolding hot temperature I need. Additionally, we've never run out of water, so the tank format is already working for our needs.

Efficiency

Tank: Imagine keeping a giant pot of water simmering on your stove at all times day and night. But imagine that pot is the size of a stout human. That's basically what the heater is doing. Not very efficient.
Tankless: It heats water only when you need it. Super efficient.
Our take: We love efficiency - this is the primary motivation to switch to tankless.

Power

Tank: Gas tanks need only gas. Electric need only electricity.
Tankless: Even if your water is heated with gas, you need to run electrical to it so it can power the brains of the system.
Our take: Even though the tankless unit would be more efficient in terms of its energy to heat the gas, it's just one more device drawing power off the grid. Plus, we didn't have power available to easily run to the unit.

Failures

Tank: If a tank fails, it could leave you with a disastrous flood.
Tankless: If it breaks, you'll be without water, but luckily water won't be all over your floors.
Our take: Our unit is outside. If it failed, the neighbor kids could make a slip-n-slide in their driveway, and my garden would be happy. We're super lucky - not everyone has this luxury. However, if our neighborhood's power goes out (which it does frequently in the hot summers) we would be without hot water - which I guess we wouldn't really even want in the hot summers anyway. But I've heard some folks report that turning the tankless unit back on is a real pain and not just a something that turns on when that surge of electricity comes back.

Natural Disasters

Tank: If we experience a natural disaster (like a California eathquake) I like knowing that we have 50 gallons of drinking water that can easily be accessed. If our power goes out, we’ll still have 50 gallons of hot water in the tank that would still provide us with a warm shower until it cools to the outside temperature, or until the power goes on.
Tankless: Water isn’t stored in the tankless system, so we don’t have any reserve in the event of an emergency.
Our take: I’m by no means “a prepper” but I like being prepared and find comfort in having the water available if needed.

Price

Tank: We were quoted $1,200 for a 40 gallon tank replacement.
Tankless: We were quoted $3,500 for a new unit.
Our take: Depending on how much you value each of the above items, the extra price of tankless may be moot. Or, depending on your area and capacity needs, the prices may be more similar. However, since we didn't need the smaller size or more demand, the extra price was really just to get a more efficient unit. Getting a return on the savings is debatable.

Are you still with me? Is a post all about my logic for buying a house utility at all interesting?

Conclusion

We bought a tank. A boring run-of-the-mill 40-gallon tank. You probably could have guessed it, but the benefits of tankless just don't apply to us. Maybe if we go solar we can get an electric thankless unit in a few years when the tank ultimately fails. (fingers crossed for solar!)

I drew all of my information from my online research and hearing from your experiences! But, if I missed anything, please use the comments section to weigh in and share your thoughts. I'd like to see this blog serve as a resource based on your experiences as well as mine!

Isn't she pretty?

New Water Heater

Weekly Roundup of Instagram Accounts You've Probably Never Heard Of

A few weeks ago, Sarah of Room for Tuesday shared her favorite blogs. Some are the tippy top bloggers, and others aren't yet the hot shots (she even included me. meee??? I'm still blushing). It has me inspired to share some of the Instagram accounts that I adore, but don't (yet!) have the biggest following.

Without further ado, my favorite up-and-coming home/design/interiors Instagrammers with fewer than 2,000 fans.

@KAEMINGKDESIGN

Be sure to follow all of those folks - they're doing great things!


Who did I forget? Am I missing anyone? Please share your favorite accounts that are still growing!

My Number One Tip To Style A Bookshelf

I don't believe that there are rules for styling shelves. It's such a unique and personal way of showing off your collection, that preaching my rules feels just plain wrong. I will, however, share my number one tip!

The Gold Hive Shelf Styling

One of the best ways to dress up, or rather, dress down your books is to remove their dust jackets. The floppy papers wrapped around the covers have lots of color/style variety, so removing them can strip the book down to its simplest form. The book's actual spine is traditionally one color, with an understated typeface. It's so much more of a classic style that keeps your bookcase looking more intentional, and I actually find it easier to locate my favorite reads. 

Everyone loves an animated gif, so I put one together to show off how much of a difference removing the dust jacket makes. (If you're reading this in an RSS reader, click through to the original post to see the animation.)

The Gold Hive Dust Jacket

If you're less of a gif animation person and more of a spot-the-different person, well, here you go:

The Gold Hive Tip to Style Shelves

Did you see the Audubon book without its jacket?? So. Pretty.

Once I stripped the books of their jackets, I collected things that I love from around my home and moved them around on the shelves until it felt right.

The Gold Hive Styling A Bookshelf

That timelapse (if you're in an RSS reader, you may have missed it and you should click here to see it) was my whole entire process. You can see I changed my mind several times, and kept tweaking over and over. My approach is more organic and less crafted than profesh designers might do.

As I made changes, I kept an eye on color, texture, height, and objects - aiming to vary them throughout the bookcase. It isn't perfect, and I'm still continuing to tweak things.

The Gold Hive Styling a Bookshelf

If you want to get serious about styling your shelves, you could keep everything to a uniform color palette, turn less-pretty spines to the back, or use more sculptural items to match a theme. However, I like books for being books. I'm generally not a fan of the shelves that organize the spines by color.

I also like to style my home with things that I find to be unique or heirloom-y. I'll supplement with knick knacks from Home Goods, but what I love about this shelf most is the vintage camera, the handmade pottery, the books we like to read, the record from a recent concert, the old-school Trivial Pursuit game, and the artwork that I'm drawn to.

But really, you do you. Go for the monochromatic scheme, the packed-to-the-gills library, the minimal look, or the filled-with-tchotchkes collection. I encourage you to make it feel like a representation of you and your home!

Looking to add more to your shelves? Below are a few of the items on our bookshelf. But we'd like to add more, what are your book recommendations??

Oh, and that very first photo was taken by my friend Dani for an exciting project coming up. (!!!)

Refreshing An Overly Painted Bookcase

The Gold Hive Bookcase Before and After

The bookcase room dividers were a big selling point when we (well, when I) first laid eyes on the house. But, somehow, I neglected them for two years. I got distracted with all of the other projects, so they sat empty for months. Then I started piling books on them. Then I loaded them with junk with no intention of styling them. Then they just sat there for months. I'm not perfect, okay??

The Gold Hive Bookcase Before

Luckily, all of my knick knacks covered up the horrid paint job underneath. Not only was it an unfortunate brown color, but it was peeling pretty badly. This, my friends, is why you don't want to paint water-based paint over oil-based paint without some serious prepping. Otherwise, you leave a mess of refinishing for people like me (or even yourself) years later.

Supplies:

6-in-1 tool
Razor blade scraper
Utility knife
Sander with coarse grit papers
Respirator/dust mask and goggles
Drop cloth and optionally an old sheet
Primer
Paint of choice
Angled paintbrush
Shelf support pins

The latex paint was peeling off in sheets, so I used a combination of tools to scrape and peel it all off. Some of it came off nice and easy, whereas other spots took some serious scraping. The goal was to scrape anything that wanted to come off. Really stuck-on paint could stay.

The Gold Hive Refinish a Bookcase

After what felt like 99 hours of scraping, the next step was to sand everything really smooth. Any edges where the layers of paint didn't come off entirely need to be sanded down until they are slick to the touch. You'll still see the different colors, but as long as you can't feel it to the touch, then you're golden. I used the 50 grit sanding pads on my orbital sander to smooth edges and rough up the existing finish to receive new paint.

Since power sanders blow a bunch of dust around, I wanted to protect the rest of the house from the mess. Thus, a made a cocoon for myself with an old sheet to encapsulate all of the dust. Of course, I wore face protection to keep dust out of my eyes and lungs.

The Gold Hive sanding a bookcase

I'll admit that the funny looking technique wasn't the most comfortable way to work. It got pretty hot and rather dusty. But I didn't need to clean up much dust at the end of the project, so I consider it a win!

Once everything was sanded smooth and paint scraps were cleaned up, I coated the surface with my go-to primer, Zinsser 1-2-3.

The Gold Hive bookcase primer

That's just primer, but look at the transformative power of paint!

Next, I did a couple of coats of paint left over from the One Room Challenge. Benjamin Moore's Simply White in the satin finish is such a pretty, soft white. So much better, right?

The Gold Hive Refinish a Bookcase

The bookcase has small holes on the sides to mount adjustable shelves on pins. Each of them was filled with so much paint (prior to my scraping), that the pins didn't fit. After painting my own three layers of paint, which subsequently mucked it up even further, I redrilled the holes. Using a bit the size of the holes (1/4" in my case) I re-drilled each of them being sure not to make them any bigger than their original size.

The Gold Hive Bookcase Refinish

The drill removed the gunk from inside of the holes, but it did pull up some of the new paint along the edges. No biggie, though.

The Gold Hive bookcase refinish

I followed up with a mallet and the end of a screwdriver to soften the edges by hammering any rough edges produced by the drilling into the hole. This is the same technique I recommend for patching a hole in the wall after removing a nail.

For a swift cleanup, I used compressed air to blow the dust out of each of the holes while vacuuming gunk that flew out with a shopvac. I followed up with a light dabbing of paint to touch up the spots that lost some of the finish.

The Gold Hive Refinish a Bookcase

Finally, I pushed the shelf mount pins in, then plopped the painted shelves on them. These pins work wondrously for creating adjustable shelving options. If you're building your own shelves, or want to add more storage to an existing unit, you could easily install a strip of wood in each of the corners with equally spaced holes. Then pop the pins in, mount a shelf, and you'd have adjustable storage!

pegs-0282.jpg

Next week, I'll share my steps for styling shelves. Maybe within the next two years I'll refinish the other matching bookcase, too!

The Gold Hive Bookshelf