15 Unique Cabinet Knobs and Pulls for Under $10

When we bought the house, all of the kitchen cabinets were adorned with handles in the shape of twigs. All cabinets but one - the drawer under the sink had a knob in the likeness of a rooster. So stylish, so festive. While I love foliage and fowls, I decided to swap them out for new pulls. Since we were seeking stopgap solutions for a phase 1 upgrade, inexpensive options were a top priority. I know I'm not the only one that likes to be nice on the budget, so I've compiled a list of cabinet hardware pieces for under $10, just for you!

The Gold Hive Budget Friendly Hardware.jpg

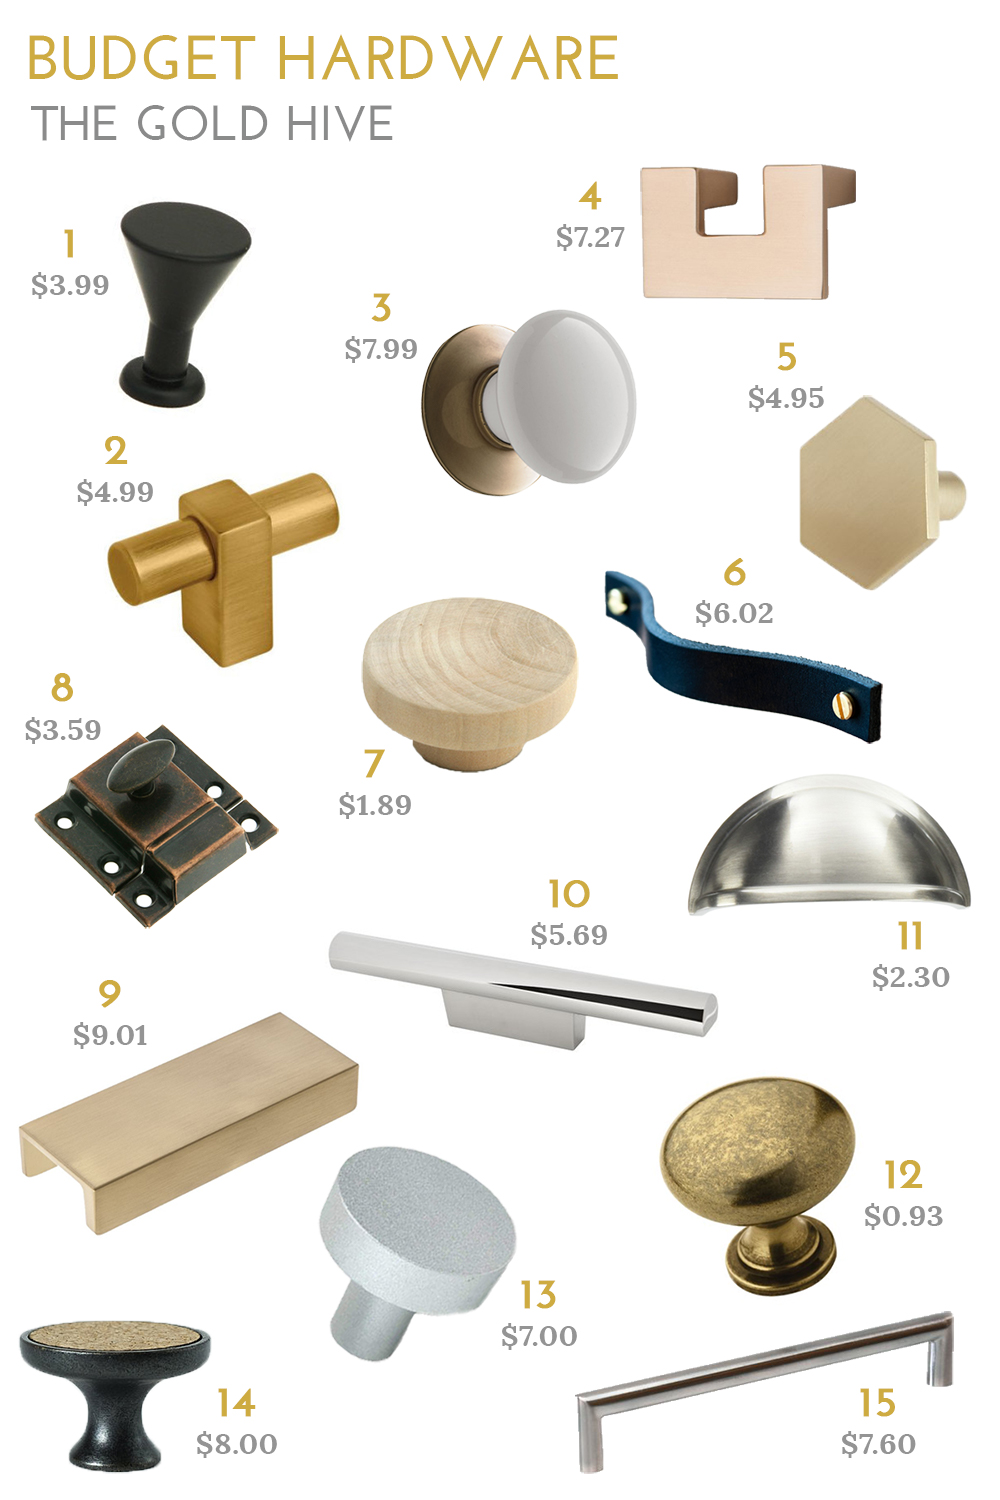
1. Peggy // 2. Paris // 3. Porcelain // 4. U-Turn // 5. Hex // 6. Leather // 7. Wooden // 8. Latch // 9. Martin // 10. Metro // 11. Cup // 12. Allison // 13. Marcel // 14. Cork // 15. Bar

When searching for budget pieces, it's easy to head straight to the big box store, but can you believe that many of those are handmade?! And all of them are under $10? And one of them is made of cork? And another with leather?

We went with #11 and #12 in nickel, but I have eyes for a few of those other pieces. Which are your favorites?

One Room Challenge Week 4 - Sourcing The Artwork

It's already week four of the One Room Challenge! We're over halfway there and the room has earned dark green paint and picture rail molding. This week, I got to hang the artwork!

This image of a man pulling a girl out of a hole is my favorite piece in the whole room. I'm obsessed with all of the collage pieces by this artist, Richard Vergez. I got this piece and (and all of the others in this post) from Society6, which is such a great resource for framed art by independent artists. The beauty of it is you can get your favorite design printed as a framed print, mug, duvet, tote, or pillow, like this one!

I can't have a room without florals! This print as a pillow does the job.

There's so much beautiful artwork (and bad artwork!) out there so deciding is such a feat. I've rounded up a few more of my favorite artworks from Society6. You can also find more of my curated pieces that I'm crushing on here.

Sources from top left: Rainier Eunice Lake The Dreamer / Colors / D24 Mountain Trees C16 / By the Hills, revisited Crown Into Abyss / El Matador Close Noir / Glacial

While I ultimately bought my prints from Society6, Minted is another great source for art. Here are some swoon-worthy pieces.

The Gold Hive Favorite Art from Minted

Sources from top left: Spiced Cider/ Blue HIlls / Road Trip 2 Torched / Dance Abstract Watercolor A Slight Chance / Conversation II / Broken Clouds Whispered Rain Reflections III / The Forest

I shared last week how much I love picture rail molding and how to install it. Well, here's how to use it! Simple dimple.

The Gold Hive Installing frames on picture rail molding

You can find picture rail hooks in a variety of finishes, shapes, and sizes, so pick whatever works for your home's style and your decor. I got these from House of Antique Hardware for their simplicity and the way the brass matches the aged brass of the switch plates.

Attaching the hook to the frame is as simple as twisting on a wire. The key is to select a wire that can withstand the weight of your frame. The Society6 prints are quite lightweight so I was able to go with a thinner gauge wire, but this same wire previously snapped when I tried using it to hang a mirror. Oops. If you don't want to use wire, rope or chain are great alternatives. I prefer how subtle the thin wire is because it doesn't take attention away from the main attraction, yet you still see a glimmer of it when the light hits just right.

The Gold Hive Installing frames on picture rail molding

I like to start by twisting the wire on to the hook so I can focus on making the twist as clean as possible, since you'll see it. After measuring how high the image will hang, cut the wire to length, leaving several inches to twist into the back of the frame. For a strong hold I like to twist the wire on, then double twist over it again.

The Gold Hive Installing frames on picture rail molding

After a bit of finessing, you have a photo hung on the wall without any holes! While I adore these new prints, and plan on enjoying them in this room for the long haul, I love having the flexibility to move them around the house without having to patch nail holes. 

The Gold Hive Installing frames on picture rail molding

The two large prints over the couch are by Lucie Birant. Deciding on a diptych is tricky because you want them to go together, but not too much. The key is for them to be sisters, not twins. Rather than picking two pieces that are nearly them same, but slightly different, I opted for two very different images, but by the same artist. They aren't matchy matchy, but they go together because they still have the same pencil work and overall style. Emily Henderson has a great PSA on avoiding generic art and how to make diptychs look grand.

The Gold Hive Sourcing Artwork

While all of the new artwork for the room was sourced from Society6, I searched high and low on lots of other websites such as Minted, Artfully Walls, and 20x200. Society6 had the best prices and the quickest turnaround for a room makeover on a tight timeline, but I really had to sort through the artwork, because I didn't love it all (remember, bad art good walls). I like Artfully Walls for the easy search features that help you curate based on themes and colors. 20x200 sells limited edition art prints that are really unique (I'm still waiting for this one and this one to arrive in the mail). Minted has a lot of great pieces that are easy to love. They aren't generic, nor too quirky like the painting of the Denny's Parking Lot I ordered from 20x200. Check 'em all out! Or, if you have your own artwork or an existing piece you want to frame, take a look at Framebridge for custom framing options at great prices.

To recap, the prints I chose for the room are Minimal and Palm by Lucie Birant, Let Me Go Or Squeeze Me Tighter by Richard Vergez, The Path by Carlos ARL, and Mount Cook Lily (Night) by Andrea Stark.

If you're here because of the One Room Challenge, I hope you'll subscribe to the blog to get future blog posts in your email! Be sure to follow along on Instagram, too!

One Room Challenge progress:One Room Challenge progress:
Week 1 - the before, the inspiration, and the plan
Week 2 - paint, paint, paint
Week 3 - how to install picture rail molding
Week 4 - sourcing the artwork
Week 5 - refreshing a chair
Week 6 - the reveal!

Be sure to admire the other rooms that are four weeks into being completely transformed! So many featured and guest bloggers are doing big things!

One Room Challenge Week 1 - A Moody Makeover

I'm currently digging moody colors. Deep blues, forest greens, and dark grays are all I'm pinning as of late. I mentioned a few weeks ago that I was contemplating painting my kitchen cabinets (again!) to give them a deeper hue. Since it's not the best use of my time, I've directed my color affection to another space. Luckily, the One Room Challenge is starting at the perfect time to scratch the moody color itch! Scroll through to see the room I'll be transforming over the next six weeks.

If you found me through ORC, welcome! I'm Ashley and for the past two years I've been restoring a craftsman bungalow in San Diego, CA. Learn a touch more about me here, and preview the before-and-after room transformations here.

Without further ado, here is the inspiration.

See where I'm going? What I particularly love about these spaces is how they play with dark on dark tones. Studio McGee's emerald couch against the navy walls and Julia's black sofa on the deep green are what moody dreams are made of.

So which space will earn its dark makeover? The family room/den/media room. What is a good name to call a space that we pretty much use only to fold laundry and watch TV in? The internet tells me that an alternate to the word "den" is "snug." I kinda like it. Please weigh in.

This room has received little to no love over the past two years. 100% of the furniture pieces were brought from our rental, so I've grown tired of them. The paint color is a reject color that I bought for our master but didn't like once painted on all of the walls. (lesson learned: paint BIG swatches before you buy a gallon of paint). Also, the trim never got its final coat of paint. 

The Gold Hive One Room Challenge Week 1

The room is fine, but it could become the dark hued space of my dreams. I'm looking forward to spending the next six weeks transforming it. I hope you'll stay tuned and check out the featured and guest bloggers participating in the spring 2017 season of the One Room Challenge!

One Room Challenge Mood Board - The Gold Hive

Sources: couch / rug (one of a kind) / lamp / pillow / chair (existing) / chair fabric / credenza (vintage) / painting

If you're here because of the One Room Challenge, I hope you'll subscribe to the blog to get future blog posts in your email! Be sure to follow along on Instagram, too!

One Room Challenge progress:
Week 1 - the before, the inspiration, and the plan
Week 2 - paint, paint, paint
Week 3 - how to install picture rail molding
Week 4 - sourcing the artwork
Week 5 - refreshing a chair
Week 6 - the reveal!

Bathroom Plans

Last week I shared some of the inspiration for our bathroom. The collection of images made a few must-have elements pretty clear: subway tile with dark grout, moody walls, hex tiles, marble, and period-appropriate finishes.

The Gold Hive Bathroom Mood Board

SOURCES: paint / medicine cabinet (ours is original) / faucet / hex tile / sconce (ours is vintage) / cabinet latch / pendant (ours is vintage) / register (ours is vintage) / subway tile / grout / console sink

We had a pretty good idea of the plans for the bathroom, but small tweaks were made over the course of the renovation. The below designs were drafted early on, so don't take these measurements as an exact blueprint of the finished product. Rather, a starting point for where we were headed.

The Gold Hive Bathroom Plan View

The layout of the existing bathroom had no reason to be changed. I like having the toilet tucked in the corner, the sink has ample room around it, and the tub configuration allows for storage at the foot of it. Many bathrooms like this are only 60" wide which gives the tub just enough room to fit wall to wall. Since we had another foot of space, we could have gotten a longer tub to stretch the length of the room, but we opted to make two spots for storage, seen in the upper right corner of the above image. The little square that measures 6.5" deep is accessible from the shower. A perfect place to nestle bottles of shampoo without having them on display.

The Gold Hive Bathroom South View

The 13" space on the right is a cabinet for toiletries, refill bath products, cleaning supplies, and more. I think it's my favorite feature in the whole bathroom.

The window shown here is a sizable improvement from the existing one, but we ended up going even bigger!

The Gold Hive Bathroom East View

Because the sink is floating in between the toilet and the tub, I didn't want a traditional vanity. I think vanities are really pretty when they look like built-in cabinetry as an extension of a wall. But on their own, vanities can look like boxes floating in the middle of a room. Thus, we opted for a console sink that visually opens the space. Sure, we gave up storage, but I'm a-okay with that. Neither Ross nor I own a lot of products for primping, so the storage at the end of the tub is perfectly adequate for us.

Other than a few tweaks, those are the plans for the bathroom! If you want to jump two years into the future, you can see the finished bathroom here and here and here.

For more bathroom progress, click the link below then subscribe so you don’t miss out when I add a bathroom in 2019!