The Reveal of My $600 Kitchen Makeover

The Reveal of My $600 Kitchen Makeover

It’s the reveal of my kitchen’s cheap stop-gap makeover! When we got the keys to the house, I didn’t feel comfortable touching anything let alone eating anything in there. So, I did cosmetic improvements, a few functional upgrades, and lots of cleaning! We didn’t want to put too much money into it because we knew we’d be remodeling soon, so I made over the space with $600 and some elbow grease.

Read More

How The Kitchen Makeover DIY Projects are Doing Four Years Later

How The Kitchen Makeover DIY Projects are Doing Four Years Later

It’s almost time to start demo on my kitchen to make way for the new space, so this is my last chance to share whatever can be shared about the current iteration of the kitchen!

As you probably recall, the kitchen was just a phase 1 makeover to hold us over until our full remodel. I thought it would only be like this for 6 months, but it’s been over 4 years. Oops. Because I didn’t want to dump a bunch of money or time into the makeover, I did some quick cosmetic fixes. They weren’t designed to hold up for a long time, but some of them have. Here’s a full report.

Read More

A Video Tour of the Inside of My Kitchen Cabinets and a Shoppable List of Everything In The Kitchen

A Video Tour of the Inside of My Kitchen Cabinets and a Shoppable List of Everything In The Kitchen

I love looking at how people store things - especially in their kitchens. I like learning other people’s reasoning for things, I like snooping, and I always like to improve on my own spaces. So, I filmed one of my own kitchen! However, mine isn’t perfect. This whole kitchen was a stopgap solution until we could renovate the space (coming soon!) so there’s no fancy pull out drawers, no custom spice racks, no perfectly sized shelves, and certainly no perfect layout.

Read More

15 Unique Cabinet Knobs and Pulls for Under $10

When we bought the house, all of the kitchen cabinets were adorned with handles in the shape of twigs. All cabinets but one - the drawer under the sink had a knob in the likeness of a rooster. So stylish, so festive. While I love foliage and fowls, I decided to swap them out for new pulls. Since we were seeking stopgap solutions for a phase 1 upgrade, inexpensive options were a top priority. I know I'm not the only one that likes to be nice on the budget, so I've compiled a list of cabinet hardware pieces for under $10, just for you!

The Gold Hive Budget Friendly Hardware.jpg

1. Peggy // 2. Paris // 3. Porcelain // 4. U-Turn // 5. Hex // 6. Leather // 7. Wooden // 8. Latch // 9. Martin // 10. Metro // 11. Cup // 12. Allison // 13. Marcel // 14. Cork // 15. Bar

When searching for budget pieces, it's easy to head straight to the big box store, but can you believe that many of those are handmade?! And all of them are under $10? And one of them is made of cork? And another with leather?

We went with #11 and #12 in nickel, but I have eyes for a few of those other pieces. Which are your favorites?

A DIY Kitchen Transformation Using Vinyl Floor Tiles + A Video Tutorial!

A DIY Kitchen Transformation Using Vinyl Floor Tiles + A Video Tutorial!

The kitchen has seen a wild transformation! So far, I've shared the plans, the concrete counter DIY, and three tutorials for adding more work space - check out those posts here. But the floors! The new flooring made the kitchen into a wonderfully different space - a big improvement from the sad termite-filled fir. I couldn't have been more excited to get started on the quick/cheap/transformative project of giving my kitchen floors a fresh buffalo check pattern. This DIY kitchen transformation using vinyl floor tiles is among my favorites yet - and it costs about as much as it does to paint a room!

Read More

Picking a Kitchen Floor Pattern

The phase 1 kitchen earned several upgrades already, like new paint, hardware, concrete countertops, and even more countertops. However, the floors didn't get much love other than a coat of poly when we refinished the the rest of the floors. As much as I love the fir, the wood was pretty damaged. Nearly every plank had either huge gouges or was brittle from years of termites gnawing on the softwood. The previous owner made attempts at repairing the mangled boards by filling the cavities with wood putty, but it definitely didn't help the aesthetics.

The Gold Hive Kitchen Flooring Damage

These photos don't do justice to the damage. We lived with the flooring as-is for a couple of years letting those termite gaps fill up with a hefty amount of cat litter and crumbs. But, I lost my patience and had to remedy it. Knowing that the kitchen will eventually get a full gut renovation, I had the opportunity to do whatever I wanted without it impacting the future plans - even if it pushes my design boundaries. So, I jumped on to the graphic look and committed myself to installing a funky pattern that I like, but wouldn't be my first choice for a permanent kitchen floor. This transitional renovation fix lets me get the bold/graphic/retro vibe out of my system before having to make the forever-flooring decision. Win win.

The Gold Hive Graphic Flooring Inspiration

Sources clockwise from top left: Megan Pflug Designs/A Beautiful Mess/Allison Burke Interior Design/The Art of Doing Stuff

At first, I was sure that I would install the checkerboard pattern to get that retro diner vibe. But after a few Photoshop mock-ups, I realized that with the large amount of uninterrupted floor space, the high contrast of black and white was too busy and could give us vertigo. The idea of modern geometric shapes was also appealing, but I worried I'd spend years cutting the tiny pieces. It didn't take much for me to fall for the buffalo check pattern. The grey neutralizes the high contrast black and white, while also adding texture with the illusion of the weaving pattern. It also has enough style that I can feel confident I didn't play it too safe.

Since this was merely a temporary solution that really only needed a bandaid, I found a flooring solution that was quick, cheap, effective, and super easy to install. The perfect improvement project for a newbie DIYer or renter.

I couldn't be happier with how it turned out. The installation went swimmingly and the result is sleek, clean, and full of personality. Come back next week to get the full tutorial and link to all of the sources! Subscribe, so you don't miss out.

Three Ways to Add Kitchen Countertop Space On A Budget

The biggest challenge with many kitchens is a lack of work surfaces. It's a pain to cook without sufficient countertop space, right? Yet, it's easy and inexpensive to DIY a spot to prep and cook. So, I bring you three super simple ways to add custom counters for cheap.

The Gold Hive How to Add Counter Space for Cheap

There are oodles of rolling bar cart options like this, this, or this, to give you more space to work, and they are great! Some have additional storage, some have spots for wine bottles, and some have fancy hooks and bars for all of your kitchen needs. But they don't always fit a space perfectly. Sometimes the height doesn't line up with the existing counters, or there's a gap next to the range, or it blocks an outlet. I tried out three different methods to add valuable work surface to a kitchen that has a couple of empty nooks.

1. The Cabinet & Counter

cabinet after-0331.jpg

Our range was centered on a narrow wall so we never had a spot to rest our tools or prep. With a few inches on either side of the appliance, the area was the perfect candidate for a new work surface and even some concealed storage. The search for a base cabinet started at Habitat for Humanity ReStore, then Home Depot and Lowe's, but I ultimately found the best size and cheapest option at IKEA. After wiggling the stove over, I had the perfect amount of room to wedge in this 18x24x30" SEKTION base cabinet.

The Gold Hive How to Add Counter Space for Cheap

I assembled the base cabinet according to the instructions provided. Instead of using the track system for the full kitchen cabinet installation, I used the components that mount it directly to the wall and supported it with the adjustable cabinet legs.

The Gold Hive How to Add Counter Space for Cheap

These cabinets don't come with a countertop, so I made my own. Butcher block was my first choice since wood is easier to work with than stone. However, even the cheapest slabs were too pricy and more material than I needed, so I used this piece of 3/4" pine that works swimmingly. In an effort to get as much surface area as possible, I made the wood overhang by 2” and notched out a spot for the door trim using my trusty jigsaw. I also sanded the corners to match the round profile of the range.

The Gold Hive How to Add Counter Space for Cheap

To finish, I coated the pine with food-safe Acrylacq so it could better stand up to the moisture in the kitchen.

The Gold Hive How to Add Counter Space for Cheap

Cabinet: $60
Cabinet legs: $6
Countertop: $20
Acrylacq: left over from
the concrete countertop project

Total Cost for The Cabinet & Counter: $86

2. The Custom Cleat Counter

The Gold Hive How to Add Counter Space for Cheap

The corner of the kitchen had been the home for a small breakfast table, but we never used it. A better use of the space was a long shelf to extend the existing counter. Instead of store-bought brackets (see #3), I used a cleat system. This technique provides strong support and gives the illusion of a floating countertop.

The Gold Hive How to Add Counter Space for Cheap

The first step was to identify the wall studs so the cleats would have something strong to sink into. I used my favorite technique from when I installed picture rail molding.

The Gold Hive How to Add Counter Space for Cheap

After finding all of the studs, the next step was to screw in lumber along the walls just below the counter. To find the height to screw in the cleats, subtract the thickness of the counter material from the height you want it off the floor. Make your mark, then using a level, draw the guide along all of the walls. It’s important that you make the cleats level so your food doesn’t roll off the counter!

The Gold Hive How to Add Counter Space for Cheap

I was lucky to have some scrap lumber, but you could get a few feet of 2x4s and cut them to size. I purposefully left a gap between the cleats so I could feed a power cord through to the top of the counter. It conveniently gets hidden behind the coffee maker.

I cut the pine panel to just a hair bigger than needed, then sanded it down until it was a snug fit. After cleaning up the edges, it got a coat of Acrylacq just like the cabinet counter.

Countertop: $35
Lumber & fasteners: already on hand
Acrylacq: left over from the concrete countertop project

Total Cost for The Cleat Counter: $35

3. The Off-The-Shelf Shelf

The Gold Hive How to Add Counter Space for Cheap

I used these brackets with this white melamine board to create out-of-the-way kitchen storage. It's as easy as hanging the brackets in the studs, then screwing the top to them. Simple dimple. We use this counter space to get the microwave out of the main part of the kitchen, store some small appliances, and plop things that are going in and out of the house. It's such a helpful spot to dump stuff, but over time, the board started to sag. See it bowing in the photo? It also started to tilt forward, so we had to reinforce it with some L brackets. Not a big deal, but it certainly doesn't have the floating cleat counter look.

The Gold Hive How to Add Counter Space for Cheap

Shelf brackets: $26
Melamine board: $13
L brackets: $6

Total Cost for The Off-The-Shelf Shelf: $45

For a grand total of $166, we gained 10.5 feet of additional counter space (and a few shelves)! While we were lucky to have lots of room to expand, I’m certain that even adding a 6” shelf between the range and the counter in a small space would do wonders. Each of these projects can be done in a weekend and are great for a rental. How would you upgrade the work surface in your kitchen?

To see how I skim coated tiled countertops with concrete and to see more kitchen progress, click here. To follow along with how the rest of the home renovation goes, subscribe!

Concrete Countertops in the Kitchen - A How To and A Report on Two Years of Use

While the kitchen didn't get a full gut and remodel like the bathroom, it received its fair share of updates to make it usable. Among the most impactful were the concrete countertops.

The Gold Hive How To Concrete Counters

The existing counters were granite tiles. Now, some of you may swoon when you hear "granite counters" but these were NOT swoon-worthy (but also, not many granite counters are swoon-worthy in my personal opinion - though, I digress).

You may be familiar with concrete countertops that are a solid piece of concrete that's poured in place, but skim coating is an easy option that doesn't require any demo. If you're a DIY-loving renter that has the "go ahead and make changes but I'm not going to pay for it" landlord, then this project is for you.

I'm not going to pretend that I came up with this DIY. I followed the instructions from John and Sherry of Young House Love to a T. For a comprehensive step-by-step, take a look at their whole process here and here, but you can follow along with my brief play-by-play below. Then, I'll get into how they are holding up 2 years later.

What you'll need:

  • Ardex Feather Finish - this is the star of the show. Amazon sells it in packs of 4 which is good if you need a lot. My kitchen needed less than 2 bags for a 12' run of counters and no backsplash. I got this option which comes with 2 bags and a trowel.

  • Measuring and mixing buckets - I used an old gardening pail and a cup. The ratios are what matter more than the actual measurements.

  • Scraping tool - I used a metal putty knife, but a 6-in-1 tool works great. I recommend something with a 2-4" blade.

  • Trowel - You can get creative with lots of different sized and shaped trowels but I used the one in the combo pack of concrete and a trowel. If you're new to this type of work, I'd recommend a short trowel to give you more control. A "pool" trowel has smooth edges which also helps newbies not make track marks as they spread. If that's what you're after, here's one.

  • Sandpaper - I used a heavy grit paper on my sander, then finer grits on the sanding block.

  • Mask and eye protection - During the sanding stages, it gets really, really, really dusty. You'll want eye protection and a mask or respirator.

  • Sealer - to protect the concrete that you so laboriously applied.

  • SafeCoat Acrylacq - to finish the counters and make them food safe.

  • Foam brushes - If you have a lot to cover, you can get a foam roller, but I used a wide foam brush.

As a reminder, here's what the kitchen looked like before.

The Gold Hive How To Concrete Countertops

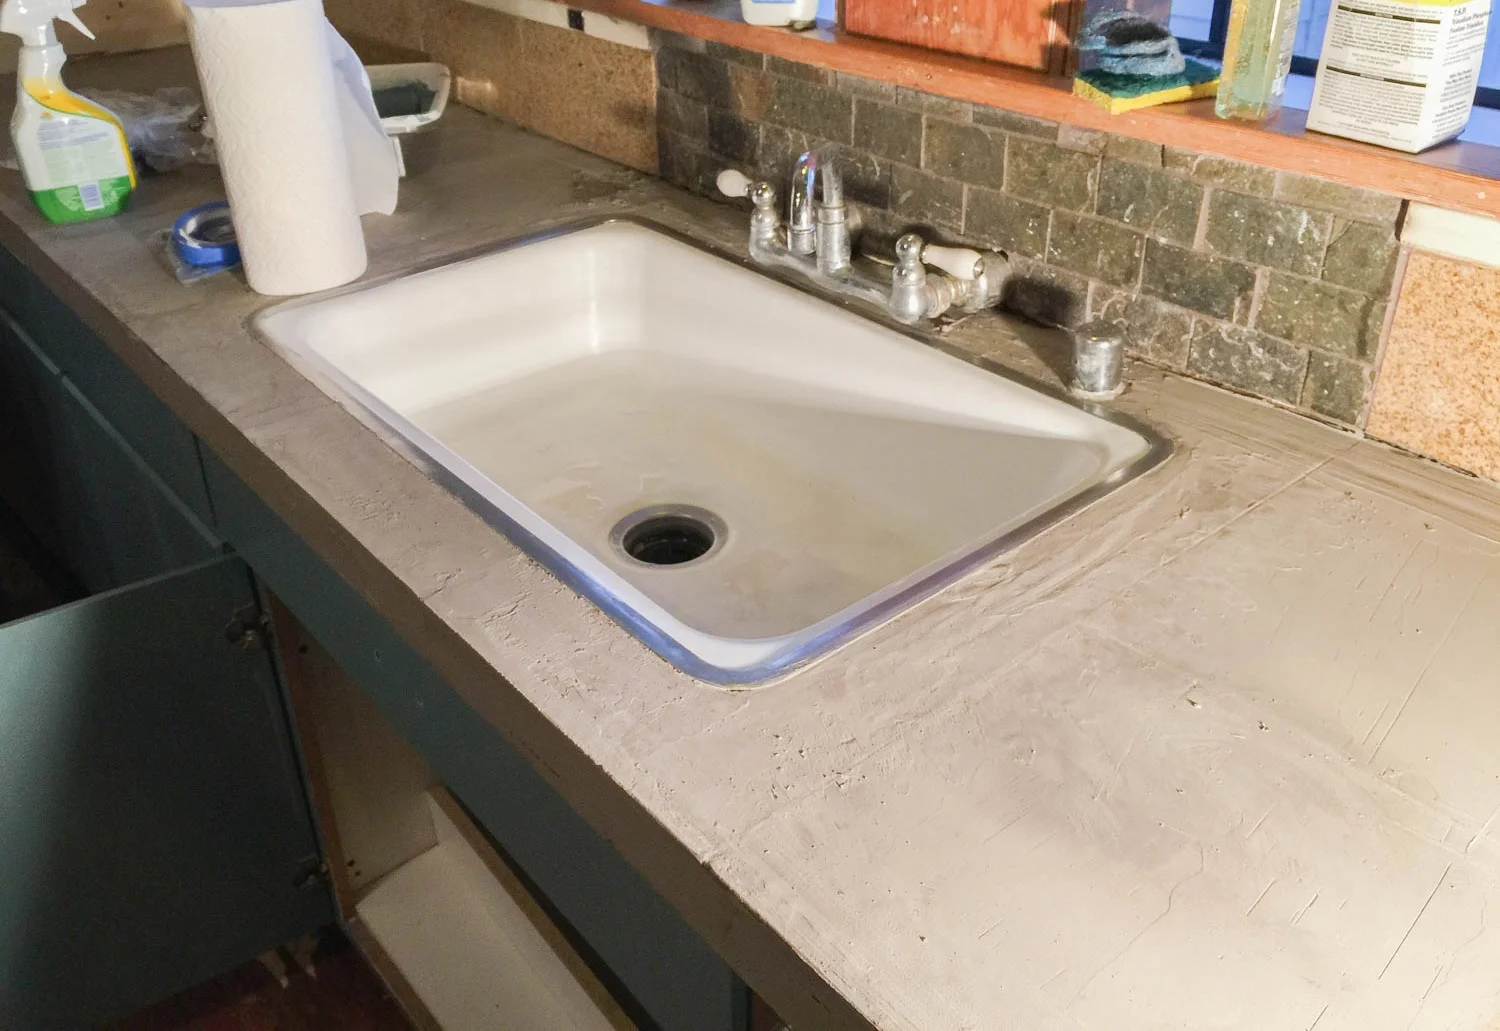
The first step is to quarantine the room you'll be working in. I was lucky to be doing this project in the midst of renovations, so dust was aplenty. But, if you're living in the house while doing this project, you'll want to thoroughly seal off the space to contain the mess. Note that this is a multi-day project, so plan accordingly.

I used a coarse grit sandpaper on my sander to rough up the counters. It seems silly to sand granite which is a pretty darn strong material, but I did it anyway to really clean up the surface and sand down remnants of anything that I didn't want between the counters and the concrete. If you have a softer countertop material, this step is helpful for scratching the surface and giving the concrete something to grip to.

After wiping up the dust, I mixed the concrete according to the ratio on the bag (2 parts powder to 1 part water) to get a toothpaste consistency. If you're doing a lot of vertical work you'll want more of a peanut butter consistency, but if you're just working on the flat counter, it can be runnier. Find what works for you! I mixed small amounts at first to see how far it went.  If you mix too much, it will harden and all you'll have is a concrete mold of your bucket.

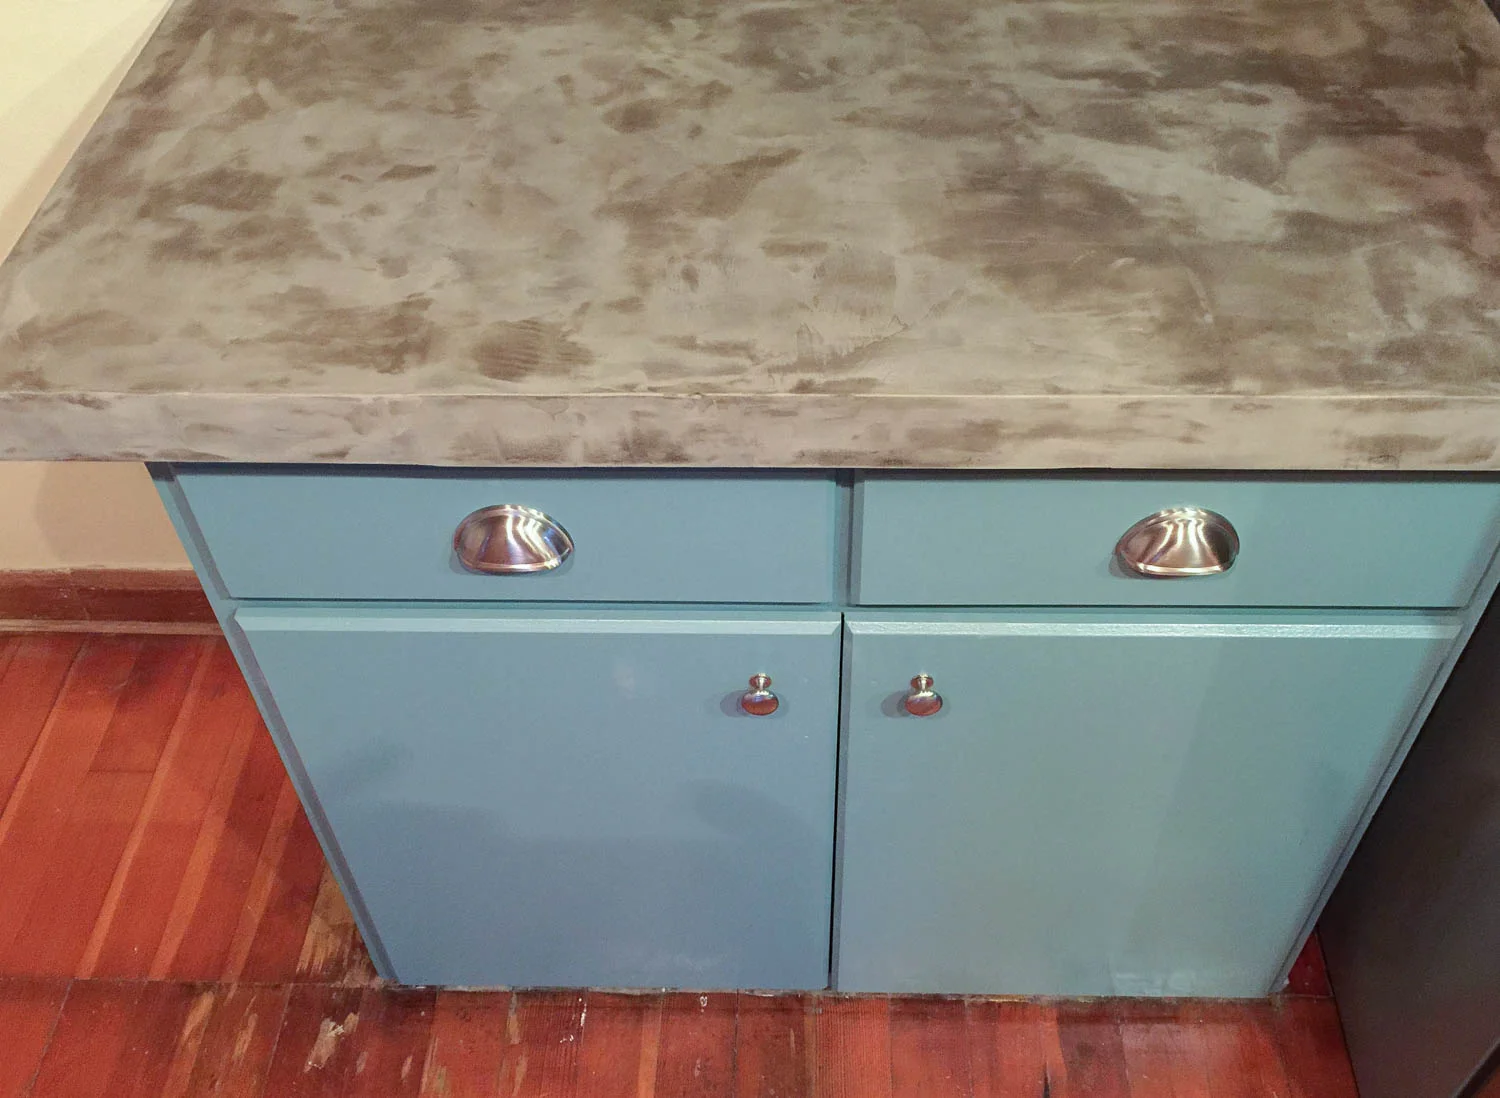
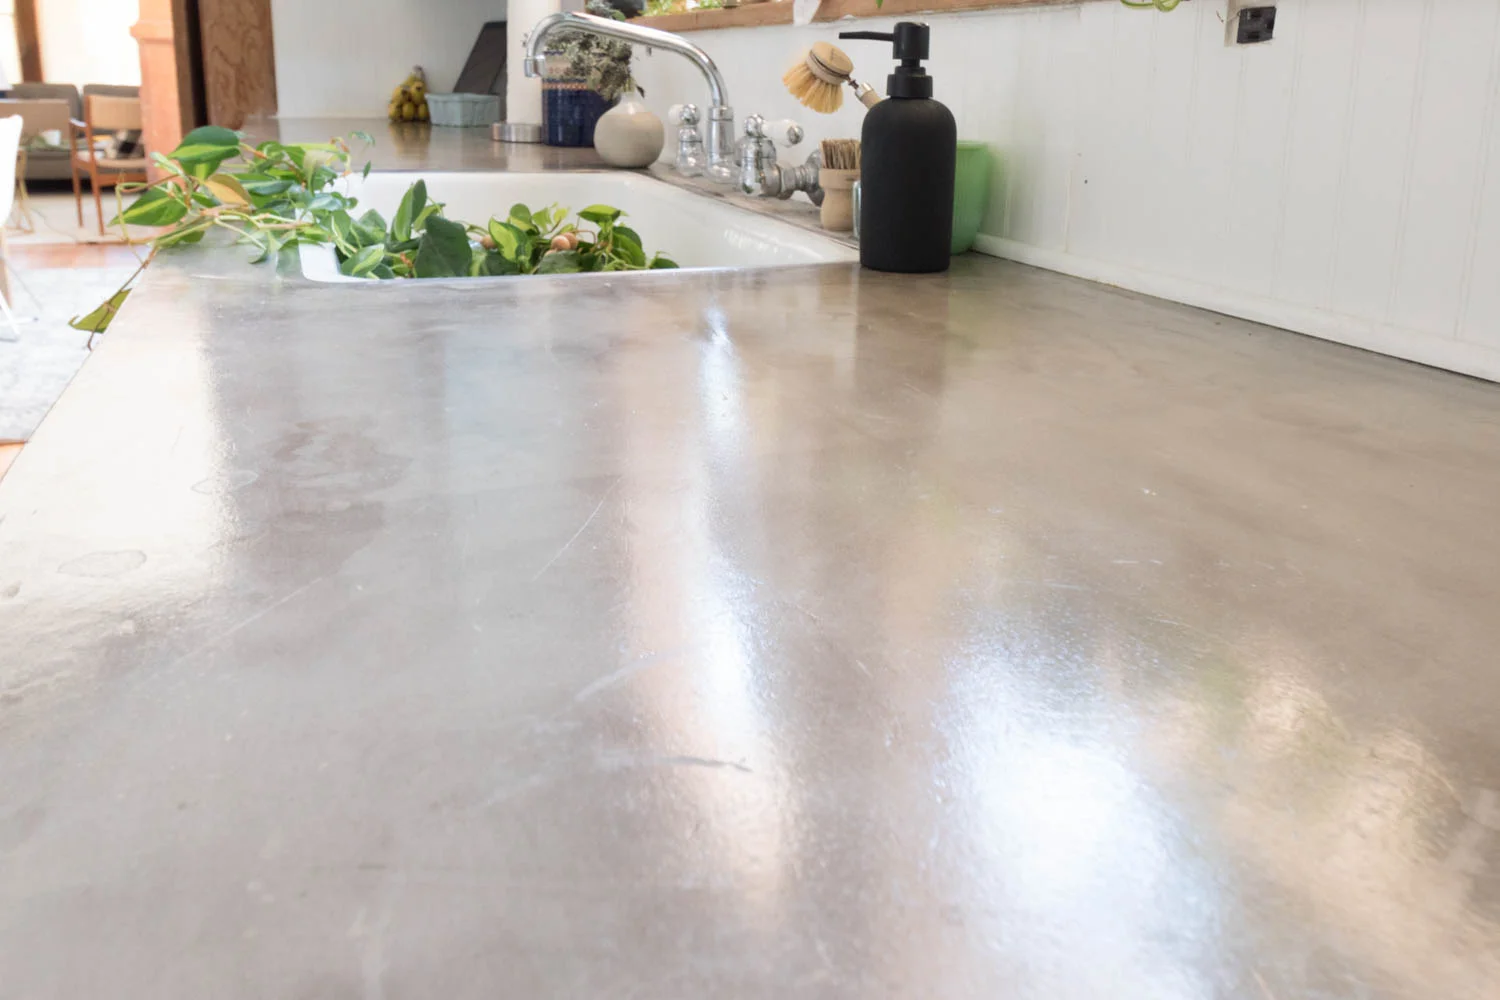
Coating the counter was like icing a cake - over and over again. The first coat is similar to the crumb coat of a cake - not pretty but an important base for the next step. I dumped out the mixture onto the counters and used the trowel to spread it to an even thickness. You don't want to go too thick or you'll prolong the already-lengthy process. Coat everything and don't worry too much about the edges.

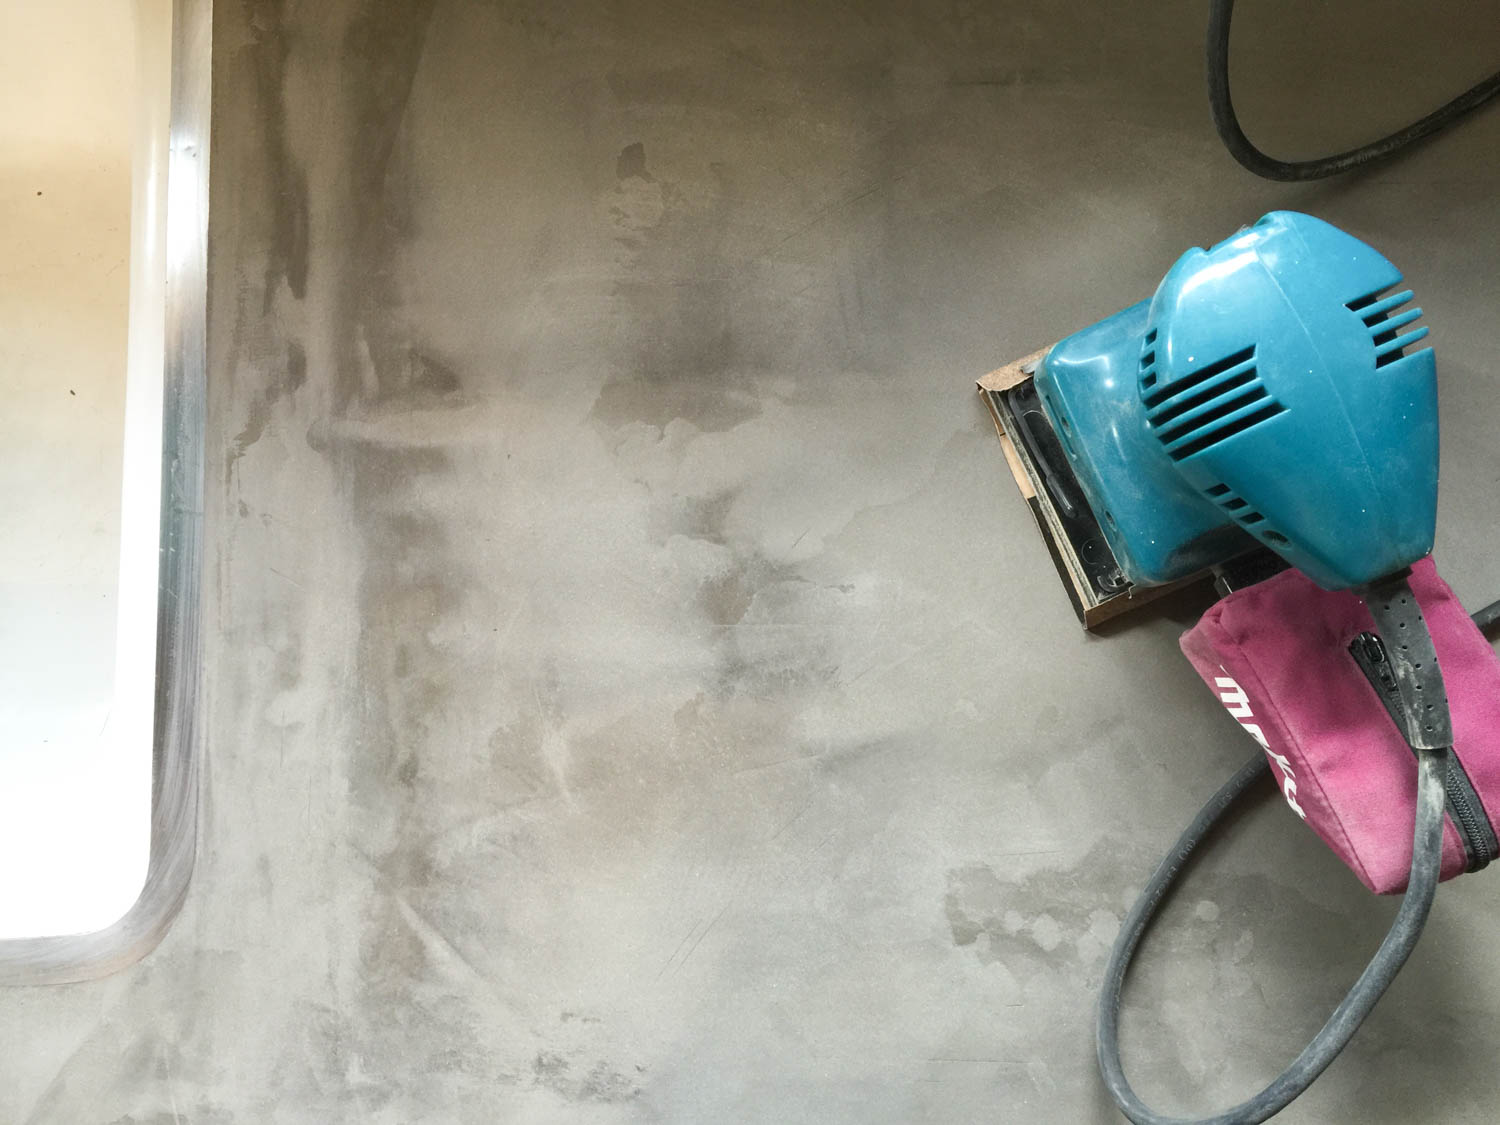
After the concrete dried for a few hours, I followed up with a scraper to knock down the bumps and imperfections. You can try to make it perfectly smooth right after you apply it, but it's often too wet and you end up messing up, then reapplying, then fudging a little, then reapplying. Hot tip: set a lamp low on the counter and point it parallel to the surface; this will emphasize the imperfections so you can scrape them off easily.

The Gold Hive How To Concrete Countertops

After the first coat dried completely, I followed up with the sander to make it smooth for the next coating. I used a power sander which made everything go by quickly, but it did get suuuuper dusty.

The Gold Hive How To Concrete Countertops

Once the base coat was sanded and smooth, I applied another coat the same way as before, and then again. Three coats is the minimum I'd recommend, and it does indeed take three days! I applied the concrete late at night, went home, went to sleep, went to work, came back, sanded, sanded, sanded, wiped up dust, applied another coat, went home, went to sleep, and repeated.

The Gold Hive How To Concrete Countertops

The sanding block was helpful for refining the edges that the power sander couldn't do. I started with a coarse grit block, then graduated to a finer grit for the last layer. 

The Gold Hive How To Concrete Countertops

I purposefully left trowel swooshes and visual texture in the concrete. If I didn't, then any imperfection would show dramatically. Concrete isn't known for being particularly beautiful, so I embraced the nature of the material and aimed for a handmade look - plus, imperfection is so much easier!

The Gold Hive How To Concrete Countertops

Once the countertops were shaped and smoothed to my liking, they had to be sealed. There are lots of opinions on sealers, but John and Sherry did lots of research, so I followed their lead. This final process included wiping on a few coats of sealer, then coating everything with a few layers of Acrylacq which is basically a polyurethane - but a non-toxic food-safe version. I don't have photos of this process, but it's easy as pouring the sealer on and spreading it out, then waiting for it to dry between coats.

The Gold Hive How To Concrete Counters

How they're holding up two years later

They are doing pretty well after two years of use! They still have a nice shine to them and still have the natural concrete look. I haven't babied them, so they're definitely seeing signs of wear.

The Gold Hive How To Concrete Counters

Water: I store our dish scrubber on the countertop, so a puddle of water will pool on top of the counters for hours/days. I worried it would break down the finish and cause big issues like mold, but the only problem is it darkens the tone. Since I don't mind the darker shade, water on the surface doesn't bug me at all.

Heat: I somehow forgot that I had (essentially) a coating of plastic on my counters when I sat a hot cookie sheet on top of them. It didn't sit there long before I remembered the many days of labor I put into the countertop project, but the cookie sheet definitely left a burn mark. There are a few small spots where the finish completely melted away.

Chemical: I sat down some laundry spray on the counters only to come back the next day to find an oval-shaped haze on the counter from where the product leaked out of the bottle. I haven't managed to get rid of these, but the haze has dissipated over time and blended into the other markings.

Rust: The bottom of my coffee maker started rusting and left a nice orange spot on the surface of the counter. I used some Bar Keepers Friend to buff off the rust, though I scrubbed through a layer of coating because it's a bit more dull there. It isn't attracting any issues, so I don't mind!

My review? Overall, I love the concrete counters and how much this project transformed the kitchen. I would do it again in a heartbeat.

The Gold Hive How To Concrete Counters

When You Can't Live With It But Can't Live Without It

There are two types of approaches I take to DIY.

  1. Permanent projects designed to last forever using solid materials

  2. Quick fixes using cheap, semi-permanent materials designed to be band-aids (with the caveat that it doesn't get in the way of future permanent projects nor damage the integrity of the home)

The kitchen project? I'm taking the latter approach. In the next year (hopefully!), we're going to tear out everything and replace it with our dream kitchen. Yet, we aren't ready for the permanent kitchen for a bunch of reasons like $$$ and my lack of decision-making skills and the fear of taking the plunge without being sure it's as perfect as can be. However, I'm totally embracing the slow evolution of the future kitchen plan. Each recipe gives us insight into functionality, each party better highlights ideal flow, and each trip to the store enlightens us on the best kind of storage. I'm taking my sweet time, but I'm learning oodles that I can apply to the big remodel.

Now, there is no way that I could ever cook a meal or host a get together in the kitchen in the state it was in when we bought it. No. Way.

Shall we revisit what she used to look like?

The Gold Hive Kitchen Before

How do you like those twig and rooster cabinet pulls?

The Gold Hive Kitchen Before

It really doesn't look that bad, but the smell, folks, the smell.

Since we couldn't wait it out for our permanent kitchen in this space, the clean it up and cover it up method was the route we took. Since we were going to do something with minimal investment that wouldn't last forever, I used the phase 1 kitchen update as an opportunity to play with styles that I wouldn't install in our dream kitchen.

So, I bring you the inspiration. These are among the MANY photos that I pinned for the kitchen two years ago when this project got started. They are a bit more vintage country than our future kitchen will be and they have a touch more color than I would gravitate towards today. But when you're going to do multiple phases of renovation, why not explore all sorts of design styles!

The Gold Hive Kitchen Inspiration

Sources from upper left: 1/2/3/4/5/6/7/8/9/10

See some trends? Muted colored cabinets, vintage drawer pulls, natural material countertops, semi-open cabinets, lots of white and light, patterned flooring/rugs, wood accents, beadboard, and nods to yesteryear.

Come back to get all the sources, the tutorial on installing linoleum floors, a how-to cover existing counters in concrete, tips on making a space feel new even when it isn't, the installation of the backsplash, a step-by-step on adding more counterspace, and a check-in to see how it's holding up two years later. If you're itching to see what she's become, click here. To follow along on the progress, subscribe!