A Console Sink Collection
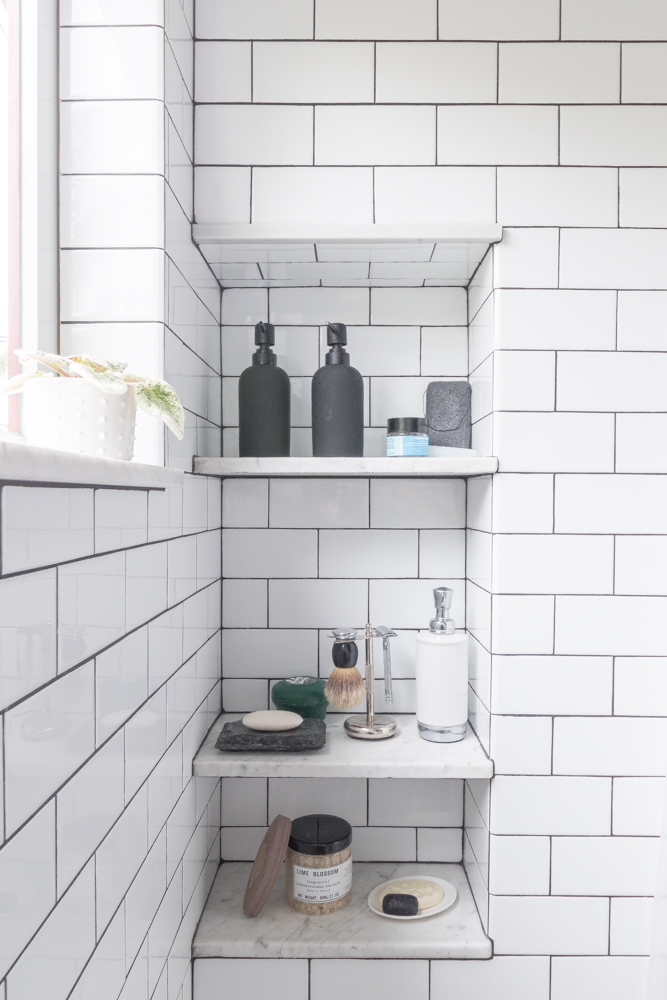
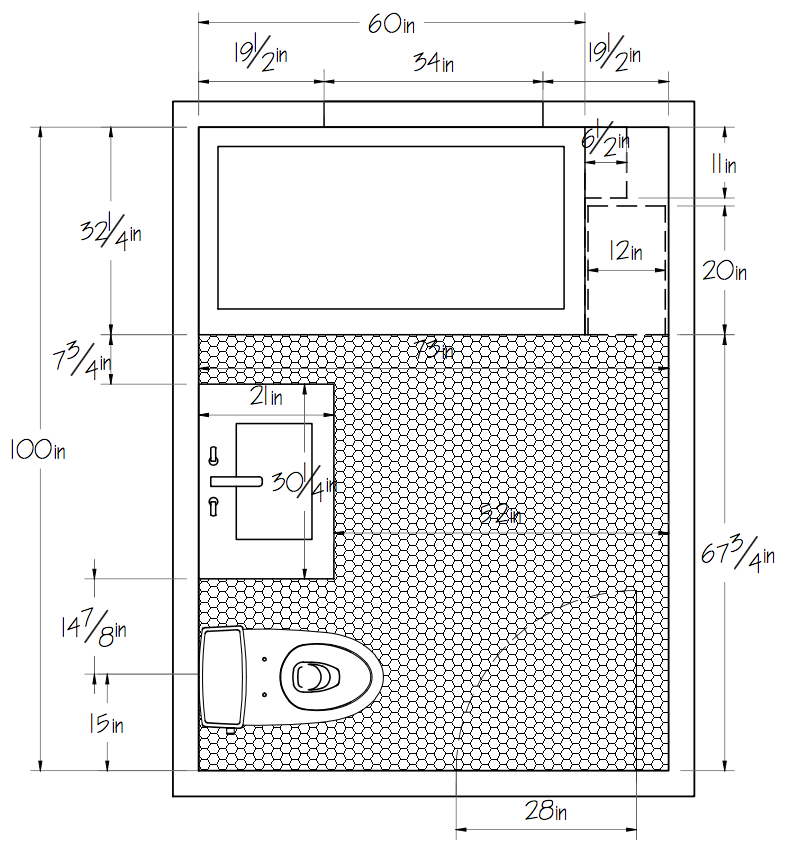
We lucked out with extra space in the bathroom to carve out lots of storage so we were able to nix the vanity and opt for a console sink. With all of our toiletries in the cabinet, the sink could be just a sink - no need for a bulky vanity taking up visual space in a small bathroom.

The Gold Hive Console Sink

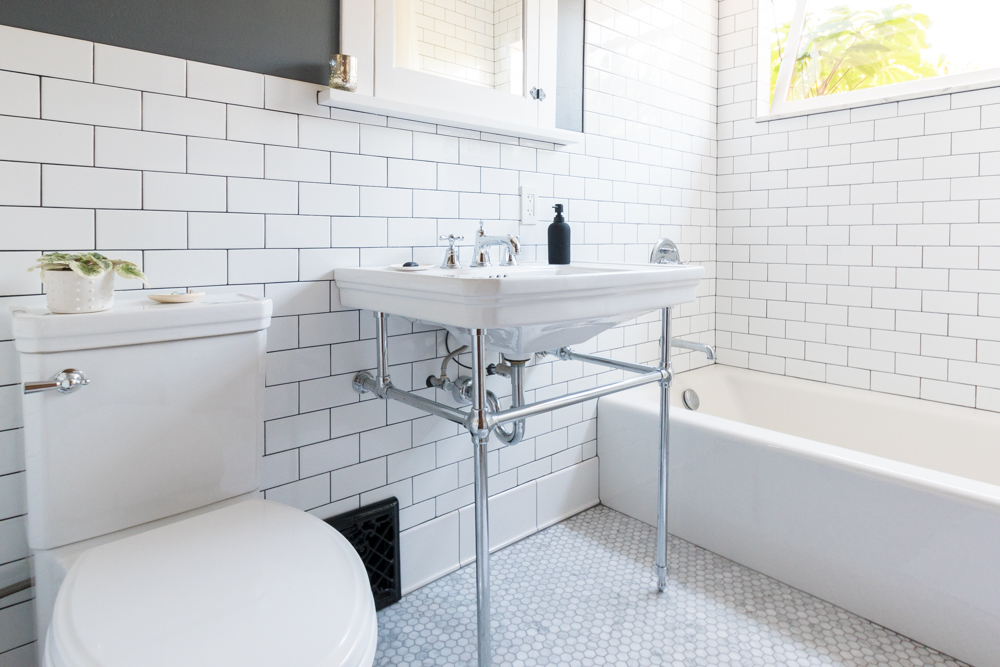
During our sink hunt, the priority to was to get as much work surface area as we could for the space we had (so we opted for this one). But if that isn't your number one goal, how about acrylic legs? wall-mounted faucets? turned legs? shelves? or marble? I've collected my favorite console sinks from a few different online retailers - each with some different features.

The Gold Hive Console Sinks

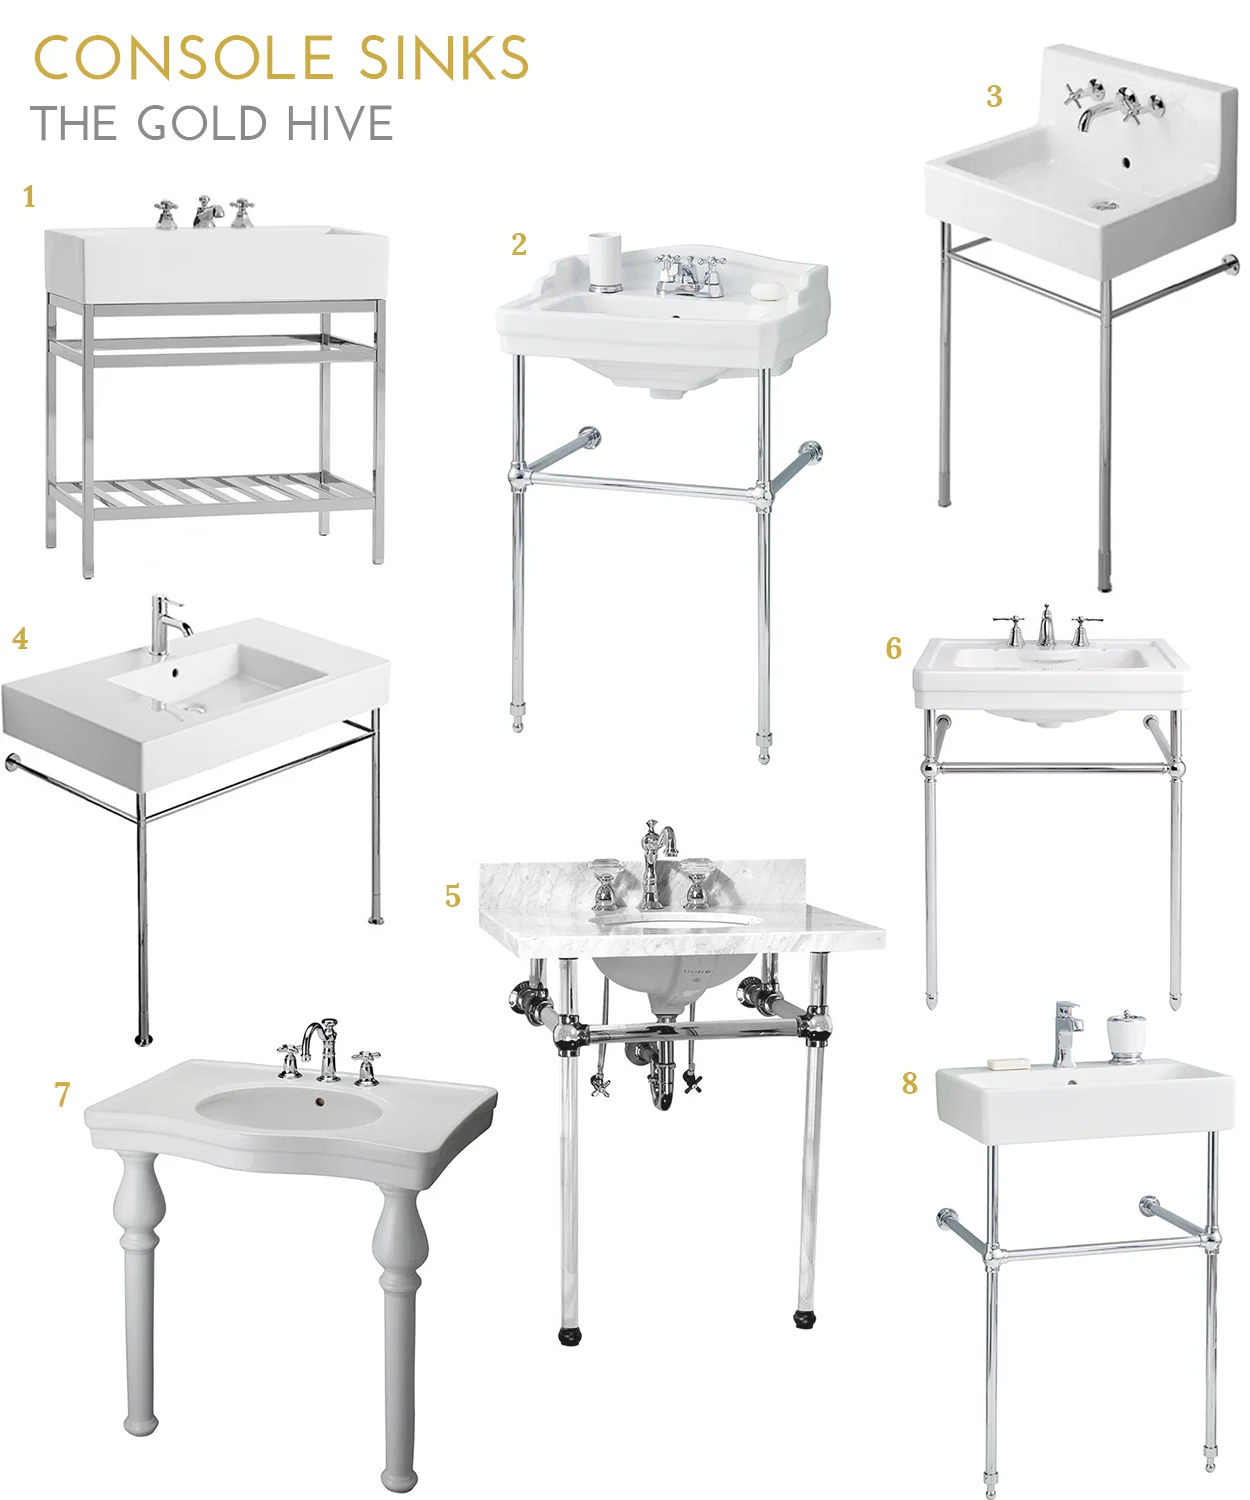
1. Mason Apothecary $999 / 2. Essex $714/ 3. Vero Wall Mount plus legs $731 / 4. Vero $582 / 5. Templeton $823 / 6. Mason $699 / 7. Milano $706 / 8. Nuo $739

Those are all great brand new sinks, but there’s nothing like an authentically antique sink. Shop available vintage sinks with the button below.

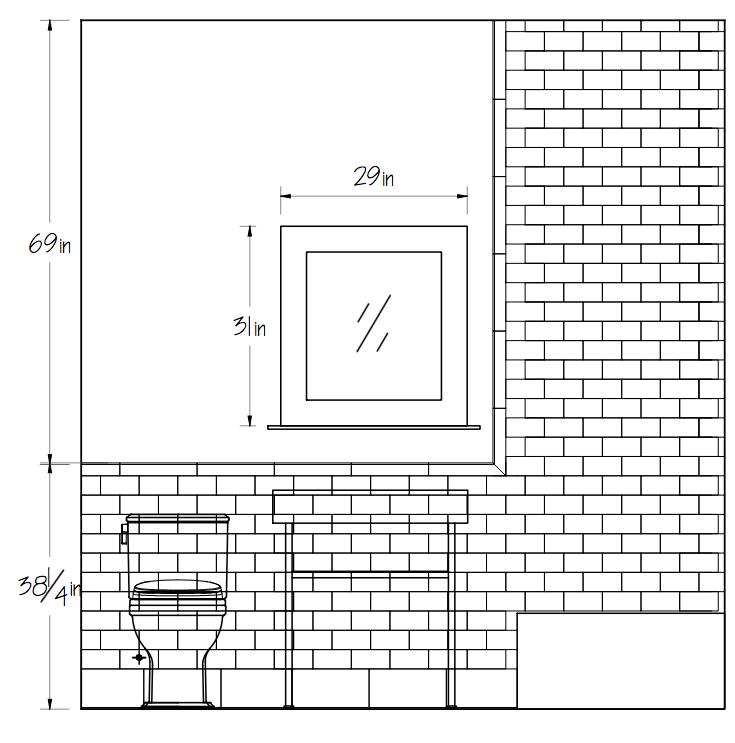
We have #6, the Mason console from Signature Hardware. We've been using it as our primary bathroom sink for two years and it's holding up beautifully - even fared well after I left a hot curling iron on it for 8 hours by accident. Doh!

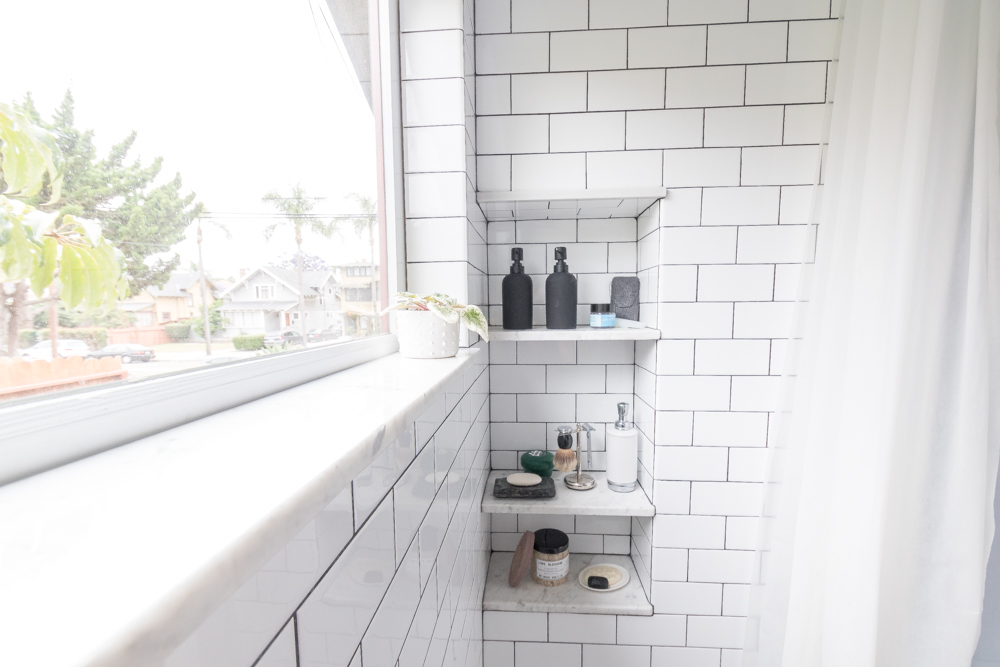
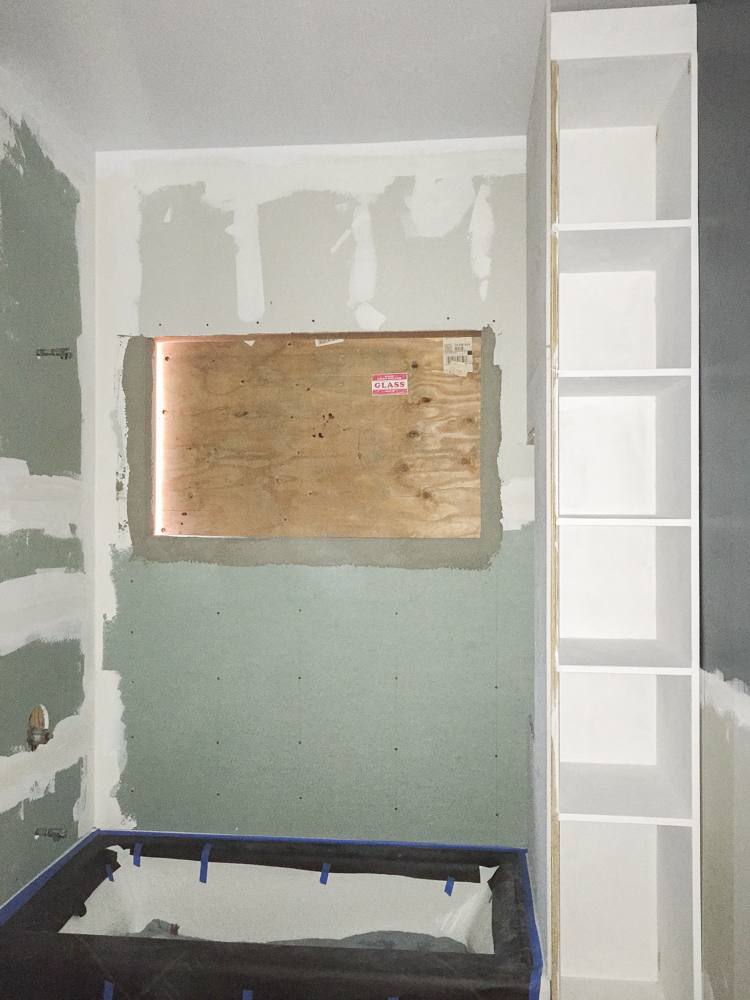
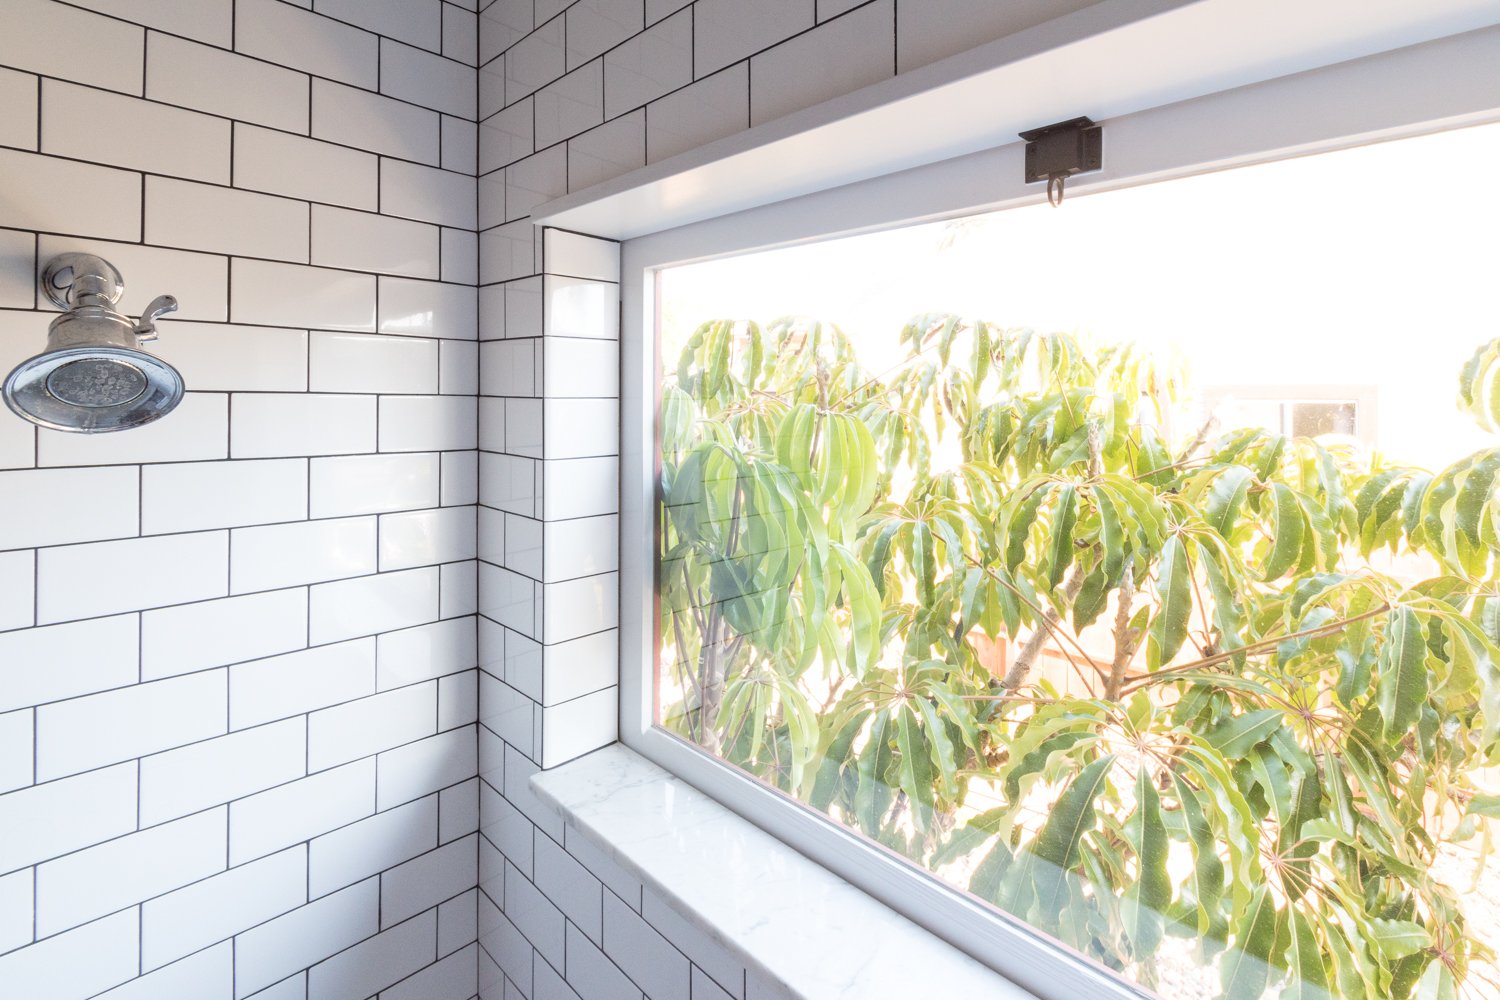
For more of the bathroom renovation progress check out the inspiration, the plans, the demo, the recessed shelves and storage cabinet, and the window. There's still more to come, so I'd recommend you subscribe.

But, Where Do You Keep All of Your Things?

Bathroom storage is a biggie. In all of the infomercials of people in dramatic black and white reenactments spilling their toiletries all over the bathroom floor or in House Hunters when a couple is tripping over each other trying to both get ready in the morning, they all exasperatedly exclaim how they need more storage in their bathroom. We've all been there, amiright?

I try my hardest to live minimally and own as few makeup products as possible, but we all have stuff to store. Without a vanity to hide all of our things in, we carved out a nice spot in the corner of the room to store all of our goodies.

The Gold Hive Bathroom Storage

To revisit, here's the layout we played with during the design stage (the finished dimensions changed a bit).

Bathroom plan view

See that chunk of space at the end of the tub in the upper right corner? That pocket is the answer to all of our storage woes. The 6.5" deep space became what I call "wet storage" and is accessed from the shower/tub. The 12" wide section is our "dry storage" that opens into the main part of the bathroom. The goal was to create as much hidden storage as possible so things didn't sit on the sink or the edge of the tub. Also, I'm one of those people that decants my shampoo into an unbranded bottle aiming to see as few product labels as possible - sorry toiletry brand graphic designers.

With these terrible photos, you can see how the whole thing came together.

The Gold Hive Bathroom Storage Progress

Before the storage unit construction began, the window was sized, the subfloor was rebuilt and prepped for tile, electrical was put in, rough plumbing was installed, walls got cement board, and the floor was tiled.

The Gold Hive Bathroom Storage Progress

When we were interviewing contractors for this project, 85% of them said that adding this storage unit was a bad idea. They said that the weight of the tile would pull on the cabinet and the only way to prevent it was to make the unit super strong by building a wall between the tub and the shelves, which would only leave 5” of usable storage space. I refused to accept that, and the contractor we ultimately hired agreed that my cabinet dreams could indeed come true.

Well, the bathroom remodel wrapped up two years ago and the storage unit is in perfect condition! 

Kim and Scott of Yellow Brick Home did a similar cabinet at the foot of their tub awhile after we installed ours. They used the wall and pre-made cabinet method - but did so much better a job than any of those doubtful contractors could have done. Either route works!

The Gold Hive Bathroom Storage Progress

A big part of what made this cabinet strong is we opted to permanently install the shelves, rather than adjustable boards that we can move up and down along pegs. The permanently affixed shelves hold the whole piece together from top to bottom. I don't have the luxury of resizing the cubbies, but that's perfectly fine for our needs.

The Gold Hive Bathroom Storage Progress

We also took the cabinet all the way to the ceiling. Which is storage heaven, and gives it extra rigidity being tied into the floor, ceiling, and wall.

The Gold Hive Bathroom Storage Progress

The wet storage earned marble shelves to create three cubbies to rest shampoo bottles. The marble sits on top of the row of tile and gets wedged in on all three sides by the second row atop the slab.

Here she is - two years later and still going strong.

The Gold Hive Bathroom Storage

The original plan was for the shower niches to be 6.5" deep, but I found a remnant slab at a local stone yard that was 8" deep, so why not! Each shelf varies in height from 8" to 14" tall to allow for different sized bottles. The whole recessed niche is 19" above the edge of the tub so its low enough that the bottom shelf can be reached while soaking in the tub, yet not so low that we're bending down to grab things while showering.

The Gold Hive Bathroom Storage

I talked about the tile in this post, but I just have to point out this detail at the bottom of the cabinet with the base tile wrapping underneath the door. Love.

The Gold Hive Bathroom Storage

The bottom shelf is 23" tall to allow for the toilet brush, plunger, and cleaning supplies. The rest of the shelves are 13" tall. It's the perfect size for these baskets and this modular acrylic storage. With 17" of depth, I can fit 24 rolls of toilet paper easily within reach. Any deeper and it would be hard to reach anything in the back of the shelves.

The Gold Hive Bathroom Storage

The concealed storage and the tucked away shower niches give all of our toiletries some privacy. Yet, whenever guests ask "Where are all of your things?!" I proudly open up the cabinet and pull back the shower curtain to reveal the shampoo bottles. Which kinda defeats the purpose of designing a hidden niche and a concealed cabinet. oops!

The Gold Hive Bathroom Storage

You can read about all the rest of the bathroom elements by clicking the button below. Then, subscribe so you can follow along when we add another bathroom to the house in 2019!

Installing a Custom Wood Window in the Shower

Installing a Custom Wood Window in the Shower

The window in our bathroom is perhaps the star of the show. Not until I got to bathe right next to the great outdoors did I come to fully appreciate how great a window in the shower is. And boy is it great! We had a custom wood window installed and while some people would disagree with this approach, I wouldn’t change a thing!

Read More

One Room Challenge Week 6 - The Moody Room Reveal!

The Gold Hive One Room Challenge Week 6 Reveal-0008.jpg

Can you believe it's been six weeks since the One Room Challenge began? Six weeks. To recap, here's the before, the inspiration, and the plan, the moody paint, the installation of picture rail molding, the artwork, and the refresh of a chair. And now here we are, at week six! 

The Gold Hive One Room Challenge Week 6 Reveal-0061.jpg

Can you believe that paint color? I still can't get over it. It is the perfectly dark tone with the richness of an emerald green. My heart! This shade is Salamander by Benjamin Moore. It's more like a chameleon because it shifts throughout the day and ranges from nearly black to emerald and blue green to forest green. It's perfection.

The Gold Hive One Room Challenge Week 6 Reveal-0028.jpg

The goal was for a tone on tone color scheme with blues, blacks, and greens, plus a heavy dose of contrast with some bright whites. The room was starting to feel stark, so this ottoman makes the space feel like a casual place to kick up our feet for some Netflix viewing - which is what happens in here 90% of the time.

The Gold Hive One Room Challenge Week 6 Reveal-0041.jpg
The Gold Hive One Room Challenge Reveal

The sofa used to be in the living room, but it is so much happier in here. In its previous configuration, it sat against a wall of windows so it was always backlit and you could never enjoy the texture of the tufting and the velvety finish. The couch is a sleeper, so the room can very easily transform into a guest bedroom. Win Win.

The Gold Hive One Room Challenge Week 6 Reveal-0026.jpg

The TV and the stand stayed from the previous iteration of the room. That credenza is just too perfect in size and deco style to get rid of it

The Gold Hive One Room Challenge Week 6 Reveal-0089.jpg

There's that print that I love so so much. Shall we admire the artwork, now?

The Gold Hive One Room Challenge Week 6 Reveal-0056.jpg
The Gold Hive One Room Challenge Week 6 Reveal-0093.jpg
The Gold Hive One Room Challenge Reveal

I wanted to make sure that the dark walls didn't get too covered up by large frames, so I exercised some restraint when I was eyeing all of the great possibilities for artwork. I ultimately settled on these prints that are showstoppers on their own, but also let the moody paint shine.

All of the artwork is hanging off the newly installed picture rail molding. Since it's so easy to swap the frames out, you can bet that I will move pieces around the house from time to time.

The Gold Hive One Room Challenge Week 6 Reveal-0068.jpg

This light from West Elm was the last addition to the space, and I totally have a crush on it. I didn't want the room to get carried away with being too casual, or too dramatic, or too old fashioned, or too modern. I think this light balances all of those and gives me the best of each world.

The Gold Hive One Room Challenge Week 6 Reveal-0044.jpg

Did any of you vote on my curtain choices on last week's Instagram story? I picked up about a dozen different curtain options from IKEA to test, then return. I nearly didn't pick up these green ones, but I did on a whim, and they instantly became standouts.

So many of you chimed in with votes and they were nearly all split. A lot of you really liked the plain white, but I went with my gut. I doubled up these sage velvety drapes so each side of the window has two panels, to give them some oomph.

The Gold Hive One Room Challenge Reveal

I doubled up the side tables, too. The lightweight metal framed table gets moved around to the front of the couch periodically so I have easier access to my snacks and goodies that I park on it. Since it moves, I wanted a second table that would be stationary and could keep books and plants that don't need to migrate around the room.

The Gold Hive One Room Challenge Week 6 Reveal-0111.jpg
The Gold Hive One Room Challenge Week 6 Reveal-0102.jpg

The other side of the couch needed its own table, too. But in a tight space with high arms on the couch, the necessary dimensions were impossible to find in a store-bought table, so I made my own. Using some plywood, parson legs, and plates, I cut the pieces to the exact dimensions needed, put it together, and spray painted it black.

For added storage, a small box sits on the floor under the table to house the laptop charger and hide the cables from nearby lamps.

The Gold Hive One Room Challenge Reveal
The Gold Hive One Room Challenge Week 6 Reveal-0073.jpg

We previously didn't have any seating other than the couch. It didn't let the room be much more than a place to park ourselves in front of the TV. The addition of the newly refreshed chair and lamp gives the room much more versatility.

The Gold Hive One Room Challenge Week 6 Reveal-0115.jpg

Sources

Couch - Rochester from West Elm / Ottoman - Long Pouf by Minda Living / Rug - One of a Kind from eCarpet Gallery / Pillows - VELU from Article,  Mount Cook Lily (night) from Society6 / Tray - Format ClearSquare Tray from CB2 / Black Lamp - STILT from Article / Books - Old Home Love, Styled, In The Company of Women, Pick Me Up, Illustrated Elements of Style, The Kaufman Mercantile Guide / Deer sculpture - Artist Jeff Irwin / Artwork -  Minimal and Palm by Lucie Birant, St. Bernard by Mary Sinner, Feral House #7 by James Griffieon / Chandelier - Pelle Asymmetrical from West Elm / Candle Stick Holders - Taper Candleholder from World Market / Side Table - TAIGA from Article / Potted planter - Glowing Arbor Pot from Anthropologie / Shallow Flower Vase - Moonbird Pottery / Curtains - SANELA from IKEA / Curtain Rod - Umbra Cappa / Shade - Solar Shade from Select Blinds / Side table materials - plywood, parsons leg, top plate / Picture rail molding and hooks - House of Antique Hardware / anything not listed is vintage or Home Goods.

If you're here because of the One Room Challenge, I hope you'll subscribe to the blog to get future blog posts in your email! Be sure to follow along on Instagram, too!

One Room Challenge progress:
Week 1 - the before, the inspiration, and the plan
Week 2 - paint, paint, paint
Week 3 - how to install picture rail molding
Week 4 - sourcing the artwork
Week 5 - refreshing a chair
Week 6 - the reveal!

So many other rooms have been transformed over the past six weeks, you best check' em out! There are 20 featured and 250 guest bloggers! Block out some time, put on a pot of coffee, and browse through all of those freshly designed rooms!

One Room Challenge Week 5 - Giving a Chair a Facelift

There's only one week left in the One Room Challenge! Over the past five weeks, this room has completely transformed. I'll share more before and afters next week, but let's get into this week's project.

I bought a chair off Craigslist years ago during my mid-century modern phase. However, I wasn't in love. The upholstery color didn't work in any room of the house, the webbing was totally stretched out, the frame was separating, and the finish was chipped. It was originally from Urban Outfitters, so it's not a vintage heirloom and thus I have no problem messing with it. Note that I do not condone painting 60-year-old furniture just because you're bored of it.

The Gold Hive How to Update a Chair
The Gold Hive How To Update A Chair

The chair sat in the living room for two years and every time I saw it, I thought about how I wanted to get rid of it. With a chair that needed some love, and an excuse to give it new life (thanks One Room Challenge!) I decided that the chair could stay a little longer - with a refresh and in a new room.

The first step was to update the frame. Since there was no gorgeous wood grain to reveal under the existing finish, painting was the only option. Considering I paint things pretty much only black or white (or Salamander!) the choice was easy. Black!

The Gold Hive How to refinish a chair

First, I disassembled the frame and removed the webbing. I later found out that a big reason the webbing sagged and the frame was coming apart was the previous owner had assembled the seat upside down. The puzzle didn't fit together so it was putting pressure in all the wrong spots, and the poor chair couldn't hold up.

The Gold Hive How to refinish a chair

I then gave the frame a light sanding to rough up the surface for paint and to smooth out the chipped spots before dusting each piece with a coat of primer. There's really no reason to skip this part. I'm a big fan of primer and always recommend tossing it on because your paint will adhere so much better - even if you're using a paint and primer in one.

The Gold Hive How to refinish a chair

I used a satin finish paint because flat would look well, flat and a little too, "hey look, I spray painted this chair" while a glossy finish would be like "woah, you spray painted that chair." Catch my drift? Satin has just the right amount of sheen.

The Gold Hive How to refinish a chair

After a few light coats of paint, I worked on re-webbing the seat.

The Gold Hive How To Repair Webbing on Chair

First, I stapled one end of the webbing to the frame. Then, I use this webbing stretcher (torture device) with the rubber end on the frame, and the spikes in the fabric to create tension on the strip by pushing the tool down to stretch the fabric.

The Gold Hive How To Repair Webbing on Chair

Once it's as taught as a drum, I stapled the fabric into the other end of the frame. You may think that pulling on the fabric by hand would be enough, but that torture device, I mean webbing stretcher, does the job so much better. Trust me.

The Gold Hive How To Repair Webbing on Chair

Once a few staples have secured the fabric, I cut the it with enough overhang to fold it back over the staples and staple again. I used this gal, but this pneumatic staple gun would be so dreamy. After all of the webbing strips are complete, I reassembled the chair (not upside down!).

The trickiest part of the whole process was the fabric. I fell for this Painted Check fabric by Robert Allen from Dwell Studios because it was a modern take on plaid and it was in my favorite color palette, black and white. The pattern choice is sure pleasing to look at, but boy was it tough to work with. Had I chosen a solid color or a busy pattern, I could have just cut the pieces and sewn them together. But no, I had to pick a fabric with a bold, high-contrast, large-scale, stripe - and a wiggly stripe to boot. I needed the pattern to give the illusion of wrapping around the sides of the cushion, so matching each piece of fabric to its four adjoining edges was critical. This is probably easy peasy for a professional, but I am not. Here's how I did it.

The Gold Hive How To Rehupolster a Chair

First, I deconstructed the existing cushion and used the pieces as a template to create a new pattern. It's important to note that fabrics can stretch over time, so duplicating the exact pattern may not be the best idea. My fabric was stretched, so I slimmed down my new cuts just a hair.

The Gold Hive How To Reupholster a Chair

I started with the top piece (where you put your tukhes) and matched everything to it. I cut each piece in the order of how visible it is. This way, if things got misaligned towards the end, the issue would only be spotted in the back.

To form each of the side panels, I layered the primary piece atop the roll of fabric and lined it up to its exact same pattern. I did this to create a guide so I could visualize where the cuts would need to be based on the half inch seams I'd sew later.

The Gold Hive How To Reupholster a Chair

Here, the primary piece is on the right, layered on top of the roll. The teal piece is the template of the new side panel that I need to cut. I folded back a half an inch of the cut piece and pinned it back with the purple pin to show how much fabric will be hidden with the seam. The teal piece already has folds from the original seams so I butted them up. This shows me exactly where the side panel needs to be in relation to the pattern in order to match the main piece. I then pinned the teal piece down and traced the outline onto the roll of fabric, then cut it out.

Once I figured out the method that worked best for me, I found an easier solution that uses the same principle.

The Gold Hive How To Reupholster a Chair

Instead of using the teal fabric template and visualize the multiple seams, I nixed the template altogether and just used its measurements. I layered the fabric on top of its matching pattern, then slid a ruler an inch under the fabric, then marked the width that I needed the finished piece to be. It's the same idea, just with fewer steps.

The Gold Hive How To Reupholster a Chair

Once I cut out the pieces, I used colored pins to mark corresponding edges.

The Gold HIve refreshing a chair fabric-0051.jpg

For the back panel with the zipper, I did the same process, but with two pieces and a zipper sandwiched between. For the cushion's bottom piece, I modeled it off of the front panel the way I modeled the front panel off of the top piece. This was to ensure that the lines matched on the cushion edge that was most visible.

The Gold Hive How To Reupholster a Chair

Finally, all of the pieces were sewn together and stuffed with the existing cushion. Then, I did it all over again for the second cushion.

Now that it's completed, I'm super pleased with how well the squares line up on each of the seams, as well as in the transition from the bottom cushion to the back cushion. The back panels of each piece don't match up because it is physically impossible, but I'm a-okay with that. Please feel free to weigh in on more efficient upholstering techniques, I'm sure there are great options out there!

The Gold Hive refreshing a chair
The Gold Hive How To Refinish a Chair

Doesn't she look pretty with this pillow?

If you're here because of the One Room Challenge, I hope you'll subscribe to the blog to get future blog posts in your email! Be sure to follow along on Instagram, too!

One Room Challenge progress:
Week 1 - the before, the inspiration, and the plan
Week 2 - paint, paint, paint
Week 3 - how to install picture rail molding
Week 4 - sourcing the artwork
Week 5 - refreshing a chair
Week 6 - the reveal!


Don't forget to admire the other spaces that are a week away from their grand reveal! Check out both the featured and guest bloggers.

Want remember how to refresh a chair for your next project? Pin this image below. While you're at it, follow me on Pinterest!

How to refresh a chair - The Gold Hive

One Room Challenge Week 4 - Sourcing The Artwork

It's already week four of the One Room Challenge! We're over halfway there and the room has earned dark green paint and picture rail molding. This week, I got to hang the artwork!

This image of a man pulling a girl out of a hole is my favorite piece in the whole room. I'm obsessed with all of the collage pieces by this artist, Richard Vergez. I got this piece and (and all of the others in this post) from Society6, which is such a great resource for framed art by independent artists. The beauty of it is you can get your favorite design printed as a framed print, mug, duvet, tote, or pillow, like this one!

I can't have a room without florals! This print as a pillow does the job.

There's so much beautiful artwork (and bad artwork!) out there so deciding is such a feat. I've rounded up a few more of my favorite artworks from Society6. You can also find more of my curated pieces that I'm crushing on here.

Sources from top left: Rainier Eunice Lake The Dreamer / Colors / D24 Mountain Trees C16 / By the Hills, revisited Crown Into Abyss / El Matador Close Noir / Glacial

While I ultimately bought my prints from Society6, Minted is another great source for art. Here are some swoon-worthy pieces.

The Gold Hive Favorite Art from Minted

Sources from top left: Spiced Cider/ Blue HIlls / Road Trip 2 Torched / Dance Abstract Watercolor A Slight Chance / Conversation II / Broken Clouds Whispered Rain Reflections III / The Forest

I shared last week how much I love picture rail molding and how to install it. Well, here's how to use it! Simple dimple.

The Gold Hive Installing frames on picture rail molding

You can find picture rail hooks in a variety of finishes, shapes, and sizes, so pick whatever works for your home's style and your decor. I got these from House of Antique Hardware for their simplicity and the way the brass matches the aged brass of the switch plates.

Attaching the hook to the frame is as simple as twisting on a wire. The key is to select a wire that can withstand the weight of your frame. The Society6 prints are quite lightweight so I was able to go with a thinner gauge wire, but this same wire previously snapped when I tried using it to hang a mirror. Oops. If you don't want to use wire, rope or chain are great alternatives. I prefer how subtle the thin wire is because it doesn't take attention away from the main attraction, yet you still see a glimmer of it when the light hits just right.

The Gold Hive Installing frames on picture rail molding

I like to start by twisting the wire on to the hook so I can focus on making the twist as clean as possible, since you'll see it. After measuring how high the image will hang, cut the wire to length, leaving several inches to twist into the back of the frame. For a strong hold I like to twist the wire on, then double twist over it again.

The Gold Hive Installing frames on picture rail molding

After a bit of finessing, you have a photo hung on the wall without any holes! While I adore these new prints, and plan on enjoying them in this room for the long haul, I love having the flexibility to move them around the house without having to patch nail holes. 

The Gold Hive Installing frames on picture rail molding

The two large prints over the couch are by Lucie Birant. Deciding on a diptych is tricky because you want them to go together, but not too much. The key is for them to be sisters, not twins. Rather than picking two pieces that are nearly them same, but slightly different, I opted for two very different images, but by the same artist. They aren't matchy matchy, but they go together because they still have the same pencil work and overall style. Emily Henderson has a great PSA on avoiding generic art and how to make diptychs look grand.

The Gold Hive Sourcing Artwork

While all of the new artwork for the room was sourced from Society6, I searched high and low on lots of other websites such as Minted, Artfully Walls, and 20x200. Society6 had the best prices and the quickest turnaround for a room makeover on a tight timeline, but I really had to sort through the artwork, because I didn't love it all (remember, bad art good walls). I like Artfully Walls for the easy search features that help you curate based on themes and colors. 20x200 sells limited edition art prints that are really unique (I'm still waiting for this one and this one to arrive in the mail). Minted has a lot of great pieces that are easy to love. They aren't generic, nor too quirky like the painting of the Denny's Parking Lot I ordered from 20x200. Check 'em all out! Or, if you have your own artwork or an existing piece you want to frame, take a look at Framebridge for custom framing options at great prices.

To recap, the prints I chose for the room are Minimal and Palm by Lucie Birant, Let Me Go Or Squeeze Me Tighter by Richard Vergez, The Path by Carlos ARL, and Mount Cook Lily (Night) by Andrea Stark.

If you're here because of the One Room Challenge, I hope you'll subscribe to the blog to get future blog posts in your email! Be sure to follow along on Instagram, too!

One Room Challenge progress:One Room Challenge progress:
Week 1 - the before, the inspiration, and the plan
Week 2 - paint, paint, paint
Week 3 - how to install picture rail molding
Week 4 - sourcing the artwork
Week 5 - refreshing a chair
Week 6 - the reveal!

Be sure to admire the other rooms that are four weeks into being completely transformed! So many featured and guest bloggers are doing big things!

One Room Challenge Week 3 - How To Install Picture Rail Molding

I'm back for week three of the One Room Challenge! If you're just tuning in, I'm mid-way through transforming an unloved spare bedroom into a cozy, moody space. Last week, the room underwent a metamorphosis with radically different paint in a deep green. This past week, we tackled installing the picture rail molding.

If you're unfamiliar with one of my all-time favorite old house features, picture rail molding is a narrow piece of trim that runs the perimeter of the room near the top of the walls. My house's picture rail molding sits atop the door and window frames. Some homes have the molding closer to the ceiling where crown molding would go. If you're in an old house with crown molding that doesn't quite touch the ceiling, then you may just have a picture rail! This lil' piece of wood trim has a notch at the top that allows you to put a small hook over it from which you can hang a frame from a wire. This is oh-so-handy because you never have to put holes in the wall to hang artwork. It saves me from patching holes whenever I want to change pieces - which is a big deal for someone that has major art indecision. It's also great for an old house because you don't risk damaging the plaster (that we all know I'm a fan of) by pounding a nail into the wall. (Side note, hammering plaster walls can really damage them so I always use screws rather than hammering a nail if I ever put anything into the wall). The living and dining room still have their original picture rail molding, but the rest of the house was stripped of their decorative trim at some point over the years. It's my job to put it back!

Enough about why I love this molding, let's get into how to install it.

Supplies:

The first step is to find molding that fits with your home. The profile we bought was the closest we could find to the existing molding that is still intact in select rooms. If your home never had the molding originally, or you don't know what it looked like, you can research profiles for colonials, victorians, etc. to find what would have likely been in your home. If you have a unique profile and can’t find it at any salvage shops, online retailers, or specialty wood retailers, you can have a blade custom made so wood can be milled to match your existing profile. Finding someone local that does millwork can help you to either make a custom blade to cut your profile or even see if they have one already made.

The Gold Hive How To Picture Rail Molding

The brand new molding has such crisp edges, but the existing trim in the house has a softer edge, so I took some sandpaper to each of the planks to give them a less brand-new look. The piece on the left is right out of the package, and the one on the right received a light sanding. Can you spot the mild difference?

After smoothing the edges a touch, I primed each plank with my go-to primer while Ross drafted up the plan of lengths and angles we would need.

The Gold Hive How To Picture Rail Molding

We measured each length needed, and noted the direction of the cut. Drawing it out on a floor plan helped us keep track of where each cut would go, then labeling the backside of each piece ensured we didn't get any mixed up.

The trim spans the perimeter of the room so it sits on top of the white doors as well as the green walls. I could have painted it all white to match the trim, but I decided to match the trim color to the surface color it would sit on. So, door and window pieces would be Simply White and the wall trim would be Salamander. Once we had a plan, Ross cut the pieces, while I gave them a couple of coats of their corresponding paint color.

The Gold Hive How To Picture Rail Molding

Once we cut all of the pieces, we did a dry fit. Using a level and several hands, we held up multiple pieces to see how each piece would fit against the next and how that would fit with the next and so on and so on. With old walls that aren't totally square, we had to sand down the edges a little, and we had to pull a few pieces from our spare cuttings.

The Gold Hive How To Picture Rail Molding

Since the molding would need to hold the weight of heavy frames, mirrors, or whatever I choose to dangle from the trim, it needed to be darn strong. The only way to do this is to nail the trim directly into the studs. Since plaster walls are constructed with wood throughout their backsides (learn more about old walls here), a traditional stud finder (the electronic ones that beep) won't work. THE best way to find studs in plaster walls is with this handy $10 tool. Seriously. It’s the best.

Once you find a stud, measure from that stud a distance that you think your studs may be spaced out. Common distances are 16" or 24." My house has studs 16" apart, so I used blue tape to mark each stud. You could repeat finding each studs with the handy tool, but this is more efficient. This is one of the few occasions when I actually use blue tape on walls.

The Gold Hive How To Picture Rail Molding

After we found the studs and dry-fit all of the molding, came my favorite part. We quadruple checked level before I nailed in each piece into the stud. We used this cordless electric nail gun that was such a beauty to have around because it was free of needing a noisy air compressor. Not having the buzzing compressor noise ongoing in the background made the cha-chunk sound of the nail gun so much more satisfying!

The Gold Hive How To Picture Rail Molding-0438.jpg

It felt great to finally cap the door with trim it always should have had. The doors are grateful to get their hats back.

The Gold Hive How To Picture Rail

After all of the trim found its home on the wall, I retraced our steps to fill in all of the nail holes with putty, and cleaned up the seams with caulk. Two walls had long stretches without interruption so they needed more length than the 8' trim piece, so we had to sister them together. My trusty putty,  caulking, and another coat of paint erased all of the blemishes.

The Gold Hive How To Picture Rail Molding

I'm still finalizing the artwork. Until then, the hooks will rest patiently on the trim.

The Gold Hive How To Picture Rail Molding-0158.jpg

And there you have it! That, my friends, is how you add oodles of charm with a few pieces of wood. Oh, and I jumped the gun and put the couch in the room already. I'm in love with these colors.

If you're here because of the One Room Challenge, I hope you'll subscribe to the blog to get future blog posts in your email! Be sure to follow along on Instagram, too!

One Room Challenge progress:
Week 1 - the before, the inspiration, and the plan
Week 2 - paint, paint, paint
Week 3 - how to install picture rail molding
Week 4 - sourcing the artwork
Week 5 - refreshing a chair
Week 6 - the reveal!

Make sure to check out the other room transformations that are coming along swimmingly! So many featured and guest bloggers are doing amazing things!

Taking The Bathroom Down To The Studs

I've been distracted with working on week 1 and week 2 of the One Room Challenge (this week's update coming Thursday!) so I've left you hanging since first introducing you to the bathroom remodel. Sorry! But, we're back and headed into demo.

As a refresher, here's what the bathroom looked like.

The Gold Hive Bathroom Before

Since most everything was leaking, rusting, failing, sinking, or otherwise not super pretty, nearly all had to go. But as an old home lover, original features don't get ripped out that easily. Only a few elements had been there for a century. The original medicine cabinet would need patching and cleaning, but it could get freshened up to be a real stunner. The hardwoods were original but were rotten beyond repair rotten and couldn't be salvaged. The bathroom door and trim were original and would definitely stay. So, those keepers would get saved, but  the rest of the bathroom would go.

The Gold Hive Bathroom Before

That tubular thing in the crawlspace is our HVAC, but it reminds me of the dragon in The NeverEnding Story.

The Gold Hive Bathroom Remodel

Isn't a wall of exposed lath so pretty? It's like my very own Agnes Martin installation.

It isn't uncommon during remodels to demo only select parts of the room. You don't always need to pull all the drywall down and demo into the attic and crawlspace like we did. Yet, demo only happens once, so it's the only chance to expose everything and repair anything. With evidence of bigger problems, and knowing the plumbing has been there for a century, we didn't hesitate to take everything out to start from scratch.

A contractor that I interviewed to do the project proposed putting the new floor tile directly on top of the existing hardwood. Let me count the ways that it was not a good option. 1. Adding tile on top of existing flooring would leave a perfect place to stub my toe walking into the bathroom with the floor an inch higher than the hallway. 2. The hardwoods and the subfloor were visibly rotting, so adding a new floor atop certainly wouldn't resolve that issue. 3. The plumbing would have never been revealed to see how corroded it was.

The Gold Hive Bathroom Before

Yum.

Thank goodness we didn't heed the advice of that contractor because those 100-year-old pipes were at the end of their life. We also found that the vent pipe had a big crack down the back of it.

The Gold Hive Bathroom Before

Also, inside of the exterior wall, we found a beehive. A hive! 

The Gold Hive Bathroom Find

I suspect that the bees found a hole in the exterior wall and started to build their home, only to get locked out when someone noticed the buzzing and sealed their entrance. I saved the honeycomb but have yet to find a use for it. Any ideas?

Even though we spent a bit more time gutting the whole room, we've gained so much peace of mind having fresh materials. I realize most renovators know that the advice to layer new material on top of failing material isn't the smartest move, but if you ever had any doubt, let this be a lesson. You just might find a beehive!

For more bathroom progress, click the link below, and then subscribe for more - I’ll be adding a new bathroom in 2019!

One Room Challenge Week 2 - It's All About That Paint

The biggest transformation for the One Room Challenge's makeover of the den/guest room is the paint. And we're getting into it first!

I had loads of inspiration and lists of paint colors that had been used successfully in multiple spaces. I was trying to marry the wall color with the blue velvet couch that I planned for that room to give it a dark-on-dark upgrade without making the room look monochromatic. As a reminder, here's the before, inspiration, and design plan.

Clockwise from upper left we have Salamander by Benjamin Moore, Hunter Green by Benjamin Moore, Pine Grove by Clark + Kensington, Tarrytown Green by Benjamin Moore, and Narragansett Green by Benjamin Moore.

I painted swatches on the back of a foam core presentation board, since I already had it on hand (I use it as a reflector for photos) but you could instead buy the paint sample boards at the paint store. I was quick to rule out a few colors, then painted my favorites on the wall. By the end, Salamander won our vote.

While rolling on the paint in broad strokes provides immediate satisfaction, my painting specialty is cutting in the edges. I don't use blue tape to get crisp edges, rather a steady hand and some trusty tools.

I use the HANDy Paint Cup whenever painting edges, when I need to be more mobile than a gallon of paint allows, or when I'm working with small amounts of paint. This convenient tool fits in your hand, has a magnet to hold the brush, and cleans up so easily (just let the paint dry in the cup, then peel it off - so satisfying!).

The Wooster Shortcut paint brush is perfect for cutting in. I'll use almost any 2" angled brush for the job, but this lil' one is so comfy with its rubber handle.

When scooching around on the floor to paint the edges on the baseboard, a kneeling pad is a must. I use it for gardening, painting, tiling, etc. While I don't think you'll find this crouched painting position recommended on HGTV, it works for me.

In addition to the walls needing a couple of coats of paint, the baseboards hadn't been touched since before the floors were refinished. They were scuffed up from the sander and I just left them like that for two years. A nice coat of Benjamin Moore's Simply White was all they needed to look their best. The baseboard, three doors, and a window all needed some paint love. Lucky for me, I had the S-Town podcast to keep me company during the hours and hours of painting.

After a weekend's worth of cutting in, I'm swooning over the freshly painted room. The green is so pretty and has a velvety look when the light hits it mid-day. At night, it's nearly black - which is just what I was going for.

Next week, I'm tackling the picture rail moulding installation! Come back over the next few weeks as this room gets a total overhaul. Don't forget to admire the work of the featured and guest bloggers participating in the One Room Challenge!

If you're here because of the One Room Challenge, I hope you'll subscribe to the blog to get future blog posts in your email! Be sure to follow along on Instagram, too!

One Room Challenge progress:
Week 1 - the before, the inspiration, and the plan
Week 2 - paint, paint, paint
Week 3 - how to install picture rail molding
Week 4 - sourcing the artwork
Week 5 - refreshing a chair
Week 6 - the reveal!

One Room Challenge Week 1 - A Moody Makeover

I'm currently digging moody colors. Deep blues, forest greens, and dark grays are all I'm pinning as of late. I mentioned a few weeks ago that I was contemplating painting my kitchen cabinets (again!) to give them a deeper hue. Since it's not the best use of my time, I've directed my color affection to another space. Luckily, the One Room Challenge is starting at the perfect time to scratch the moody color itch! Scroll through to see the room I'll be transforming over the next six weeks.

If you found me through ORC, welcome! I'm Ashley and for the past two years I've been restoring a craftsman bungalow in San Diego, CA. Learn a touch more about me here, and preview the before-and-after room transformations here.

Without further ado, here is the inspiration.

See where I'm going? What I particularly love about these spaces is how they play with dark on dark tones. Studio McGee's emerald couch against the navy walls and Julia's black sofa on the deep green are what moody dreams are made of.

So which space will earn its dark makeover? The family room/den/media room. What is a good name to call a space that we pretty much use only to fold laundry and watch TV in? The internet tells me that an alternate to the word "den" is "snug." I kinda like it. Please weigh in.

This room has received little to no love over the past two years. 100% of the furniture pieces were brought from our rental, so I've grown tired of them. The paint color is a reject color that I bought for our master but didn't like once painted on all of the walls. (lesson learned: paint BIG swatches before you buy a gallon of paint). Also, the trim never got its final coat of paint. 

The Gold Hive One Room Challenge Week 1

The room is fine, but it could become the dark hued space of my dreams. I'm looking forward to spending the next six weeks transforming it. I hope you'll stay tuned and check out the featured and guest bloggers participating in the spring 2017 season of the One Room Challenge!

One Room Challenge Mood Board - The Gold Hive

Sources: couch / rug (one of a kind) / lamp / pillow / chair (existing) / chair fabric / credenza (vintage) / painting

If you're here because of the One Room Challenge, I hope you'll subscribe to the blog to get future blog posts in your email! Be sure to follow along on Instagram, too!

One Room Challenge progress:
Week 1 - the before, the inspiration, and the plan
Week 2 - paint, paint, paint
Week 3 - how to install picture rail molding
Week 4 - sourcing the artwork
Week 5 - refreshing a chair
Week 6 - the reveal!

Bathroom Plans

Last week I shared some of the inspiration for our bathroom. The collection of images made a few must-have elements pretty clear: subway tile with dark grout, moody walls, hex tiles, marble, and period-appropriate finishes.

The Gold Hive Bathroom Mood Board

SOURCES: paint / medicine cabinet (ours is original) / faucet / hex tile / sconce (ours is vintage) / cabinet latch / pendant (ours is vintage) / register (ours is vintage) / subway tile / grout / console sink

We had a pretty good idea of the plans for the bathroom, but small tweaks were made over the course of the renovation. The below designs were drafted early on, so don't take these measurements as an exact blueprint of the finished product. Rather, a starting point for where we were headed.

The Gold Hive Bathroom Plan View

The layout of the existing bathroom had no reason to be changed. I like having the toilet tucked in the corner, the sink has ample room around it, and the tub configuration allows for storage at the foot of it. Many bathrooms like this are only 60" wide which gives the tub just enough room to fit wall to wall. Since we had another foot of space, we could have gotten a longer tub to stretch the length of the room, but we opted to make two spots for storage, seen in the upper right corner of the above image. The little square that measures 6.5" deep is accessible from the shower. A perfect place to nestle bottles of shampoo without having them on display.

The Gold Hive Bathroom South View

The 13" space on the right is a cabinet for toiletries, refill bath products, cleaning supplies, and more. I think it's my favorite feature in the whole bathroom.

The window shown here is a sizable improvement from the existing one, but we ended up going even bigger!

The Gold Hive Bathroom East View

Because the sink is floating in between the toilet and the tub, I didn't want a traditional vanity. I think vanities are really pretty when they look like built-in cabinetry as an extension of a wall. But on their own, vanities can look like boxes floating in the middle of a room. Thus, we opted for a console sink that visually opens the space. Sure, we gave up storage, but I'm a-okay with that. Neither Ross nor I own a lot of products for primping, so the storage at the end of the tub is perfectly adequate for us.

Other than a few tweaks, those are the plans for the bathroom! If you want to jump two years into the future, you can see the finished bathroom here and here and here.

For more bathroom progress, click the link below then subscribe so you don’t miss out when I add a bathroom in 2019!

Refinishing Our 100-Year-Old Oak Floors

The Gold Hive Master Bedroom Floors

Refinishing the hardwood floors was the last step in remedying the odor issue. Once all was said and done, the smell disappeared and the flooring was revived – win win!

As a reminder, here’s what the flooring looked like.

flooringbefore

The 100-year-old rift and quartersawn white oak was actually in pretty great condition throughout most of the house. However, the urine stains (the dark spots seen above) and termite damage warranted repairs. Plus, there's no better time to restore the floors than when not living in the house - you’d have to move eeeeeeverything out off the floors otherwise.

The very first step was to make a mess. All drywall, painting, and bathroom construction (stay tuned!) occurred before the flooring crew set foot in the house. There's no sense in making that oak perfect and shiny, to then drag a bag of demo debris over it. I've heard professional painters say to paint after floor refinishing because dust can get into the paint, but I sided with the hardwood guys that said to paint first. It makes so much more sense, I mean, I've been known to drop a cup of paint from the top of a ladder.

Oops. Thank goodness for rosin paper. Once I was done spilling paint, the sanding process could begin.

That freshly sanded oak makes my heart skip a beat! I also have a crush on this sander. Ain't she a beaut? Looking back, I think that retro pale green influenced my kitchen cabinet color.

The floors had previously been refinished, but in the back of the closets was the original wax finish. It was pretty dull, but there's something so special about finding a part of the house that hadn't been messed with over the years - even if its a small bit of dingy flooring. Below, you can see the wax finish transition to the glossy polyurethane before getting sanded down. Also, note the termite damage.

All of the boards that were brittle from termites gnawing on them had to be replaced.

It's no surprise to find a few boards that are beyond repair, but the bummer was discovering that termites had eaten through the subfloor, too. It was so chewed on that I could easily poke my finger straight through to the crawl space. Half of the master bedroom flooring had to go. This is where I can't stress enough the importance of house maintenance. This back corner of the house was termite heaven because of the moisture that built up in a non-vented crawl space. There's also no record of termite treatments after 1982. People, these are BUGS inside of your floors/walls/furniture/etc. Get them out before they do this!

Local suppliers were out of the same type of flooring we have (2” x 1/2” rift and quartersawn white oak) and tried to convince us to use plain/flatsawn wood. We insisted on using the same type of cut as the existing flooring, and even though it delayed our move-in date, it was well worth the wait. Once the matching hardwood arrived, it had to acclimate to match the house's humidity.

During the acclimation time, we brainstormed how to finish the floors. The sanding did wonders for the small stains and scuffs, but the urine damage was still noticeable and would stand out even more when coated in polyurethane.

I was prepared to stain the wood a dark shade in order to hide the stains. But at the last minute, Ross made his biggest design contribution to date - he declared, "no stain!"

The ghosts of urine blemishes remain, but we couldn't be happier with the choice to keep the white oak light and natural.

After an application of wood putty and another few rounds of sanding, the floors were coated in an oil-based satin polyurethane. The finish is just shiny enough without being glossy, and its amber tones add to the patina of the 100-year-old wood. Choosing to do oil-based was in my goal of keeping with the history of the house - giving it the warm amber look and using finishes customary from years ago. But I kind of which we didn’t do the oil based poly and instead left the wood even more pure in it’s lighter hue. It’s okay, though!

We hired out the project and spent about $5k on the whole process. It was well worth it considering we were in a rush to move in and had lots of other things going on. But, I do yearn for the day when I can refinish floors myself! The Grit and Polish shared how they refinished their floors themselves and included the cost to do so here.

Once the flooring was complete, it felt like a whole new space - almost ready to be lived in. But before moved-in, there was still so much more to do. Which of those projects do you want to hear about next? The bathroom remodel? The kitchen update? More odds-and ends?