A DIY Kitchen Transformation Using Vinyl Floor Tiles + A Video Tutorial!

A DIY Kitchen Transformation Using Vinyl Floor Tiles + A Video Tutorial!

The kitchen has seen a wild transformation! So far, I've shared the plans, the concrete counter DIY, and three tutorials for adding more work space - check out those posts here. But the floors! The new flooring made the kitchen into a wonderfully different space - a big improvement from the sad termite-filled fir. I couldn't have been more excited to get started on the quick/cheap/transformative project of giving my kitchen floors a fresh buffalo check pattern. This DIY kitchen transformation using vinyl floor tiles is among my favorites yet - and it costs about as much as it does to paint a room!

Read More

Picking a Kitchen Floor Pattern

The phase 1 kitchen earned several upgrades already, like new paint, hardware, concrete countertops, and even more countertops. However, the floors didn't get much love other than a coat of poly when we refinished the the rest of the floors. As much as I love the fir, the wood was pretty damaged. Nearly every plank had either huge gouges or was brittle from years of termites gnawing on the softwood. The previous owner made attempts at repairing the mangled boards by filling the cavities with wood putty, but it definitely didn't help the aesthetics.

The Gold Hive Kitchen Flooring Damage

These photos don't do justice to the damage. We lived with the flooring as-is for a couple of years letting those termite gaps fill up with a hefty amount of cat litter and crumbs. But, I lost my patience and had to remedy it. Knowing that the kitchen will eventually get a full gut renovation, I had the opportunity to do whatever I wanted without it impacting the future plans - even if it pushes my design boundaries. So, I jumped on to the graphic look and committed myself to installing a funky pattern that I like, but wouldn't be my first choice for a permanent kitchen floor. This transitional renovation fix lets me get the bold/graphic/retro vibe out of my system before having to make the forever-flooring decision. Win win.

The Gold Hive Graphic Flooring Inspiration

Sources clockwise from top left: Megan Pflug Designs/A Beautiful Mess/Allison Burke Interior Design/The Art of Doing Stuff

At first, I was sure that I would install the checkerboard pattern to get that retro diner vibe. But after a few Photoshop mock-ups, I realized that with the large amount of uninterrupted floor space, the high contrast of black and white was too busy and could give us vertigo. The idea of modern geometric shapes was also appealing, but I worried I'd spend years cutting the tiny pieces. It didn't take much for me to fall for the buffalo check pattern. The grey neutralizes the high contrast black and white, while also adding texture with the illusion of the weaving pattern. It also has enough style that I can feel confident I didn't play it too safe.

Since this was merely a temporary solution that really only needed a bandaid, I found a flooring solution that was quick, cheap, effective, and super easy to install. The perfect improvement project for a newbie DIYer or renter.

I couldn't be happier with how it turned out. The installation went swimmingly and the result is sleek, clean, and full of personality. Come back next week to get the full tutorial and link to all of the sources! Subscribe, so you don't miss out.

Weekly Roundup

Domino compiled a collection of some gorgeous wallpapers for spring and I think this floral one from Sandberg Wallpaper's Brunnsnäs Collection is my favorite. 

On Wednesday, I shared the story of our floor refinishing. We hired the job out, but it's totally DIY-able. Cathy and Garrett of The Grit and Polish did it by themselves and boy, do those floors shine!

Last week, I asked you to weigh in on whether or not I should re-paint the kitchen cabinets a deep green. The votes are split, so I don't know what my plan is, yet. With color on my mind, I was taken aback by this house in a nearby neighborhood that hit the MLS this week. Wowza!

Colorful-house-in-golden-hill

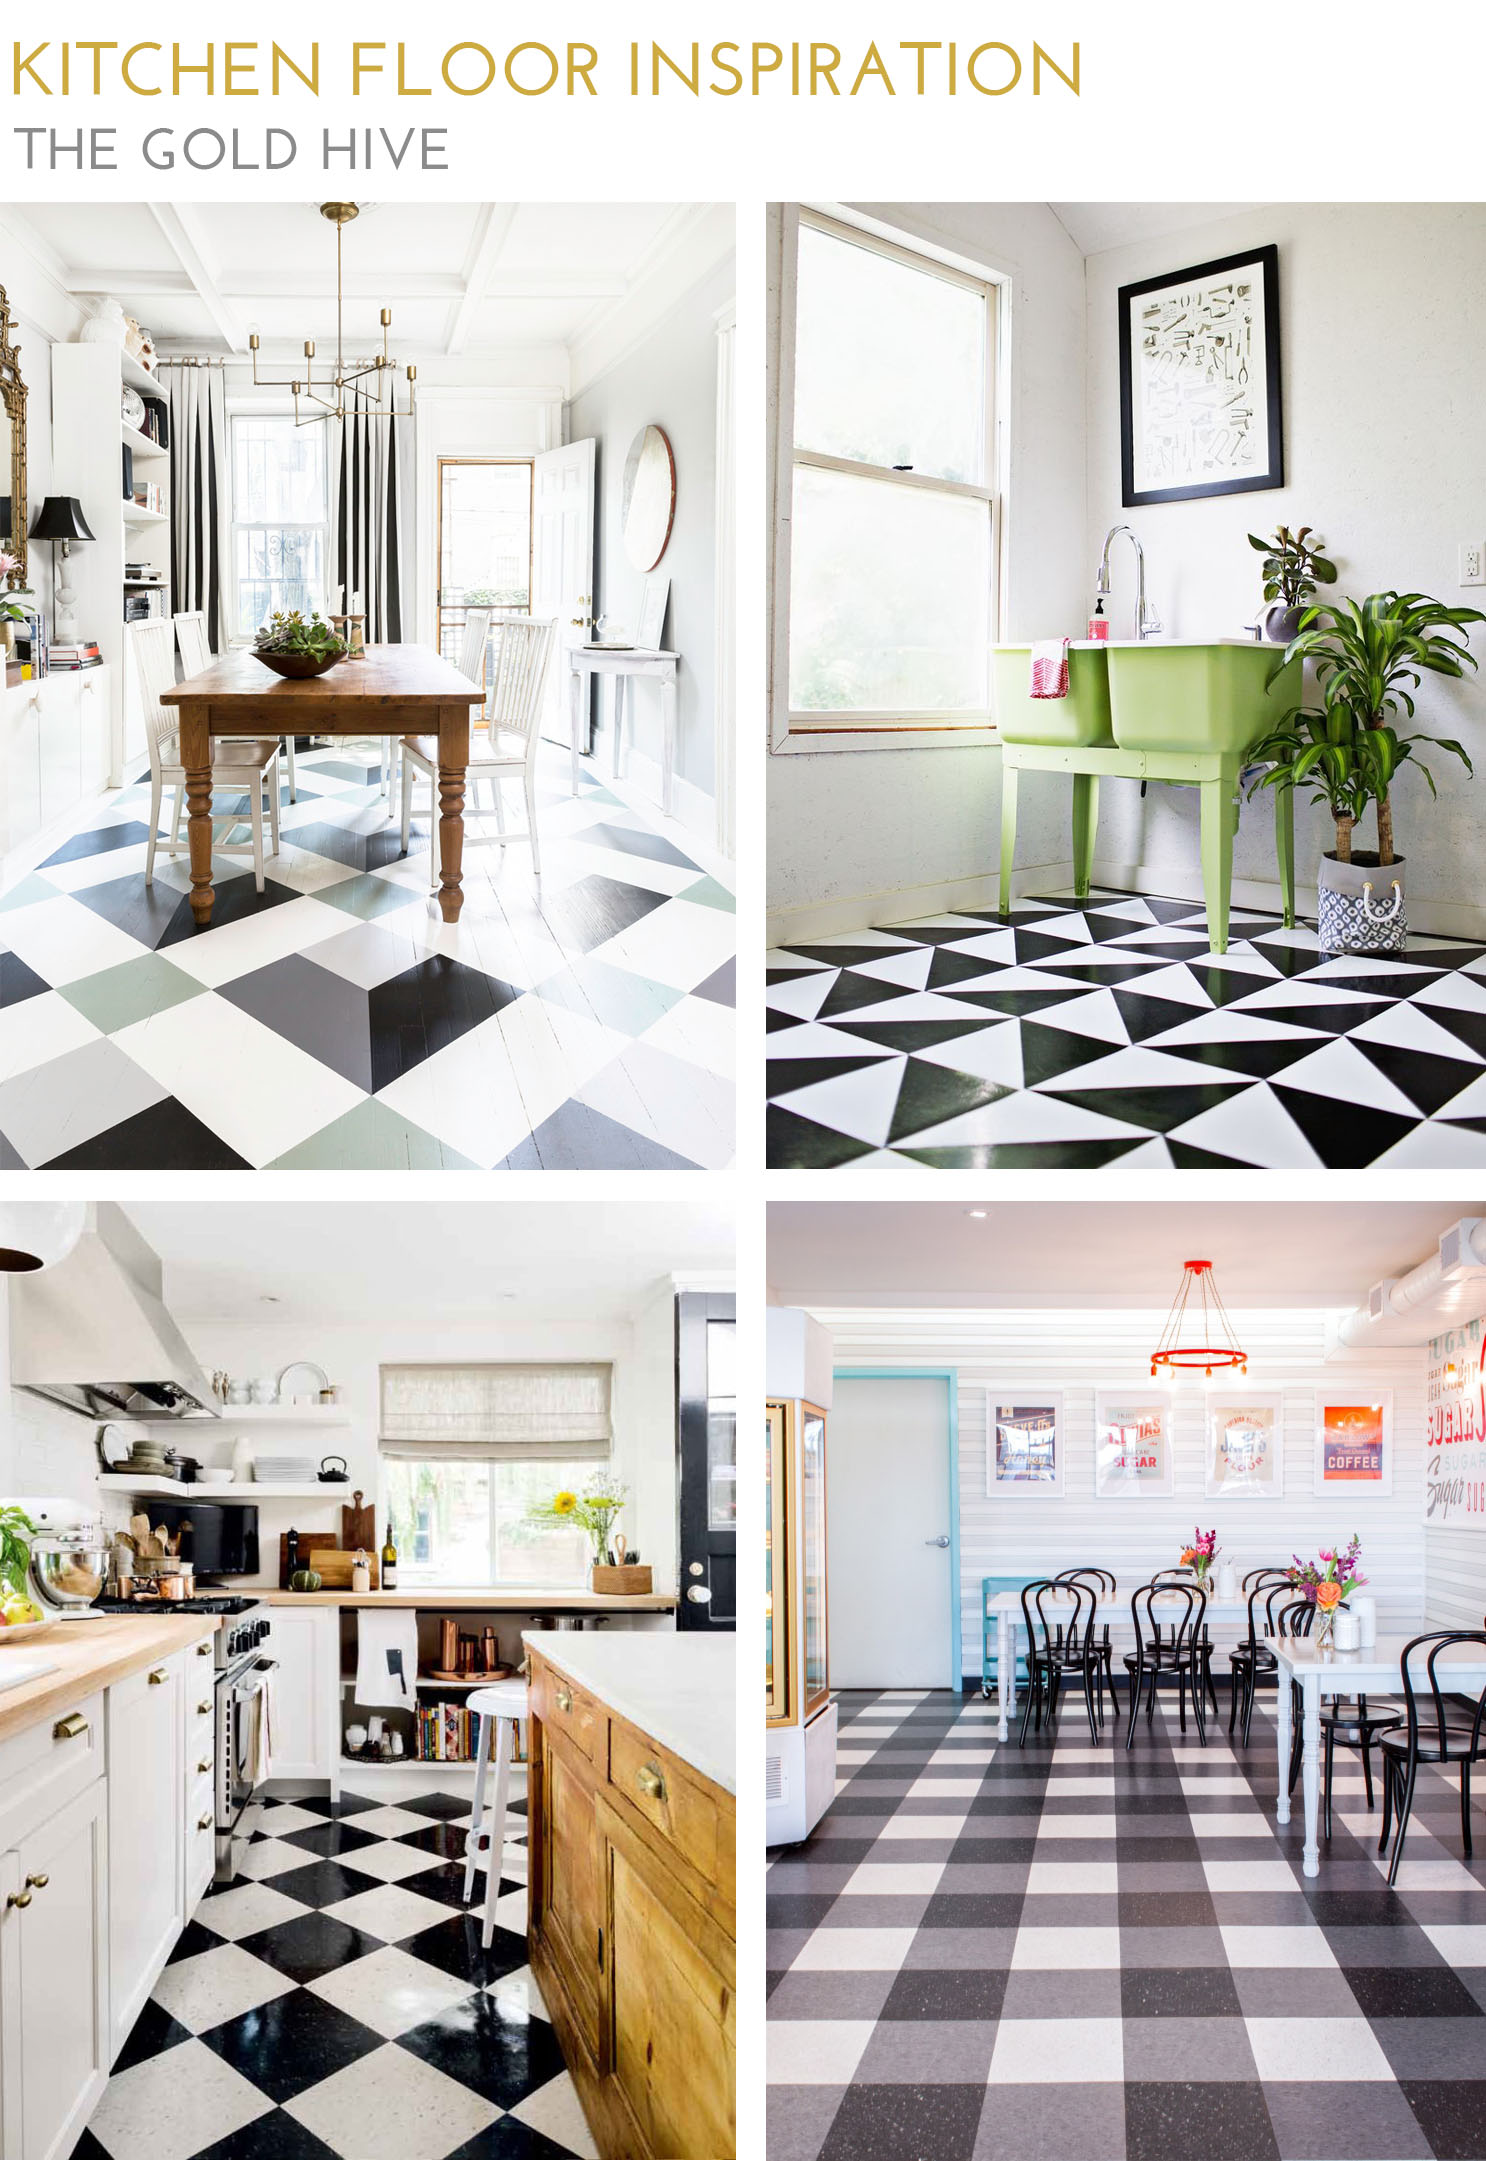
Michaels is having a killer sale on frames right now, including online. Alternatively, if you need custom framing, here's $10 off your first order at Framebridge.

I've watched every.single.one of Casey Neistat's videos, so I've developed a crush on his wife and her entrepreneurial, no-nonsense, sarcastic spirit. Resource Magazine featured her so I can't wait to get my hands on a copy. I searched all around town for the latest edition but couldn't find one, so I read the preview online. Candice and Casey are each highly driven makers - truly inspiring for this couch potato.

I'm not a big clothing shopper, but I did get some new shoes this week. I've been wearing Birkenstock clogs for ages so these are a major upgrade in the style department. And yes, those are technically men's shoes, but so what - plus, my feet are too big for lady shoes. 

We went to the movies for the first time in probably two years (I've mentioned I'm a homebody, right?) to see Get Out. It was exceptional. I can't stop thinking about it, and I can't stop listening to this Childish Gambino song that was featured in the film. Speaking of songs in movies, I'm also digging this song by Michael Kiwanuka which plays during the opening of the show Big Little Lies.

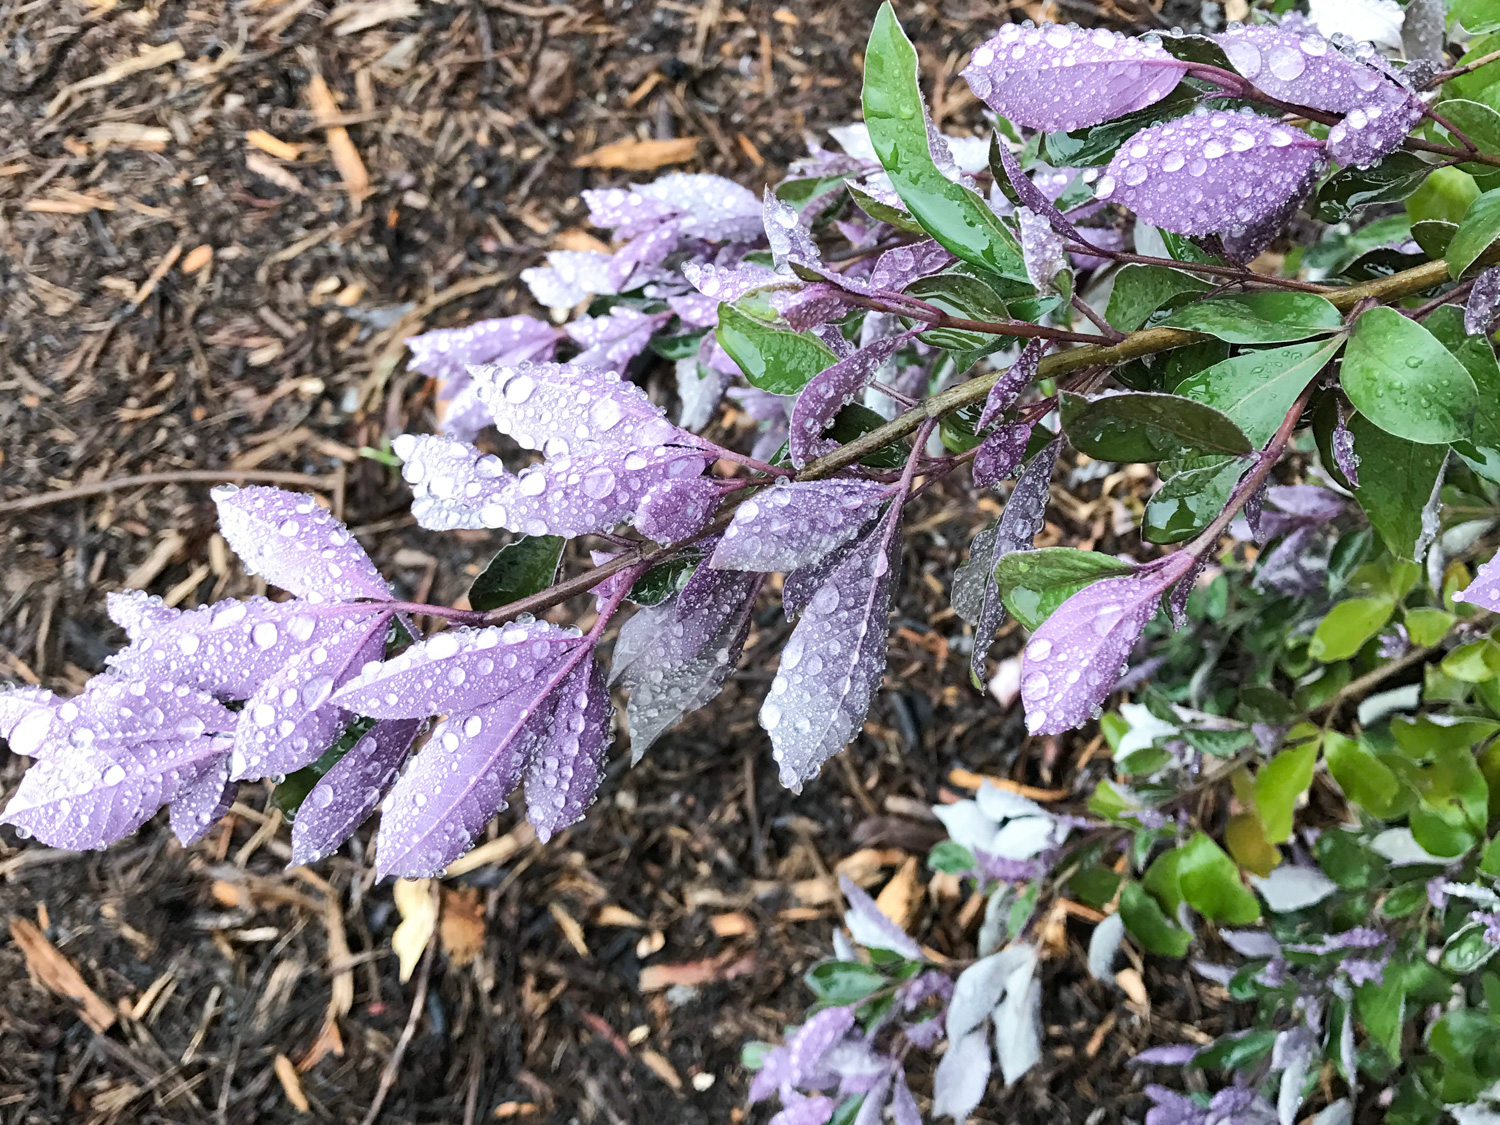
Spring has sprung so the front yard is gaining new blooms. San Diego is still getting much-needed rain which is making the fresh plantings very happy. The Arabian lilac is one of my favorite new plantings with its half-purple and half-green leaves.

Happy Friday!

Refinishing Our 100-Year-Old Oak Floors

The Gold Hive Master Bedroom Floors

Refinishing the hardwood floors was the last step in remedying the odor issue. Once all was said and done, the smell disappeared and the flooring was revived – win win!

As a reminder, here’s what the flooring looked like.

flooringbefore

The 100-year-old rift and quartersawn white oak was actually in pretty great condition throughout most of the house. However, the urine stains (the dark spots seen above) and termite damage warranted repairs. Plus, there's no better time to restore the floors than when not living in the house - you’d have to move eeeeeeverything out off the floors otherwise.

The very first step was to make a mess. All drywall, painting, and bathroom construction (stay tuned!) occurred before the flooring crew set foot in the house. There's no sense in making that oak perfect and shiny, to then drag a bag of demo debris over it. I've heard professional painters say to paint after floor refinishing because dust can get into the paint, but I sided with the hardwood guys that said to paint first. It makes so much more sense, I mean, I've been known to drop a cup of paint from the top of a ladder.

Oops. Thank goodness for rosin paper. Once I was done spilling paint, the sanding process could begin.

That freshly sanded oak makes my heart skip a beat! I also have a crush on this sander. Ain't she a beaut? Looking back, I think that retro pale green influenced my kitchen cabinet color.

The floors had previously been refinished, but in the back of the closets was the original wax finish. It was pretty dull, but there's something so special about finding a part of the house that hadn't been messed with over the years - even if its a small bit of dingy flooring. Below, you can see the wax finish transition to the glossy polyurethane before getting sanded down. Also, note the termite damage.

All of the boards that were brittle from termites gnawing on them had to be replaced.

It's no surprise to find a few boards that are beyond repair, but the bummer was discovering that termites had eaten through the subfloor, too. It was so chewed on that I could easily poke my finger straight through to the crawl space. Half of the master bedroom flooring had to go. This is where I can't stress enough the importance of house maintenance. This back corner of the house was termite heaven because of the moisture that built up in a non-vented crawl space. There's also no record of termite treatments after 1982. People, these are BUGS inside of your floors/walls/furniture/etc. Get them out before they do this!

Local suppliers were out of the same type of flooring we have (2” x 1/2” rift and quartersawn white oak) and tried to convince us to use plain/flatsawn wood. We insisted on using the same type of cut as the existing flooring, and even though it delayed our move-in date, it was well worth the wait. Once the matching hardwood arrived, it had to acclimate to match the house's humidity.

During the acclimation time, we brainstormed how to finish the floors. The sanding did wonders for the small stains and scuffs, but the urine damage was still noticeable and would stand out even more when coated in polyurethane.

I was prepared to stain the wood a dark shade in order to hide the stains. But at the last minute, Ross made his biggest design contribution to date - he declared, "no stain!"

The ghosts of urine blemishes remain, but we couldn't be happier with the choice to keep the white oak light and natural.

After an application of wood putty and another few rounds of sanding, the floors were coated in an oil-based satin polyurethane. The finish is just shiny enough without being glossy, and its amber tones add to the patina of the 100-year-old wood. Choosing to do oil-based was in my goal of keeping with the history of the house - giving it the warm amber look and using finishes customary from years ago. But I kind of which we didn’t do the oil based poly and instead left the wood even more pure in it’s lighter hue. It’s okay, though!

We hired out the project and spent about $5k on the whole process. It was well worth it considering we were in a rush to move in and had lots of other things going on. But, I do yearn for the day when I can refinish floors myself! The Grit and Polish shared how they refinished their floors themselves and included the cost to do so here.

Once the flooring was complete, it felt like a whole new space - almost ready to be lived in. But before moved-in, there was still so much more to do. Which of those projects do you want to hear about next? The bathroom remodel? The kitchen update? More odds-and ends?