
HomeStyler: The Free Room Design Software I've Used for Years
/Whether renovating rooms or just planning a new furniture layout, I’ve been using this free software for years. It’s so simple to use with just dragging and dropping features. Plus, there’s no need to understand complex software like CAD or Photoshop! Truly anyone can do it if you have some patience to figure out the quirks. In addition to designing a new layout, the renderings are so pretty and helpful for visualizing your new space.
I’ve been getting questions about the software I use whenever I share design plans, so I’m here to finally answer and give you some insight. This post isn’t sponsored, nor is it a full tutorial with instructions on how to use it. I simply hope this is helpful for giving you an idea of a starting place to design your home/yard/etc.
The software is called HomeStyler and you can use it on any desktop computer in any browser.
I’ve been using the software for several different applications:
Floorplanning as I remodel and plan to adjust walls
Figuring out spacing within room constraints
Taking measurements of designs to order products and plan designs
Visualizing finished rooms and their flow
I’ll admit that it isn’t perfect for one thing and that’s designing very specific custom furnishings/wallpapers/etc. This software is limited, but I’ll get to that soon. For fully customizing spaces, you can try SketchUp which is also more accessible than CAD or Photoshop, but it does take a TON of practice and watching tutorials before you can really see what you want it to be. My friend Alison is a queen and can make SketchUp renderings look like real photos. Check her designs out!
I’ve been using HomeStyler for years as I’ve been planning my kitchen renovation. I’ve struggled for nearly half a decade trying to determine where I should place walls, how the flow should work, how we can squeeze in an extra bathroom, and just general floor planning conundrums. HomeStyler has been a key player in helping me play with the many different designs to weigh the pros and cons. Remember when I was first planning the kitchen layout??
Keep in mind, I’m not a professional interior designer with access to all the tools and knowledge. I’m just a super invested neurotic homeowner, here! If you are too, I’ll bet you’ll enjoy playing in this software.
I’ve designed my whole house in HomeStyler! (psst: if you like seeing my whole house layout, you can also watch a full home tour video here)

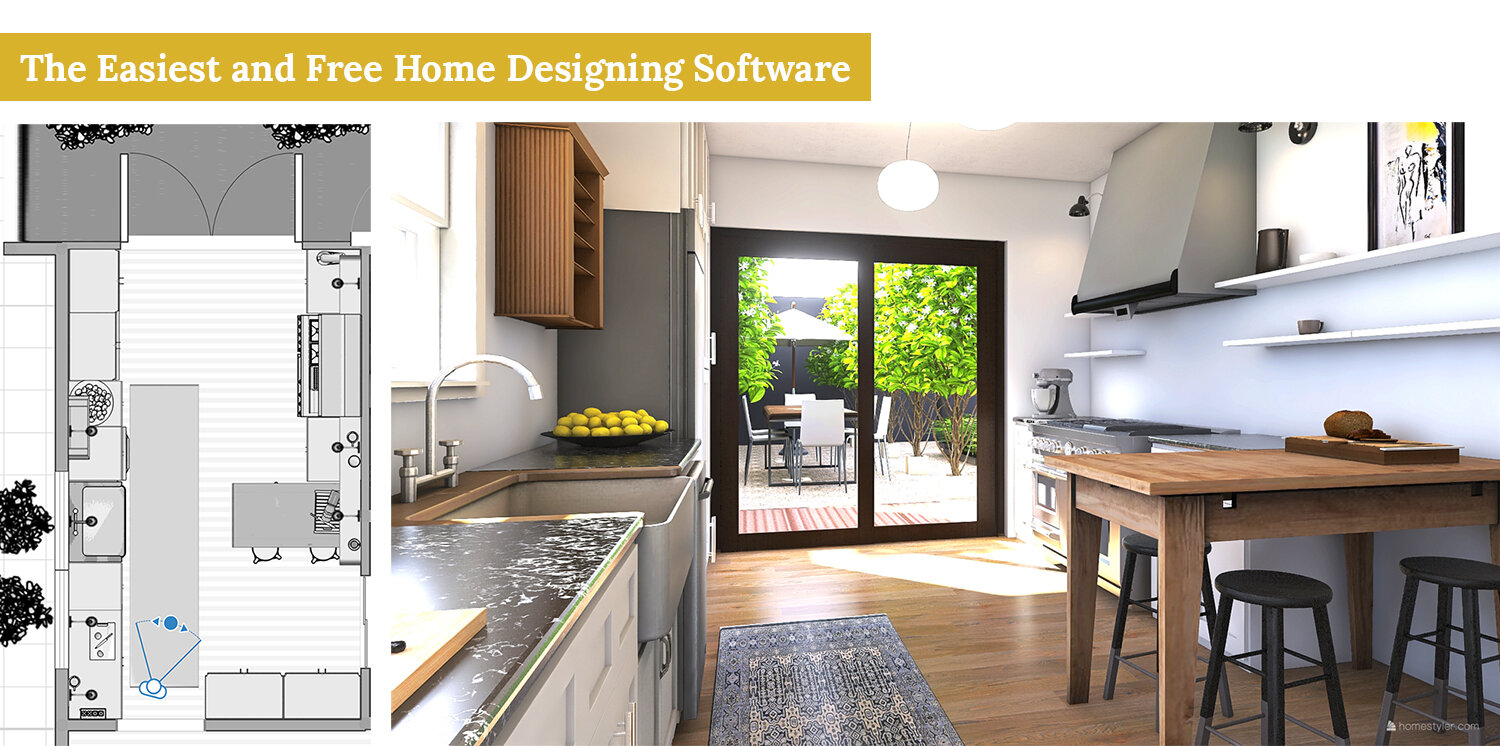
The view above is super helpful for laying out spaces, evaluating flow, and taking measurements. You start out in this plan view by just drawing a room, setting the measurements, then plopping in elements. You’ll add doors, windows, openings, columns, etc. before adding furniture. At this stage, you’ll want to be super detailed with measurements because everything next is based on these specs. I recommend getting yourself a good tape measure for small elements, and then get a laser distance measure for walls and open spaces. Start with just one room then adding on each adjoining space. I couldn’t stop at one room so I laid out every square foot of our property. I even have our A/C unit pictured, but you know, I’m type A.

Once the walls and windows are positioned, you can add furnishings and wall colors to make the space look relatively realistic. You can see above that this is our primary bedroom. It doesn’t look identical to the finished space, but it’s good enough for giving an idea of the space.
Again, HomeStyler isn’t perfect at making it look identical to the final design. And in fact, that’s what makes it easy to use and so quick to see results as opposed to more complex software programs. I’m not using the software to make a perfect rendering of the exact colors and furnishings. I use it to take measurements and to visualize the scale of furnishings, the sightlines, and the flow from room to room. This snapshot above helps me understand what the view out the window will look like if I add those outdoor couches, or see how the bed frame will intersect the window, or I can measure how much room I have walking around the bed with the ruler tool.
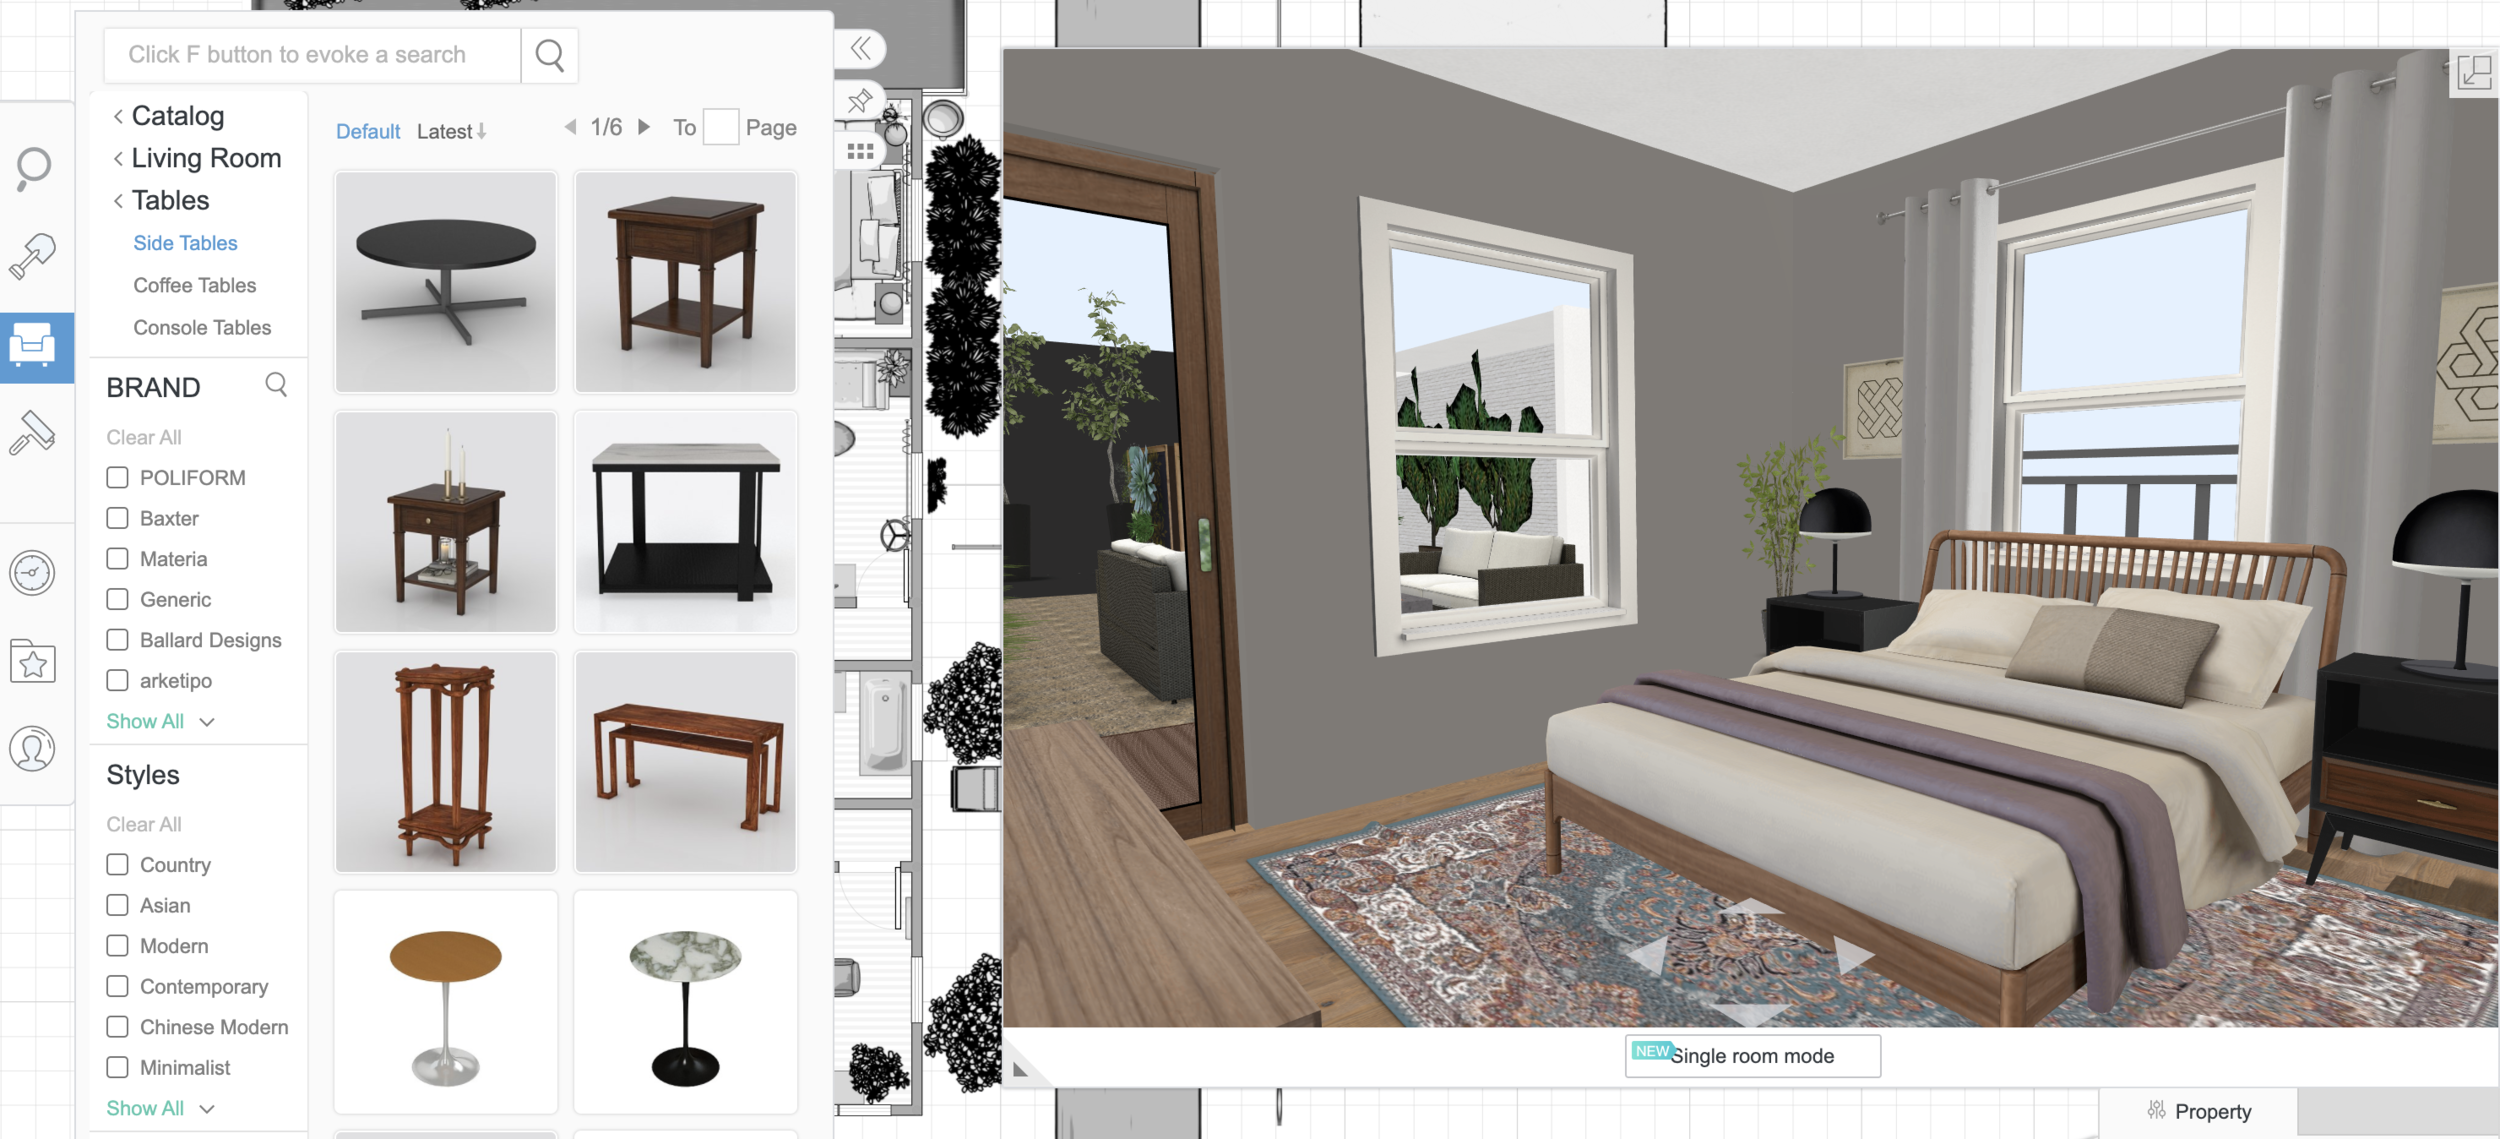
To add furniture, you select items from the extensive built-in library. You can sort by the type and even the style or manufacturer to get just what you want. Again, it’s limited though, so you often just have to pick what’s close but not exact. None of the products can be changed to be a different color, but you can change the dimensions of some of them. If you want to match something to a product in your home, you can add a similar-looking furnishing, then match the dimensions to your existing piece. So like, grab a side table, then make it wider and shallower to convert it into a nightstand, or make it tall and long so it can be a standing desk. It won’t look perfect, but it’s the measurements that matter here.
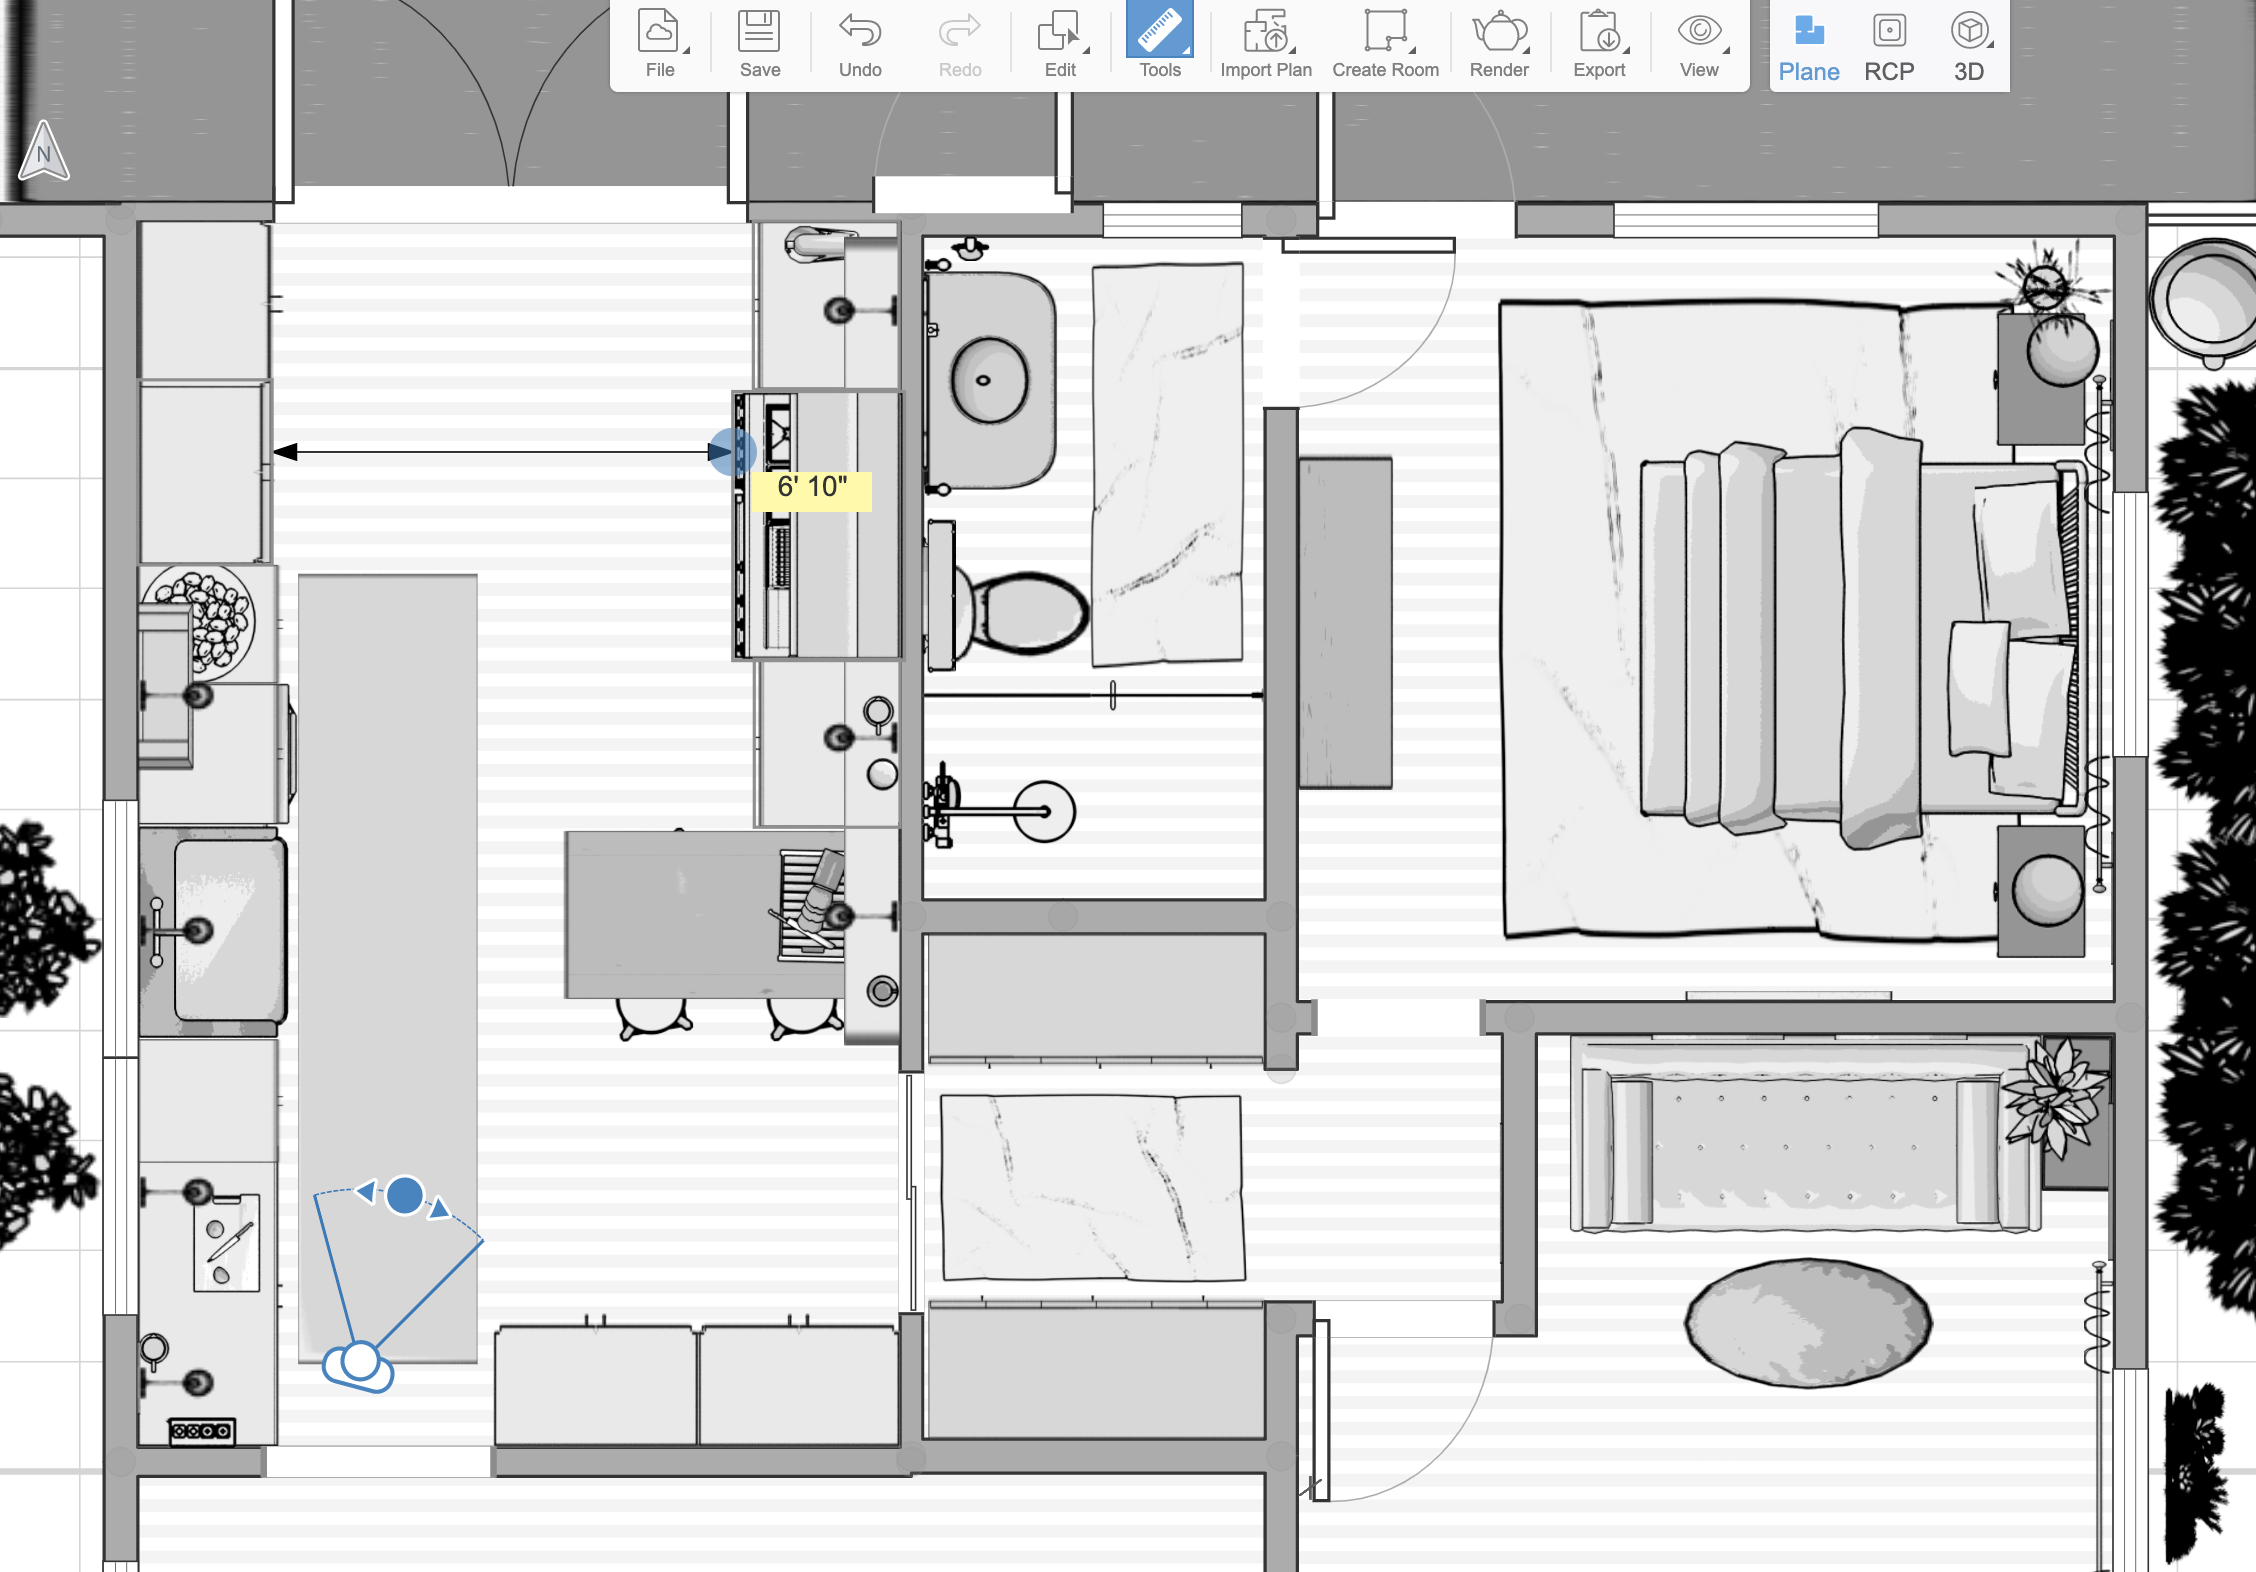
Speaking of measurements, the Ruler tool is super helpful. As I play with where I want cabinets, I can get the ruler tool out to make sure that my dimensions are within code compliance or general comfort for the layout. If not, I just keep dragging and dropping the appliances and cabinets into new spots.
I did about 40 different designs when planning the kitchen remodel (no joke). I appreciated being able to do it digitally with drag-and-drop software because I could so quickly see when things were working or failing.

For fun, I uploaded a photo of my dining room to make it look more realistic. See how the chairs and dining table are a part of the rendering the but built-in buffet, art, and light fixture are all a photo of my house? I realize this is going a bit above-and-beyond, and not at all necessary. But, helps visualize the space, no?
The cool part is you can move that little blue icon seen above around the house and pretend you’re walking through. It’s hard to demonstrate it in photos, so you can watch this video I made a couple of years ago when I was scheming new layouts (just watch the first part of it, the latter is moot since I changed the design since then).

The renderings! My goodness do they look good! Once you design a room and like how it looks, you can make the graphics look even more realistic. Throughout the post, I’ve shared photos of the graphics you see live when you’re building out the design. But you can make them extra fancy by using the Rendering tool to export high-resolution images complete with your preferred color temperature and view out the windows. If that image above doesn’t get you inspired to see my finished kitchen one day, I don’t know what will.
To take the designs even further, I export the renderings into Photoshop where I can play with coloring the cabinets, adding specific decor, and importing photos of the exact furnishings. I won’t show you those fine-tuned kitchen designs because I don’t want to ruin the surprise for you!

I’ve taken the HomeStyler designing outside to the backyard, too. I’ve laid out our dining table, seating area, and started brainstorming where we’ll put fruit trees, raised veggie beds, and our rainwater cistern. This design isn’t final, so don’t hold me to this. I’m constantly tweaking and adjusting things every time I get a new idea. Again, that’s the beauty of easy-to-modify software, huh?!
I can’t give you a full tutorial of the software, but I encourage you to set up an account (so you can save your designs), start designing one room and play around with it. If you get stuck and want video tutorials, here are some helpful ones. As a reminder, I’m not a HomeStyle spokesperson or anything, I just want to share this wildly helpful software with ya.
If you design your house will you share photos of it with me, pretty please? Tag me on Instagram, email me, or send me a shareable HomeStyler link. Happy designing!


