How to Organize Thousands of iPhone Photos Using Mac Smart Albums
/If you’re like me, you have thousands of photos on your phone or computer. I had close to 50,000! For years, I’ve wanted to make printed annual photo albums, but it was too overwhelming to organize them, so I didn’t. Now, with Margot in our lives (and significantly increasing the quality of the subject matter!), I’m determined to make her a baby book and print annual family photo books. I needed a way to narrow down the 4,000 photos I’ve taken in the last 6 months without me spending days of my life doing so. I’ve figured it out and I’m here to share.
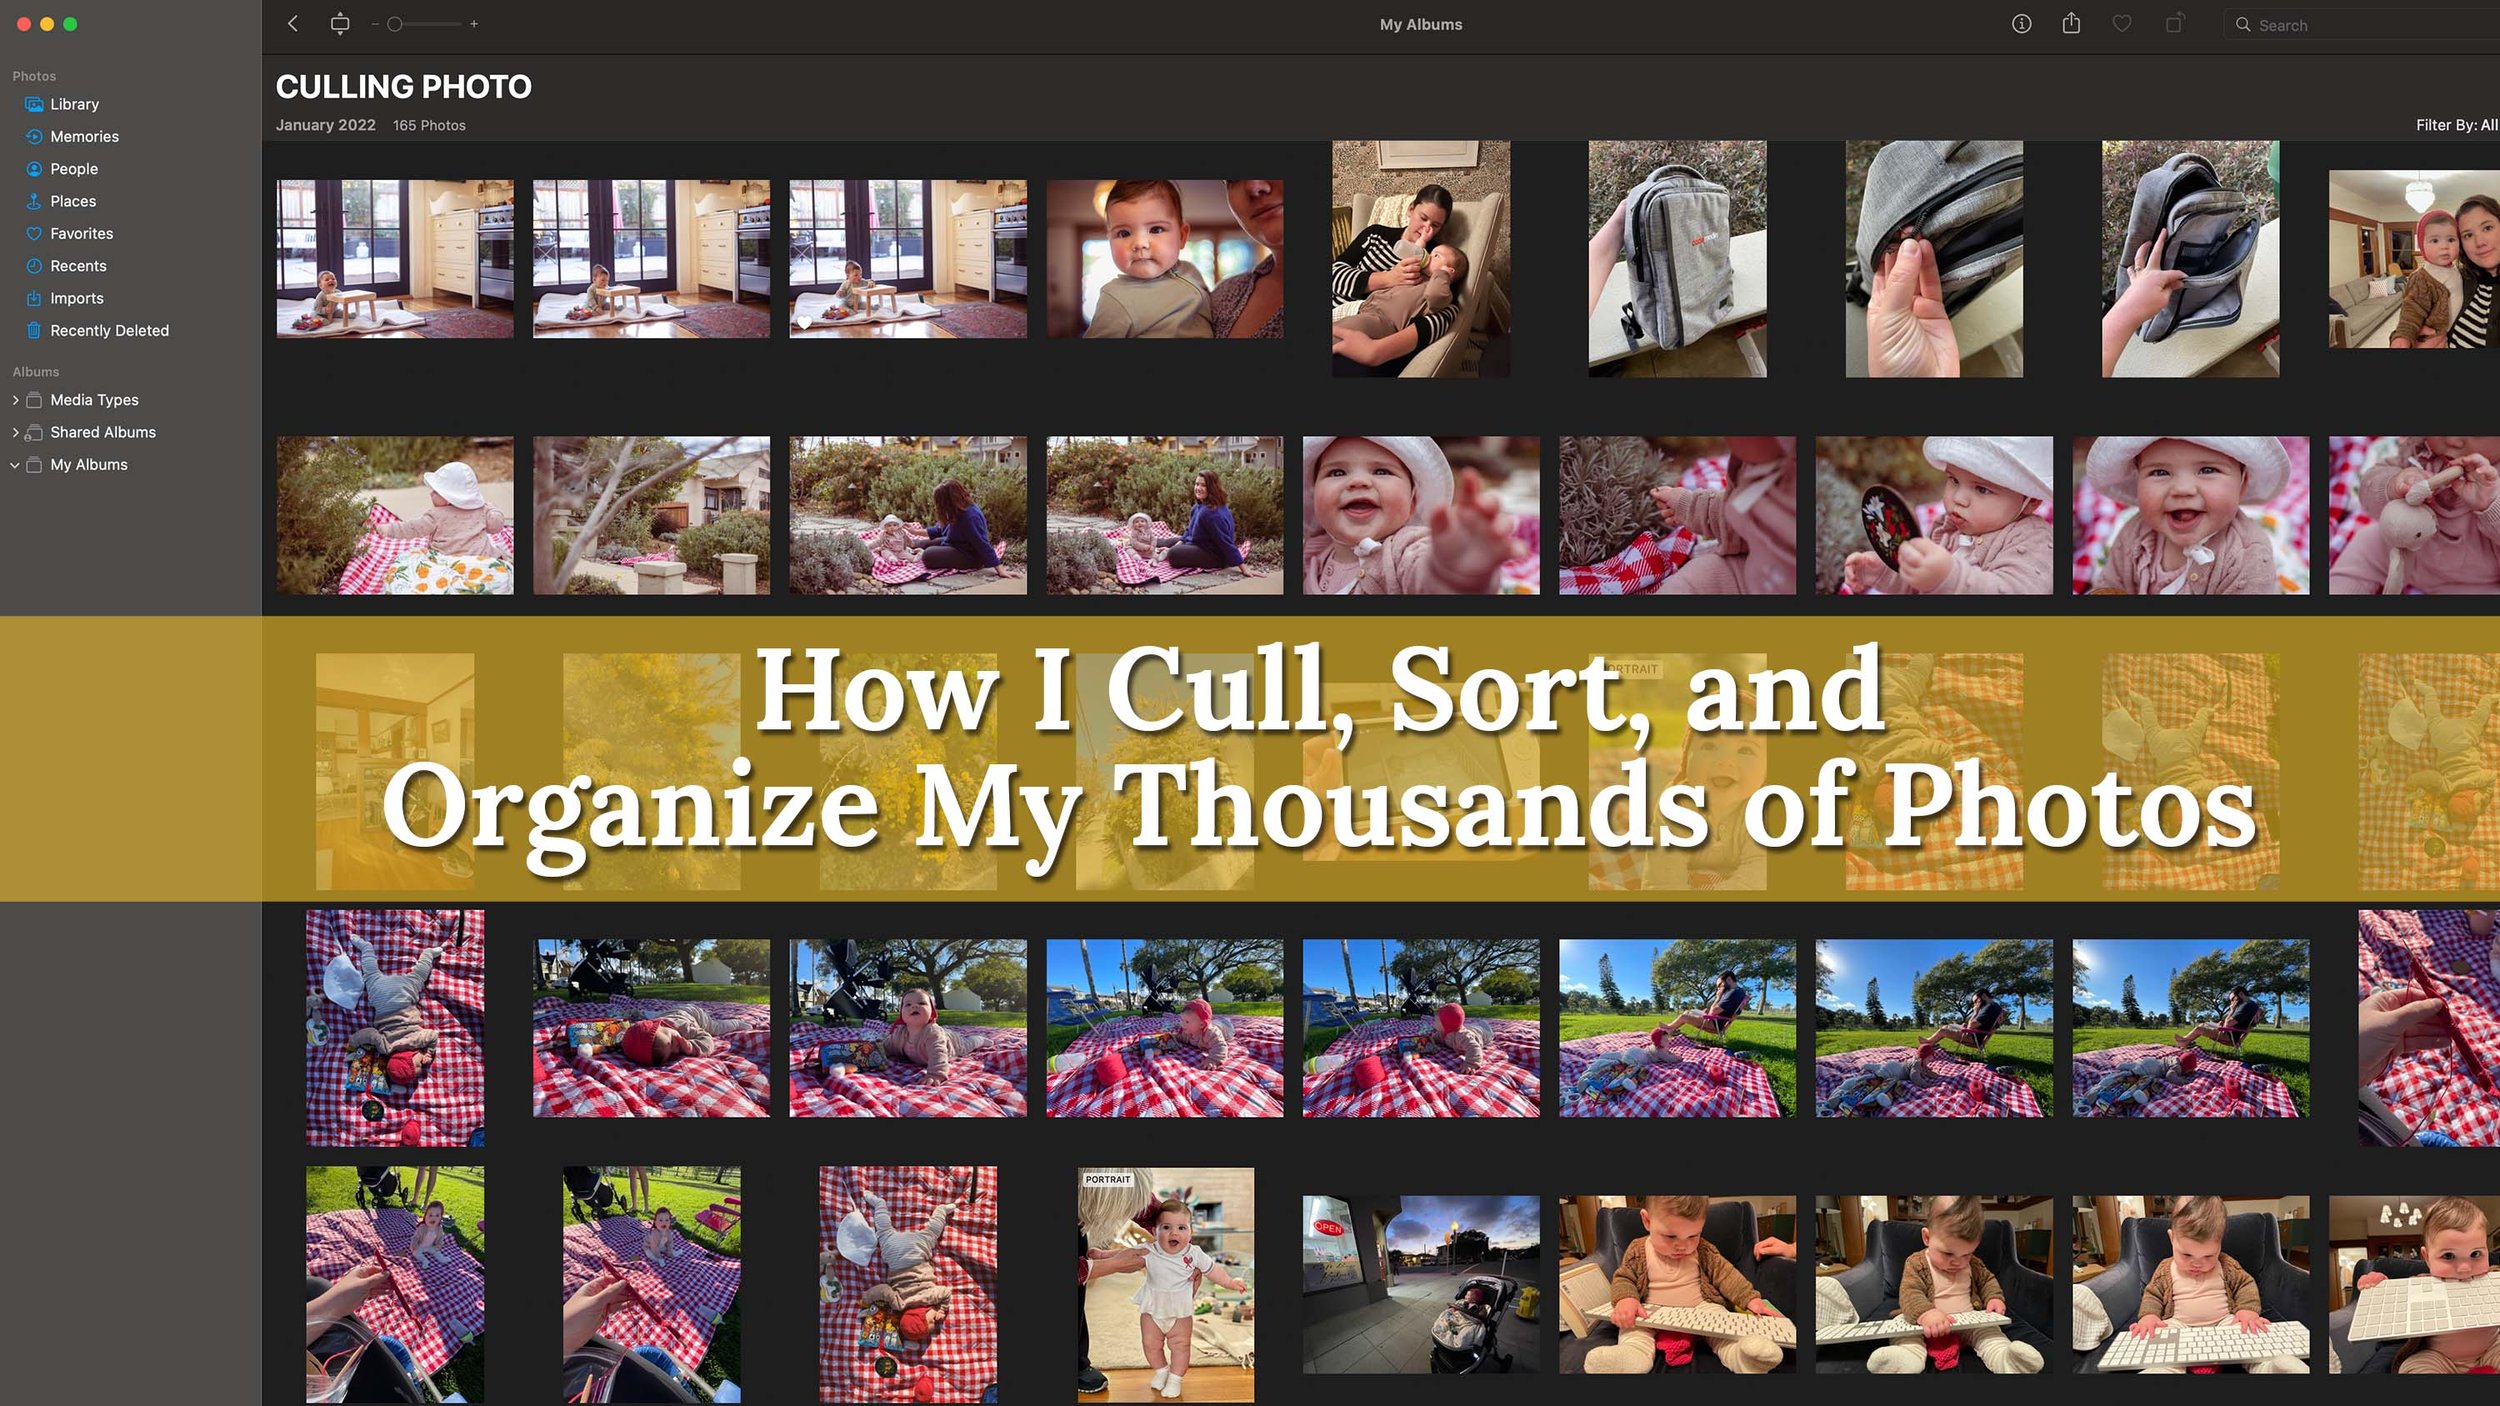
I’m going to show you how I cull, sort, and prep for an annual photo book all at once. You can delete excess photos, set aside images for a printed photo book, and organize some of the random photos in your photo roll within a matter of hours. It works really well for me, and I hope it can work for you!
A few notes to set expectations:
This is for people that feel like they have “too many photos” and “random clutter” photos. If your photo library is trim and limited to just family photos (not work, hobby, tasks, etc.) then you don’t need to do this.
This isn’t about how to take a good photo, how to edit photos, or how to print photos. It’s just organizing and decreasing the number of photos.
It does involve deleting a lot of excess photos (which is what culling photos is all about)! We need to reduce photos in order to savor the really special ones. If you can’t stomach deleting pictures, this process isn’t for you.
It takes work. I’ve devised an efficient workflow, but it still takes time and mental energy to go through each and every one of your photos.
This technique is for addressing existing photos. But, by the end, you’ll have a tool for future photos.
This is for use on a Mac computer, not an iPhone. (I welcome you to share how to do this on a Windows computer in the comments!)
I’m not pretending I’ve made up the most amazing thing. It’s really not, and arguably some will think it’s ridiculous. But I think once it’s set up, it’s pretty simple and effective. I hope it works for you.
My goal at the end of the process is to enjoy the photos I already have, be more mindful about the future photos I take, and spend more time with the people in the photos rather than organizing the photos of those people.
Video: Watch The Process
I filmed the method and talked through the steps in a video (14 minutes long, edited to be as brief as possible!) below. If you have the time, I encourage you to watch to better see the process. If you want to read then watch, or watch then read, or just read about it, you can get it all spelled out after the video. You do you!

If the video above isn’t displaying correctly, click here.
The Method:
Imagine you’re filing a huge pile of papers into a filing cabinet. Each piece of paper will go into a folder, some will get tossed, some will be assigned tasks. By the end, your pile of papers will be down to zero. That’s what we’re doing, but with photos! I’ll show you how to quickly do this with keyboard shortcuts and automation.
Step 1: Categorize
The first thing we need to do is assign broad categories for our photos.
My photo categories are:
Printed Family Photo Album - Special, best of the best photos, only a select few, would pay to print out
Keep but don’t print - Like them, but don’t need to print them, but don’t want to delete them (yet)
Work photos - Photos for the blog that belong with other blog photos in Lightroom. (You maybe have hobby photos instead of work photos. Or neither!)
To Do - All those photos that are reminders to do something (like the cookbook to buy, the bassinet to list for sale, the garden inspiration to implement, etc.)
Delete - Everyone needs a delete category! Culling photos is an important part of this work
Make whatever categories YOU want and need! Be sure the categories fit these conditions:
You actually need (only do categories that you’d need to look at each separately)
Mutually exclusive (this is critical!)
Easy to identify
UPDATE: I wrote this tutorial in 2022. Since then, Apple has launched the “Shared Library” and “Personal Library” feature. Use this as an immediate first step to culling!! The Shared Library is for all the photos my husband and I both take of the family. His is set up to automatically put photos taken at our house into the Shared Album, then, he manually adds the photos of our daughter into the Shared Album on a frequent basis. Mine is set up for me to manually add family photos to the Shared Album (which is such an easy thing to do on a weekly/daily basis on my phone or computer). THIS IS SUCH A TIME SAVER! Now, whenever I want to organize family photos, I go to the Shared Album and only categorize keep/photo album/delete. When I want to organize my other photos, I go to the Personal Album and organize keep/work/to do/delete.
Step 2: Make Keywords
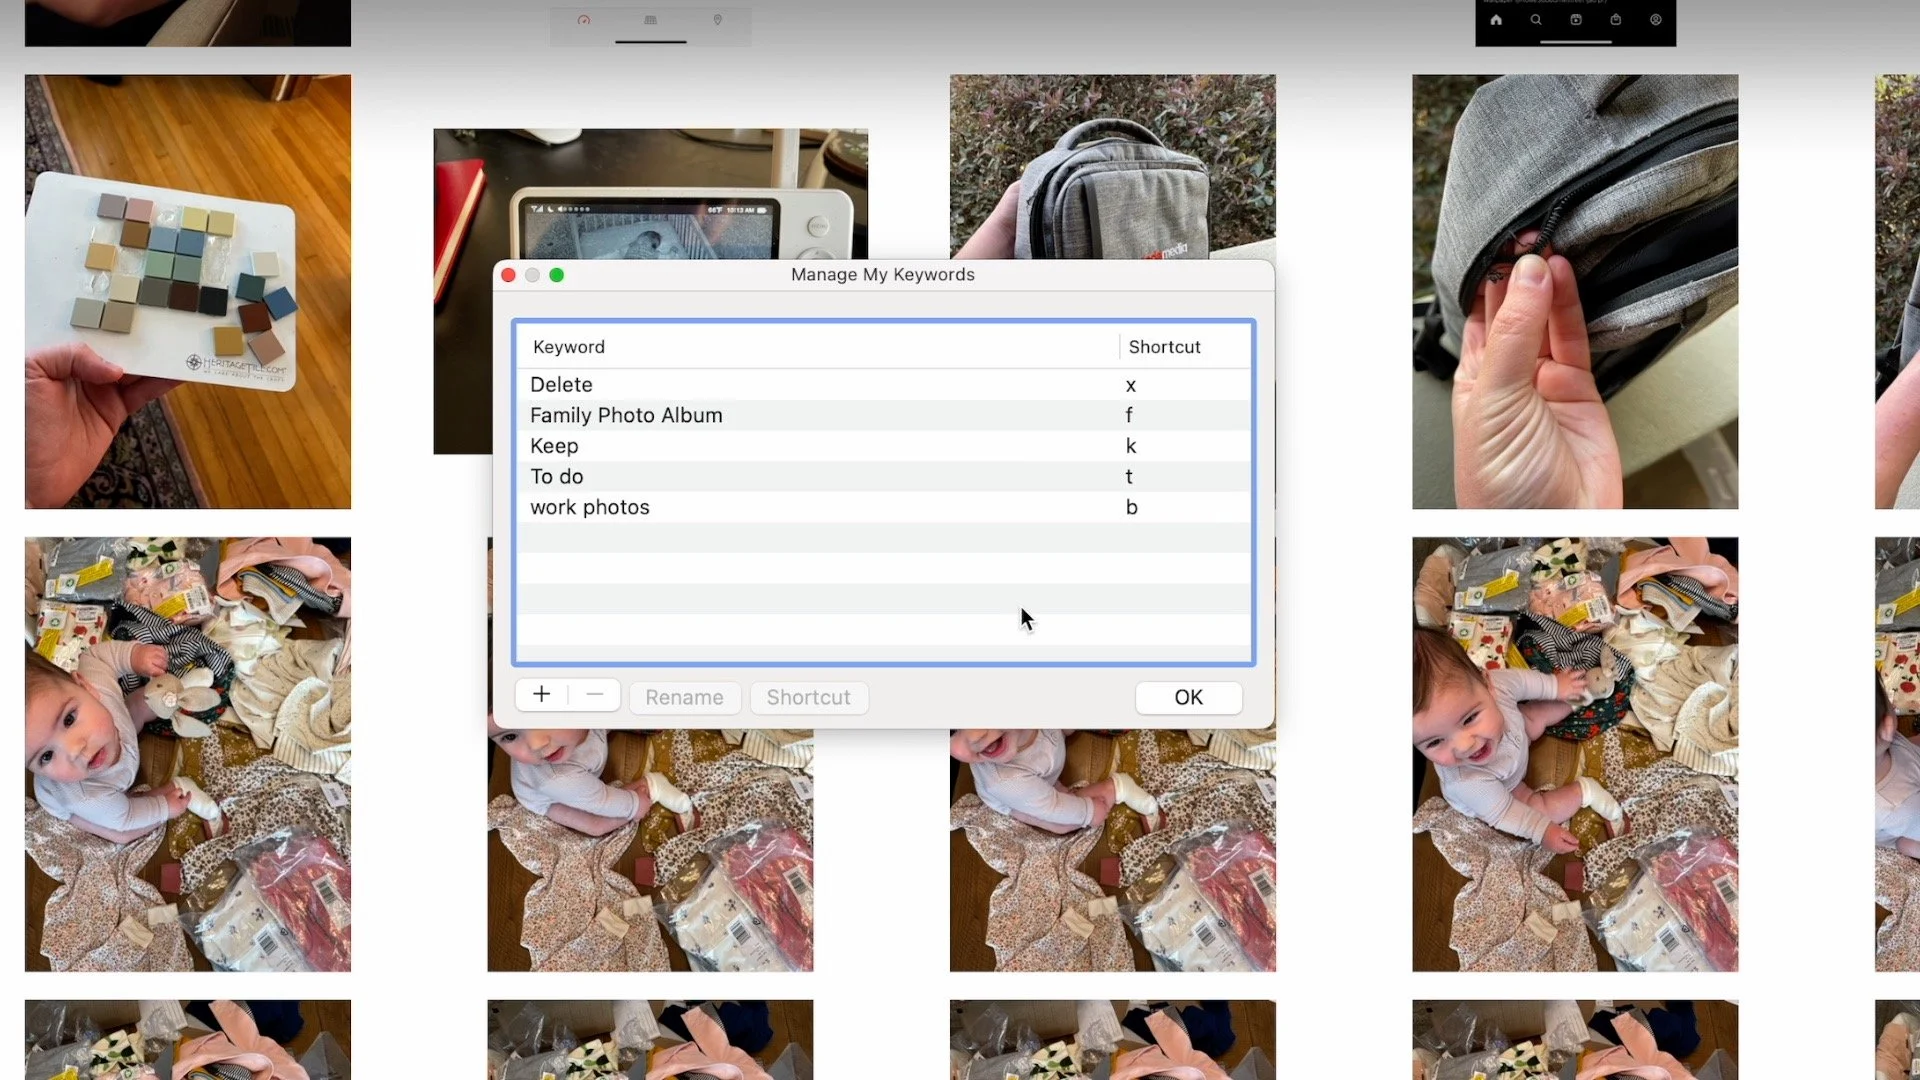
Okay, let’s actually get to work. Open up the native Photos App on your Mac. Go to Window> Keyword Manager and set up a keyword for each category. Then, assign a shortcut for each keyword. I HIGHLY recommend using shortcuts on the left side of your keyboard so your right hand can focus on using the mouse or arrow keys, and your left hand stays planted on the left doing just the shortcuts (you’ll see this in action soon).
I show you how to do this in the video at the 3:00 mark.
Step 3: Make Smart Albums
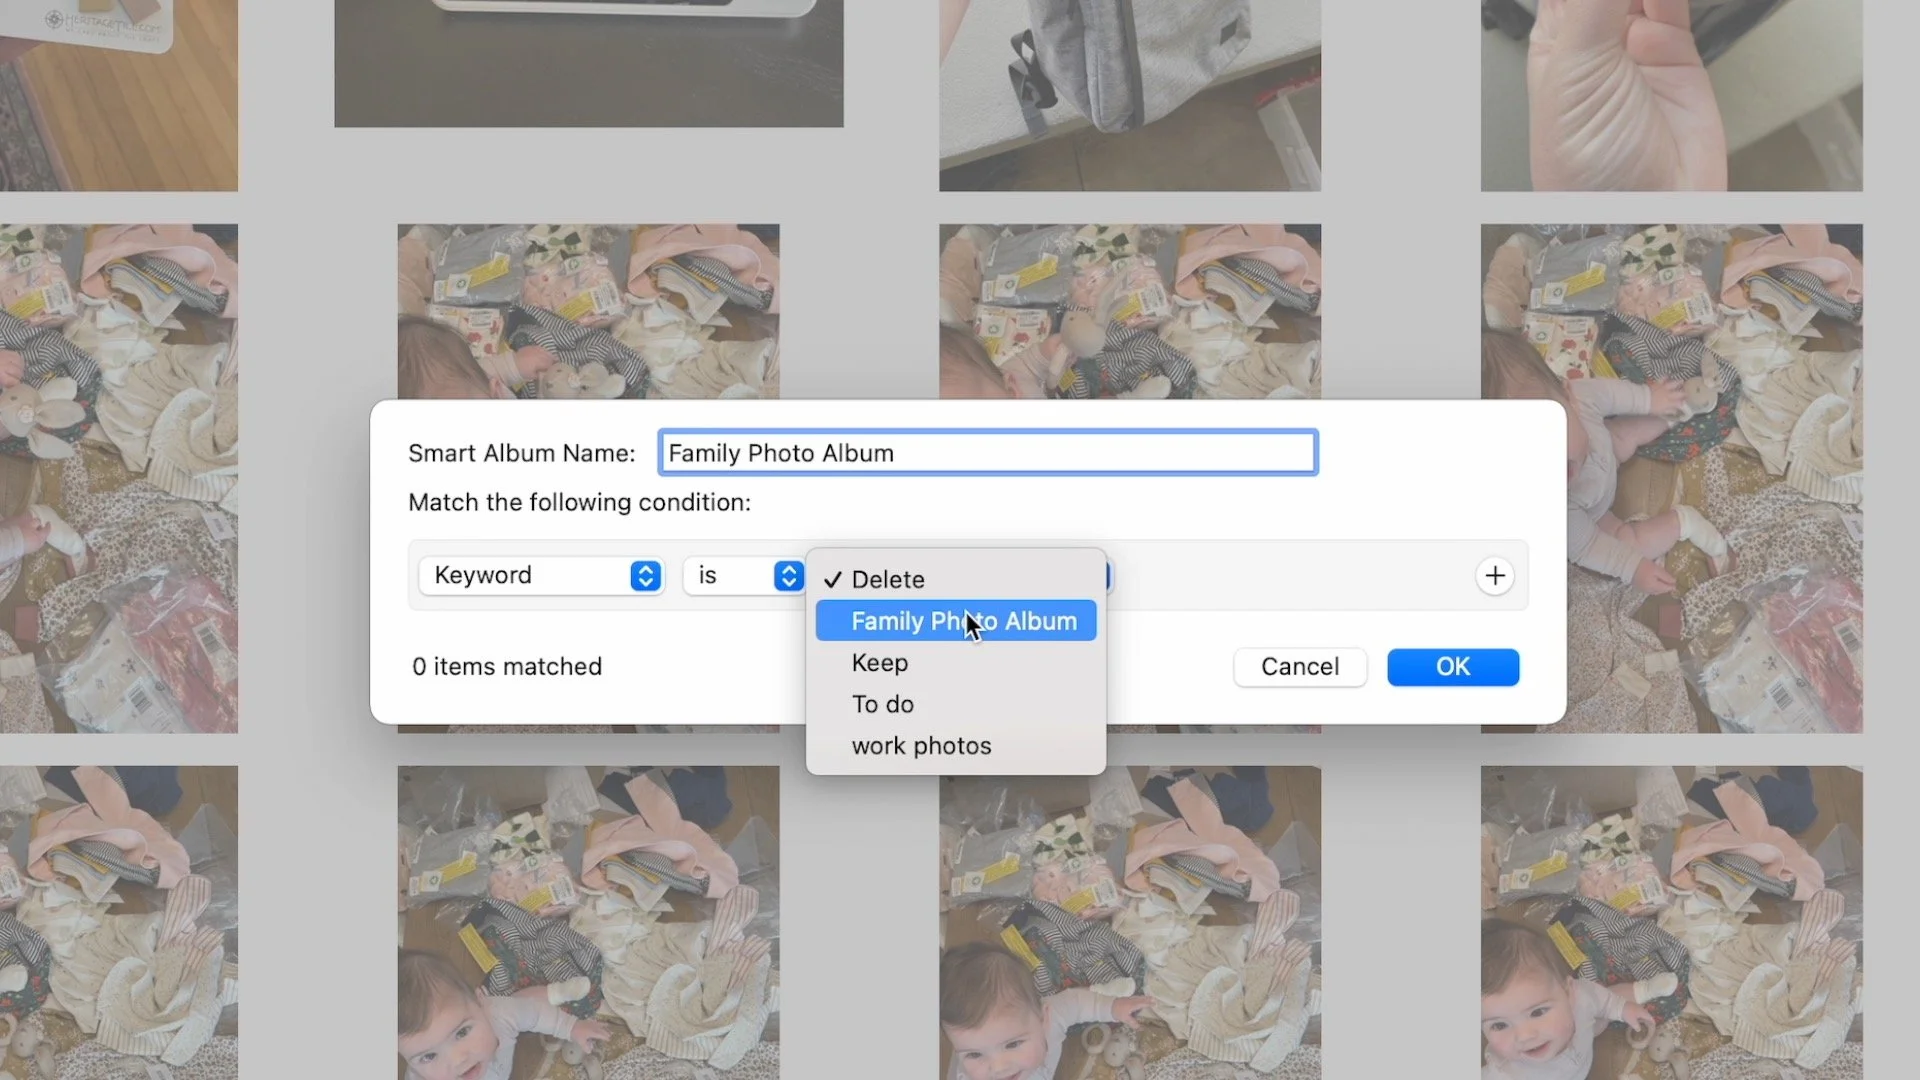
Create a Smart Album (not regular albums) for each keyword and name it that keyword. Set up the condition: “Keyword” “is” “the keyword you named” and repeat this for each of your keywords
I show you how to do this in the video at the 3:50 mark.
Step 4: Make a Culling Smart Album
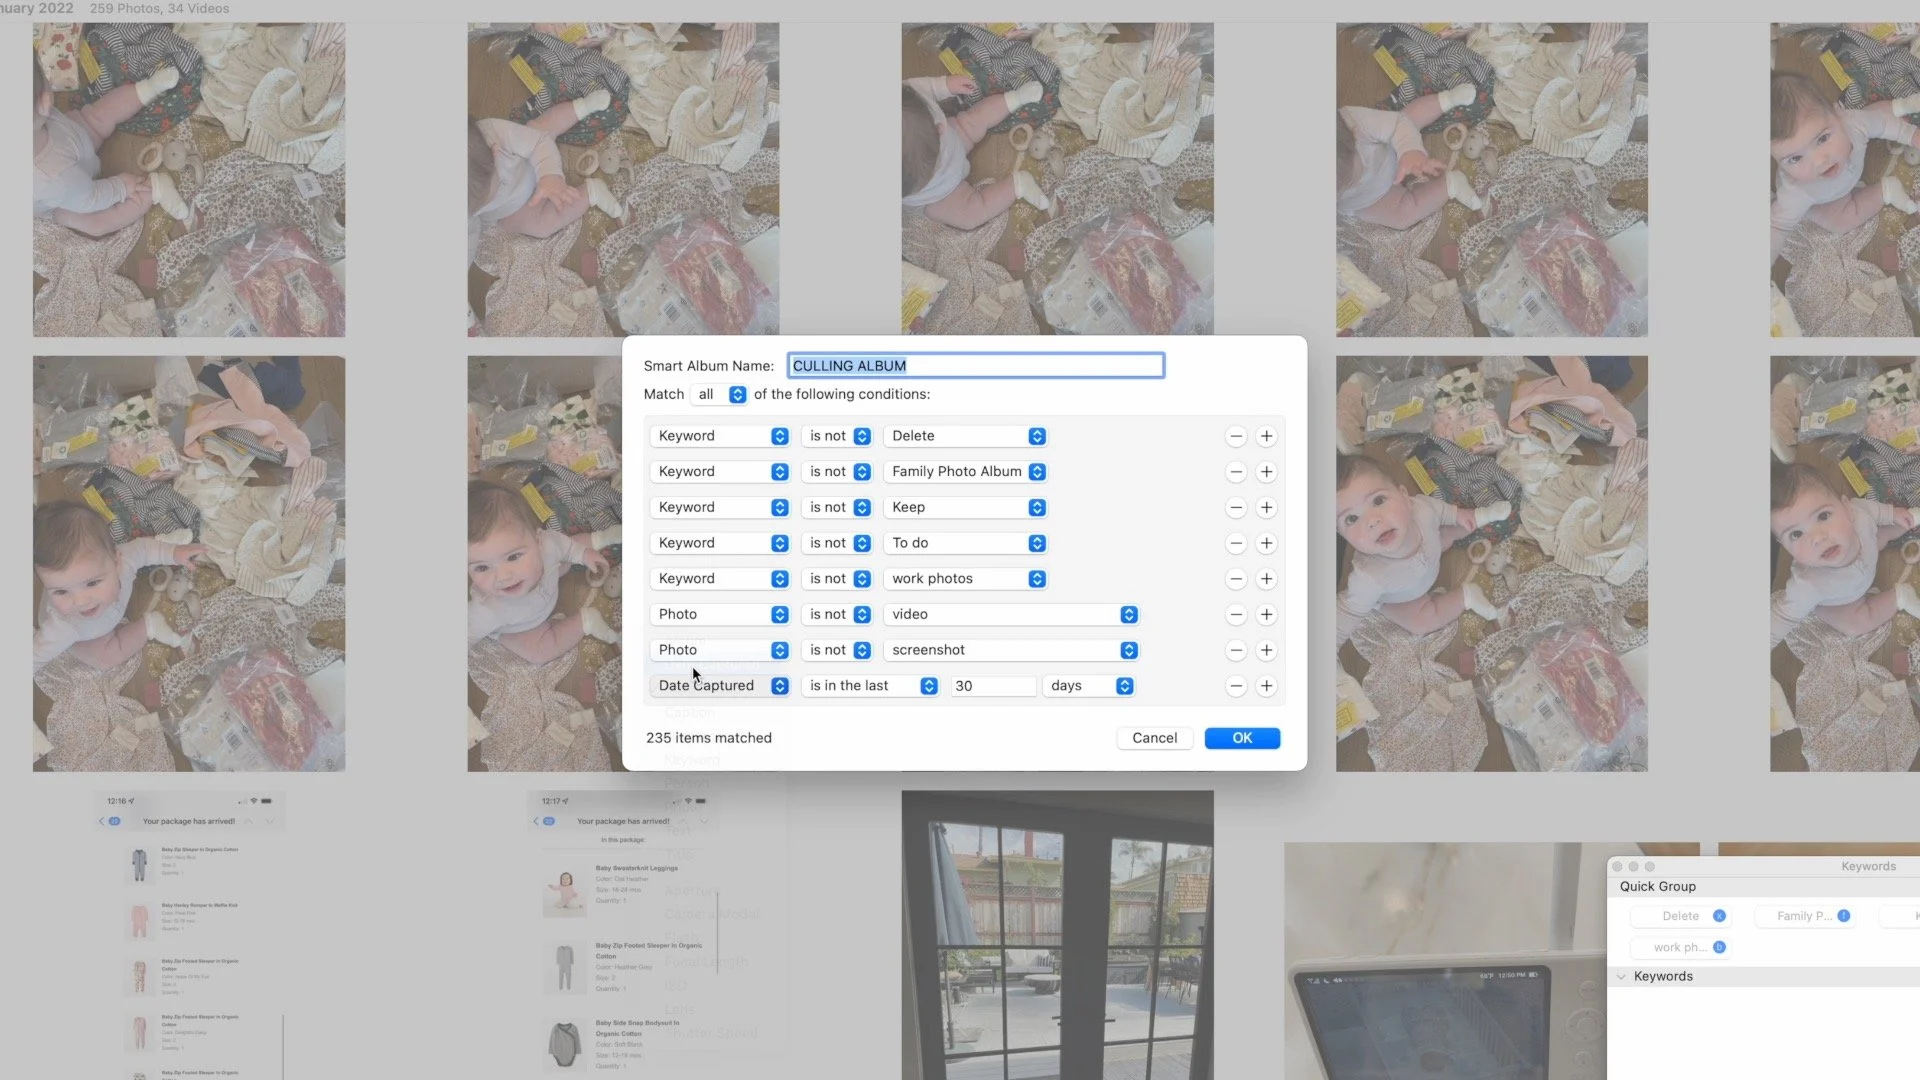
Create one more Smart Album, call it “Culling Smart Album” and set up conditions to EXCLUDE each of your keywords. Set up parameters, too. I like to start with no videos, no screenshots, and a limited time frame such as one month. (You’ll later adjust the parameters as you complete a set.)
I show you how to do this in the video at the 4:19 mark.
Step 5: Sort!
Make sure the Keyword Window is open or the software won’t work. Move it to the corner of your screen since you don’t need to look at it. Go into the “Culling Smart Album”, and assign a category to EACH image by clicking the corresponding keyboard shortcut. Use your left hand on the keyboard and your right hand on the arrow keys (or mouse) to go through the photos swiftly.
As you assign a keyword, the photo will disappear. Don’t worry, the photo is still in your library! You just aren’t seeing it because we designed this Culling Smart Album to exclude the sorted photos. When you look in each of the keyword smart albums, you’ll see your sorted photos. Yet within the Culling Album, all you see is the work you have yet to do - there’s no guessing if you already sorted a photo or not.
I show you how I do this in the video at the 6:12 mark.
The whole point of assigning keywords and smart albums is to make the sorting super efficient. Let the computer work for you by tapping away at the keyboard shortcuts quickly! If a few photos need closer inspection to assess the quality or to pick a favorite, skip them and return to them later. As you go through the process, you’ll get faster at culling and better at spotting the special photos.
Remember, if the issue is that you have too many photos that prevent you from enjoying the special ones, then be ruthless with deleting the excess! Delete delete delete! Enjoy seeing the number of photos decrease - It’s helping you create a collection of photos to treasure, not trudge through.
When looking at a group of images that are nearly the same, aim to keep only one (maybe two). In a series of duplicate photos, the ones near the end are always the best, by nature, so start with the newest photo and work your way to older. I always start culling by looking at the most recent photos and going back in time.
It may take time learning which photos to delete and which to keep. I recommend trying to think, “If I could have only one photo from this family outing, which one would it be? What mood would I want to capture from the day? Which photo would Margot take to show-and-tell? Which photo will I want to look back on in 20 years? Which photos are worth paying to print? Would I hang this photo on my wall, send it to a grandparent, set it as a screensaver?” Then, delete the ones that don’t fit those goals.
Keep in mind your goal for organizing your photos and stick to it. My goal is to make a collection of photos I love dearly that I’ll want to print in a photo album. I focus on getting a small collection of print-worthy photos and try not to get distracted with the other images.
Sub Sort
Once the photos are sorted, you can go through each smart album and do with them what you need to.
I’ll look through the family smart album and make sure they’re only the best photos worthy of printing. If any aren’t as good, I’ll move them to the “keep” album by assigning that keyword then removing the “family” keyword. (be sure to do so in that order or the photo will go back to the culling album then you’ll have to find it and assign it the “keep” keyword)
Delete the photos in the delete folder. This is key!! Remember the photos you assigned to be deleted aren’t actually in your trash, so you’ll need to move them there to actually reduce your library of photos.
Tackle the photos in the to-do folder by either doing them or exporting the photos elsewhere or writing them in a to-do list. Once you do the task, delete the photos!
Finally, expand your parameters. Widen your timeframe and assess all of the photos from the year. I like to start with the most recent month, then the month prior, and so on. Then, tackle those videos and screenshots. Keep adjusting the culling album to contain a new batch of images and repeat the process until you’ve culled all of the photos you want to cull.
Step 6: Edit
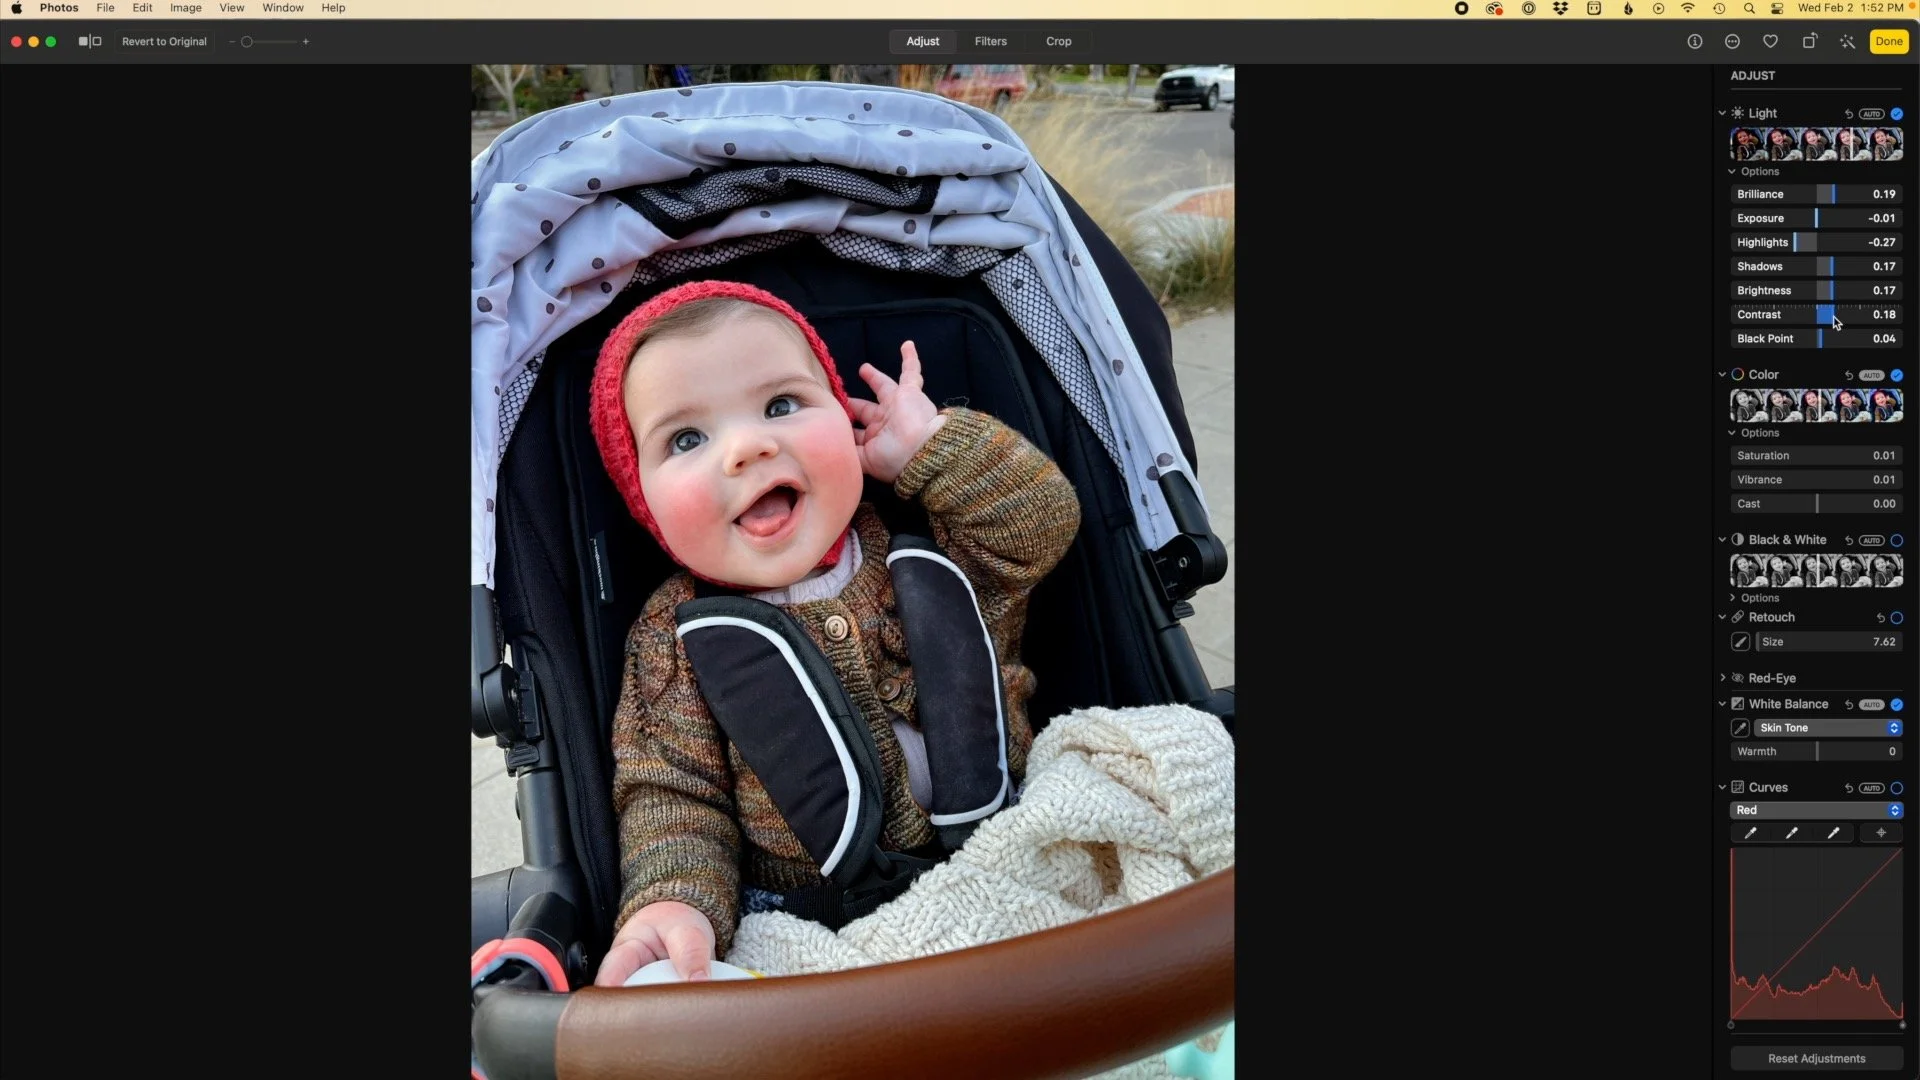
Now that you’ve reduced your photos from thousands to hundreds, you can color correct a smaller number of images. I’m ONLY going to edit the photos that I’m printing in an album!
When editing, keep the photos in the Photos app to maintain the categorizing you did, and to retain the metadata (the location, time, date, etc.). To do this, you can simply edit using the Photos app editing tools (they’ve gotten quite good - even the auto color correct tool!). Or, if you need more robust editing software like Photoshop, right-click the image then select “Edit With” and then the application. I don’t recommend exporting the photo, importing to another application, exporting it, then re-importing it back into Photos. It’s cumbersome, messy, and you can lose quality and metadata.
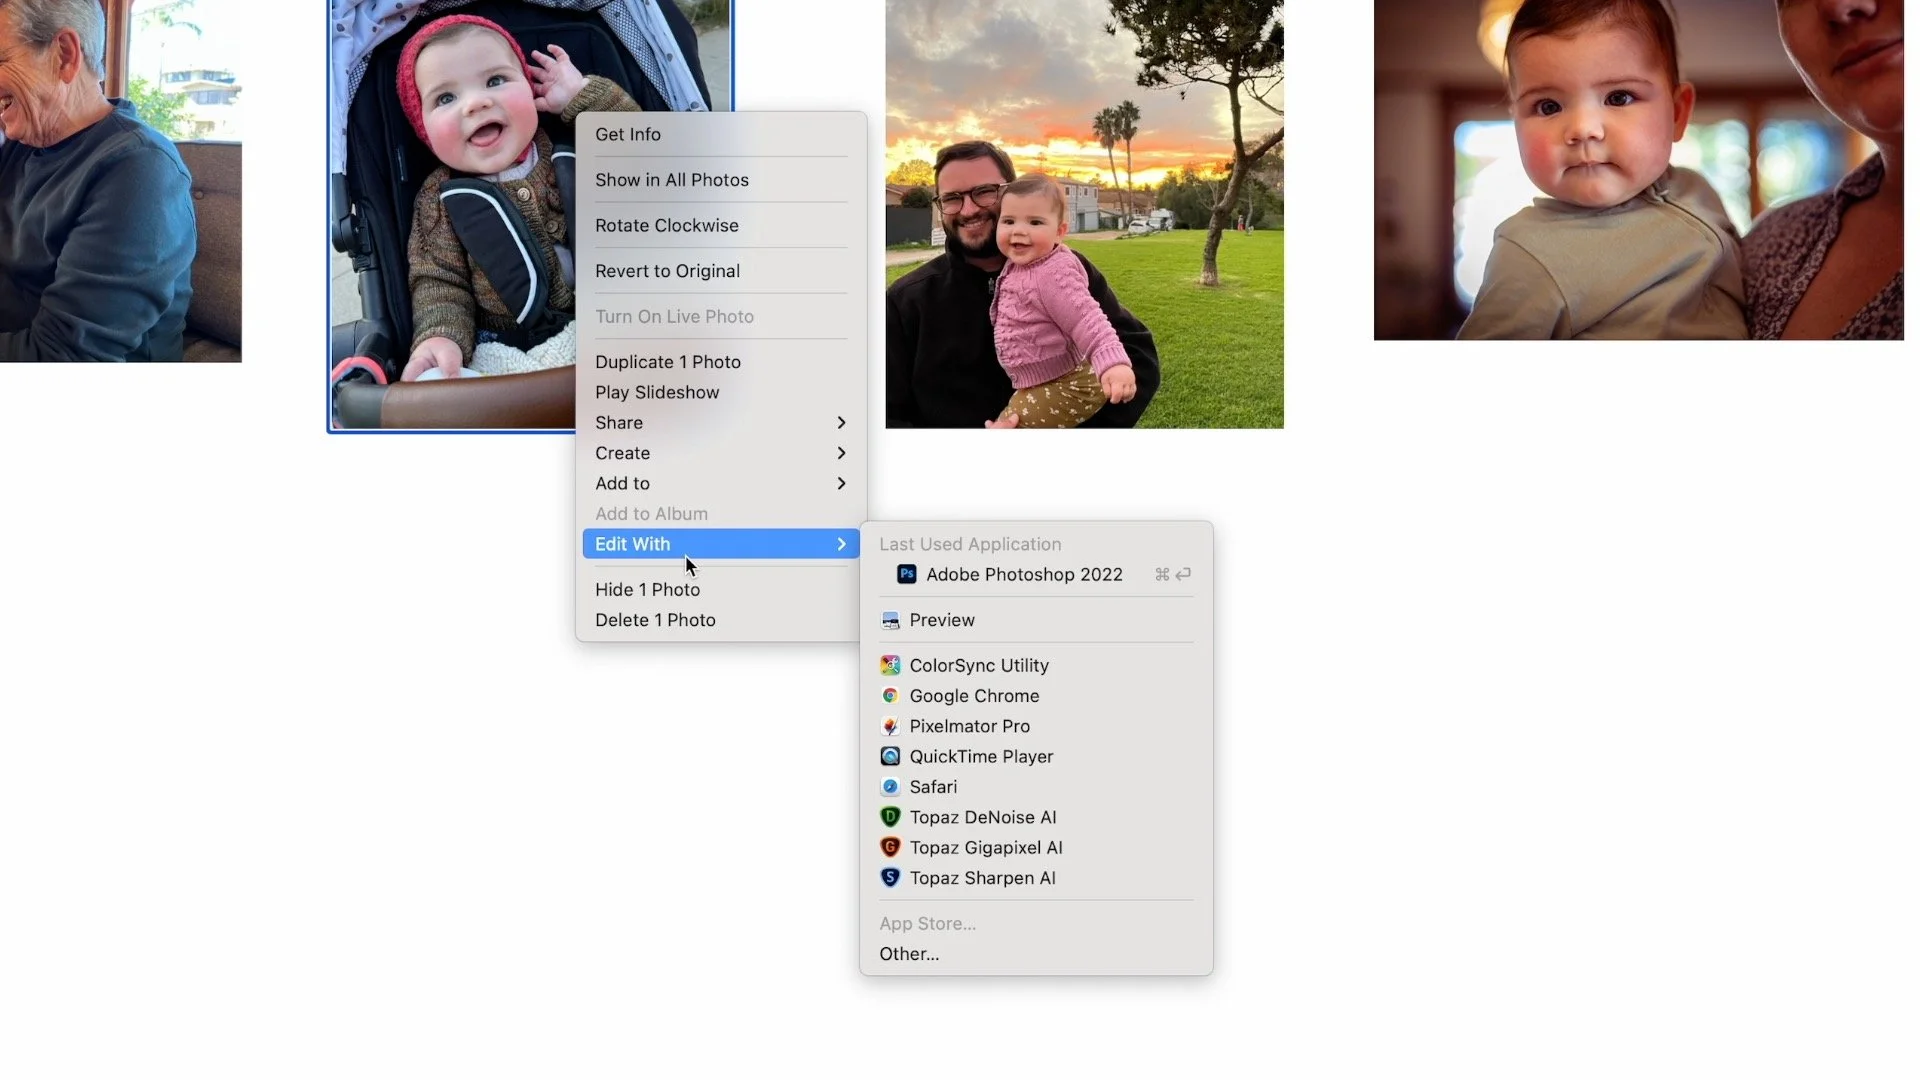
If you're looking for a photo editing software that isn’t pricey like Photoshop, try Pixelmator Pro instead!
Now what?
Now that you’ve done all the work to sort photos into Smart Albums, I hate to tell you this, but you can’t see those albums on your iPhone. I know, I know! *shakes fist at Apple!* Instead of being disappointed, think of Smart Albums as just an organization tool, not the way you keep your photos stored long-term.
The solution is to make a regular album, then drag the photos from the Smart Album into it. Do this at the end of your organization process in whatever fashion you want! I’m going to make a “2021 family photos” album and drag all of the special photos into that album so I can go straight to those special photos quickly.
Or! Don’t bother with a bunch of albums at all! Just enjoy your library that’s now free of duplicates and clutter. You can use the built-in features in the Photos app (which is also on your phone!) to comb through your photos.
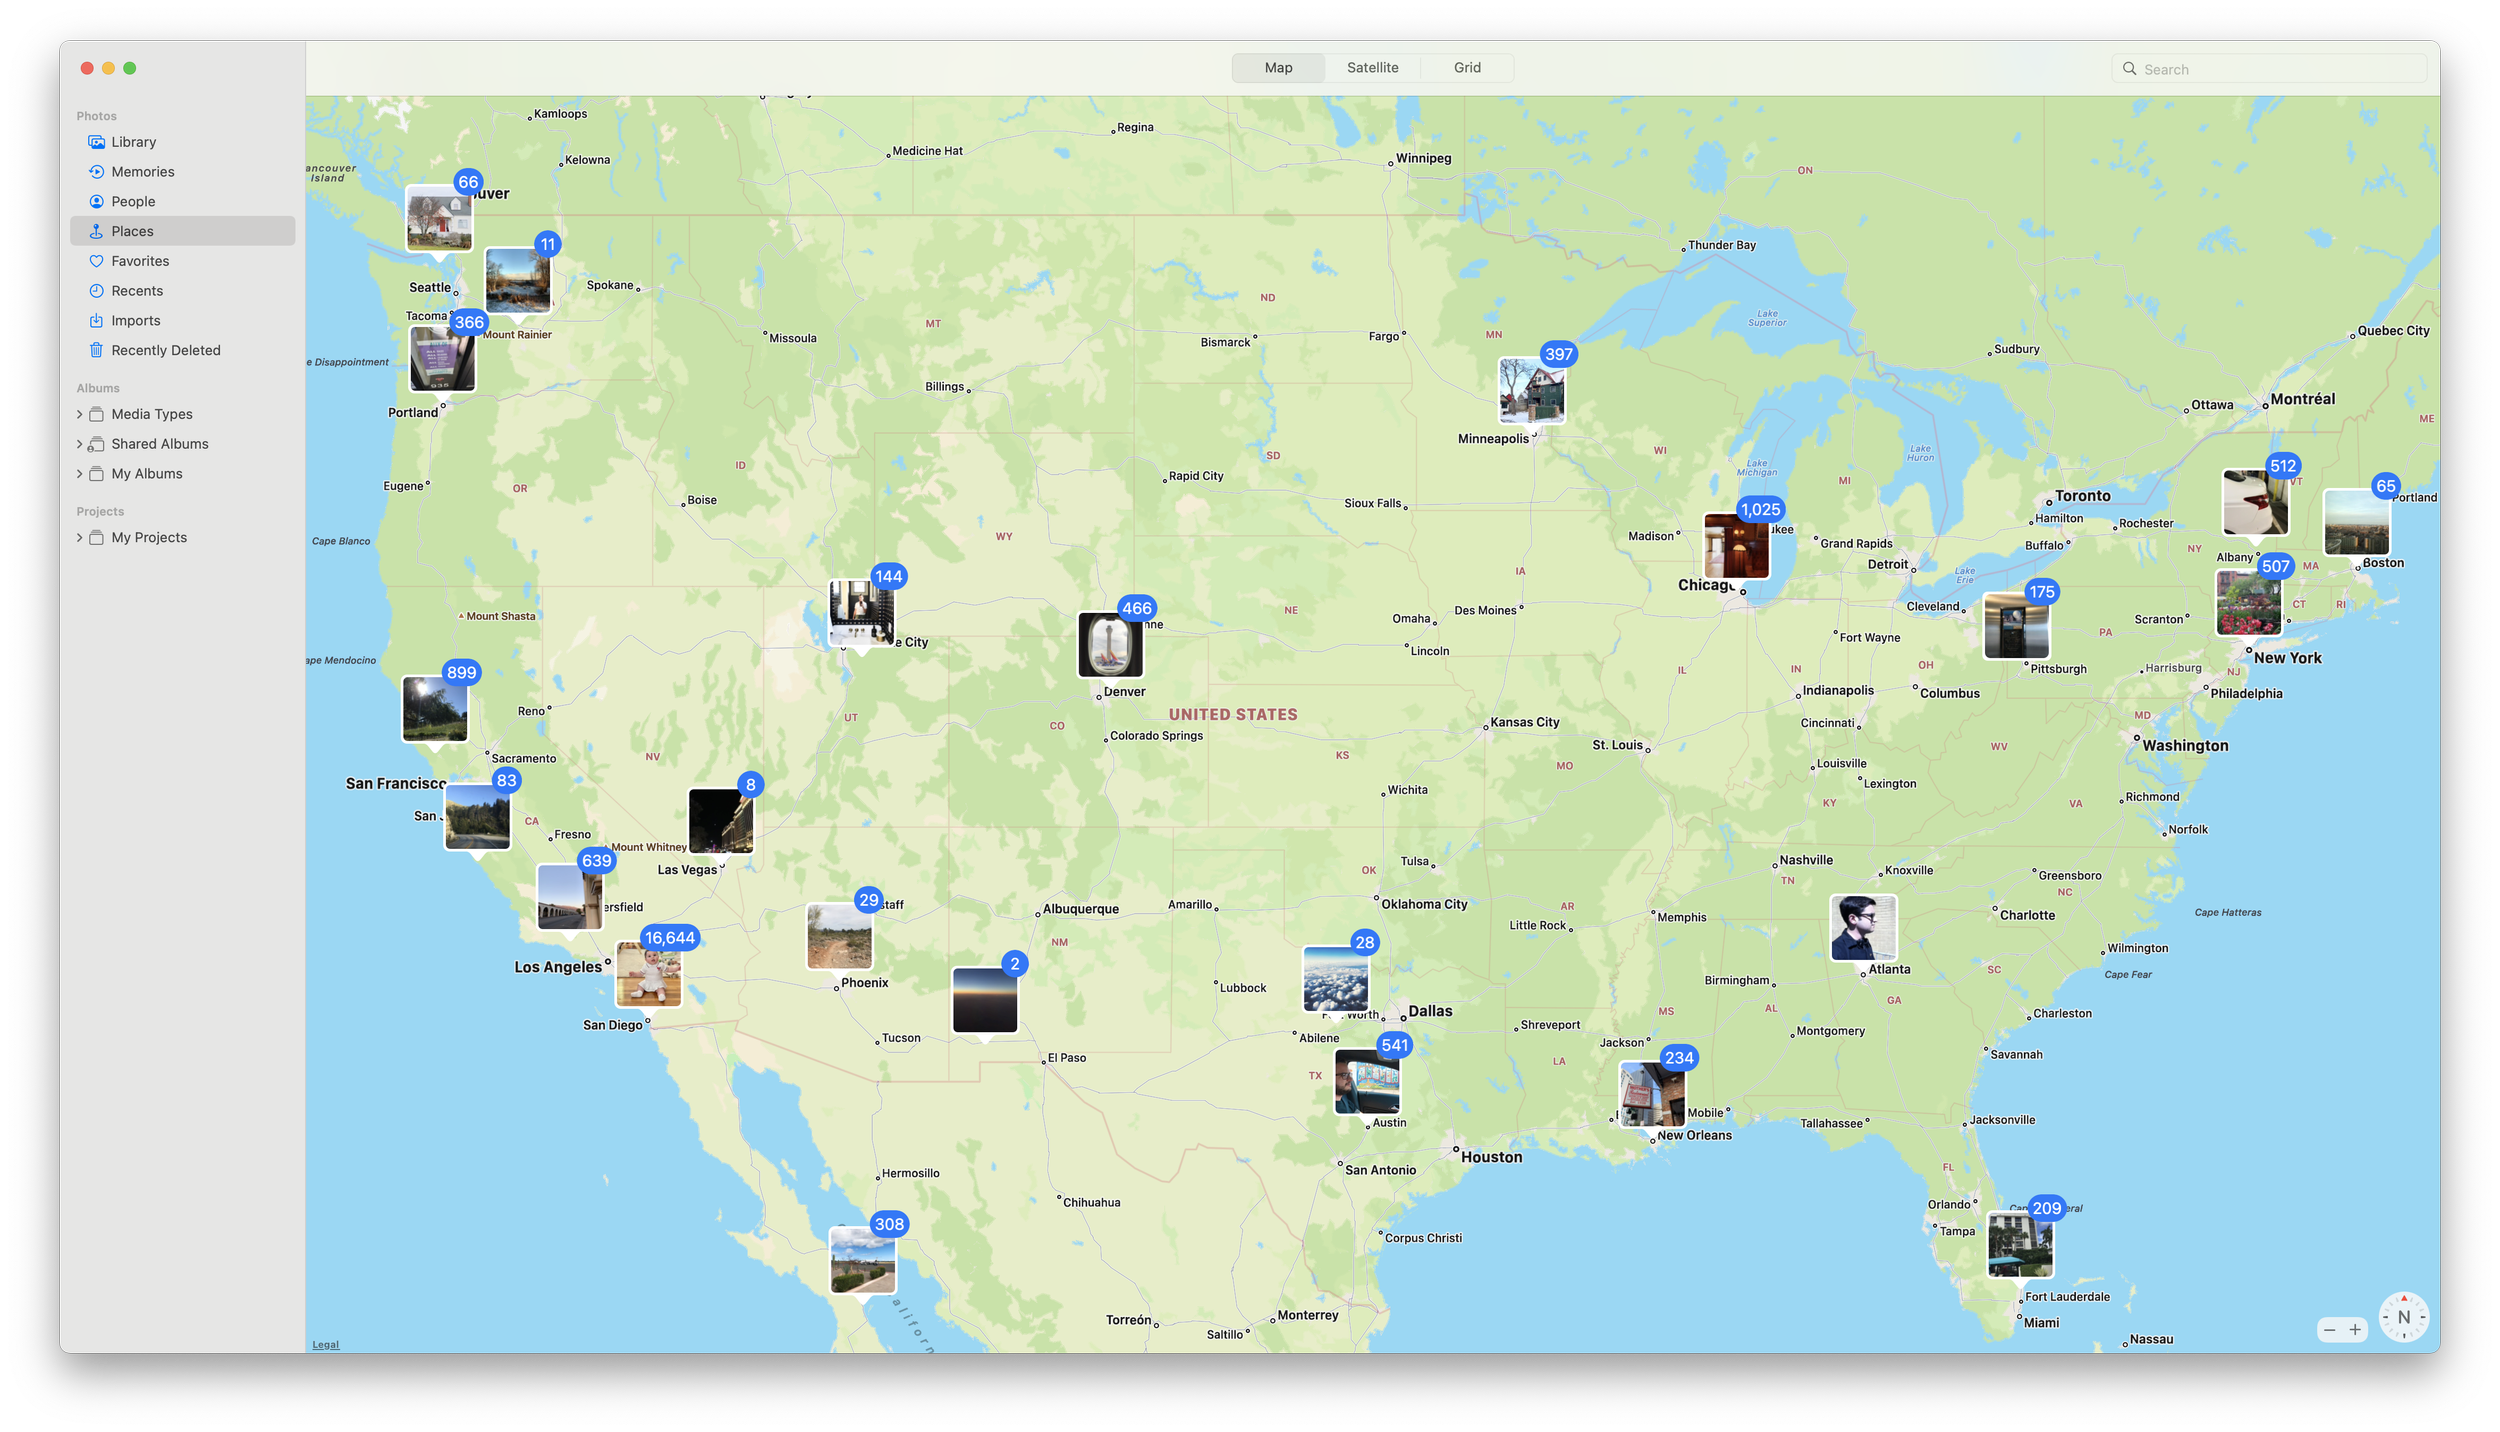
Instead of making an album of photos from your Palm Springs vacation, just click on “Places”, and zoom in to Palm Springs. Or, type “Palm Springs” and “2018” into the search bar within the Photos app to see all of those images. You can even type “flowers palm springs” to fine-tune what you’re looking for.
At the end of the process, I’m rewarding myself with a printed photo book of Margot’s first year from Artifact Uprising. Now that the photos are refined to just my favorites, I can drag the whole bunch of them into a photo book printing service and even have it automatically layout the book design for me. Easy peasy.
So, now, it’s up to you on how you want to keep your photos organized long-term. I’ve made a calendar reminder to sit down and do this process monthly.
I’m very aware of how laborious this process is, so I keep it in mind while I’m taking photos. I definitely deleted more photos than I kept, so I’m going to make an effort to photograph less. Of course, I don’t want to miss taking a great photo of my daughter, but I also don’t want to spend a week of her life at my computer organizing photos of her. I’m vowing to take fewer photos of landscapes without people in them, no more photos of rainbows, and fewer photos without a context of a special setting.
I hope this is helpful! Please leave any tips of your own in the comments to help everyone organize their photos! If you know how to do the keywords and smart albums on a Windows computer, please share in the comments!
Happy organizing and happy photo enjoying!
2023 UPDATES:
1. If you'd like to do any of your culling on your phone, I recommend the app Slidebox. It does the same thing as my system, but on the phone! Wish I knew sooner.
2. Apple has since come out with the Family Sharing photo option, which now lets me select all my family photos and move them to my "Shared Library" where my husband and I can both enjoy family photos without having to send duplicates to one another over text. I keep all my screenshots, work photos, reference images, misc. in my "Personal LIbrary." Easily separating my whole collection of photos into tow, and then culling each separately really helps! You can even automatically set up the phone to add all new photos you take to your shared album in real time based on the proximity to your partner (in our case, when my husband takes photos of our daughter when I'm nearby, it goes in the family shared library. If he's with her and I'm not around, he manually moves them over).