A DIY Kitchen Transformation Using Vinyl Floor Tiles + A Video Tutorial!
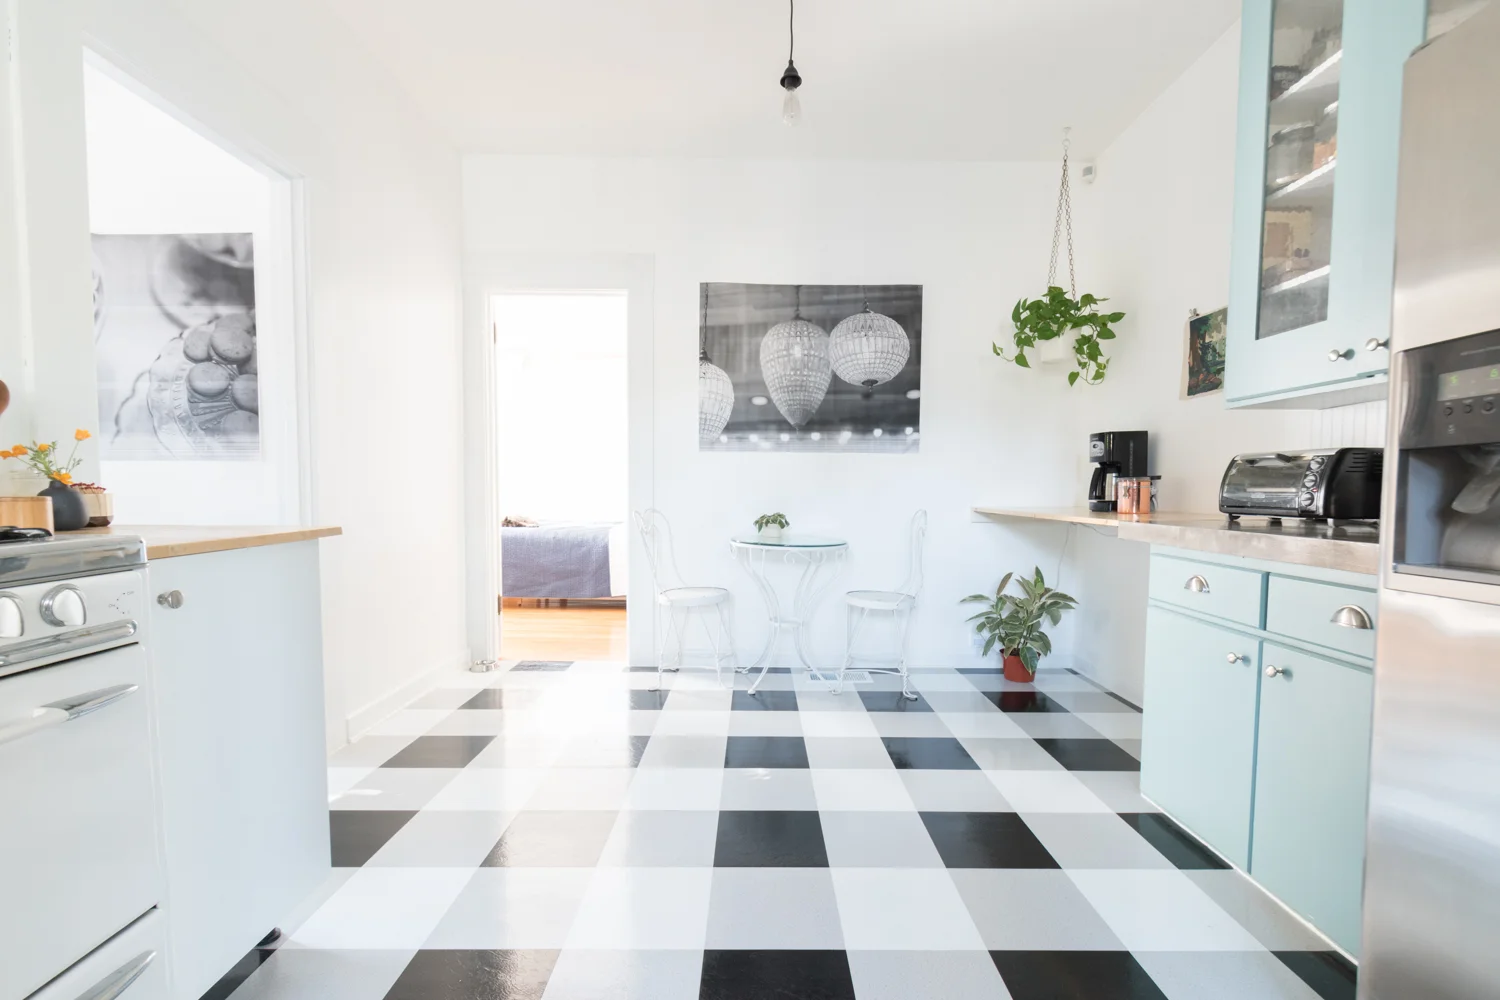
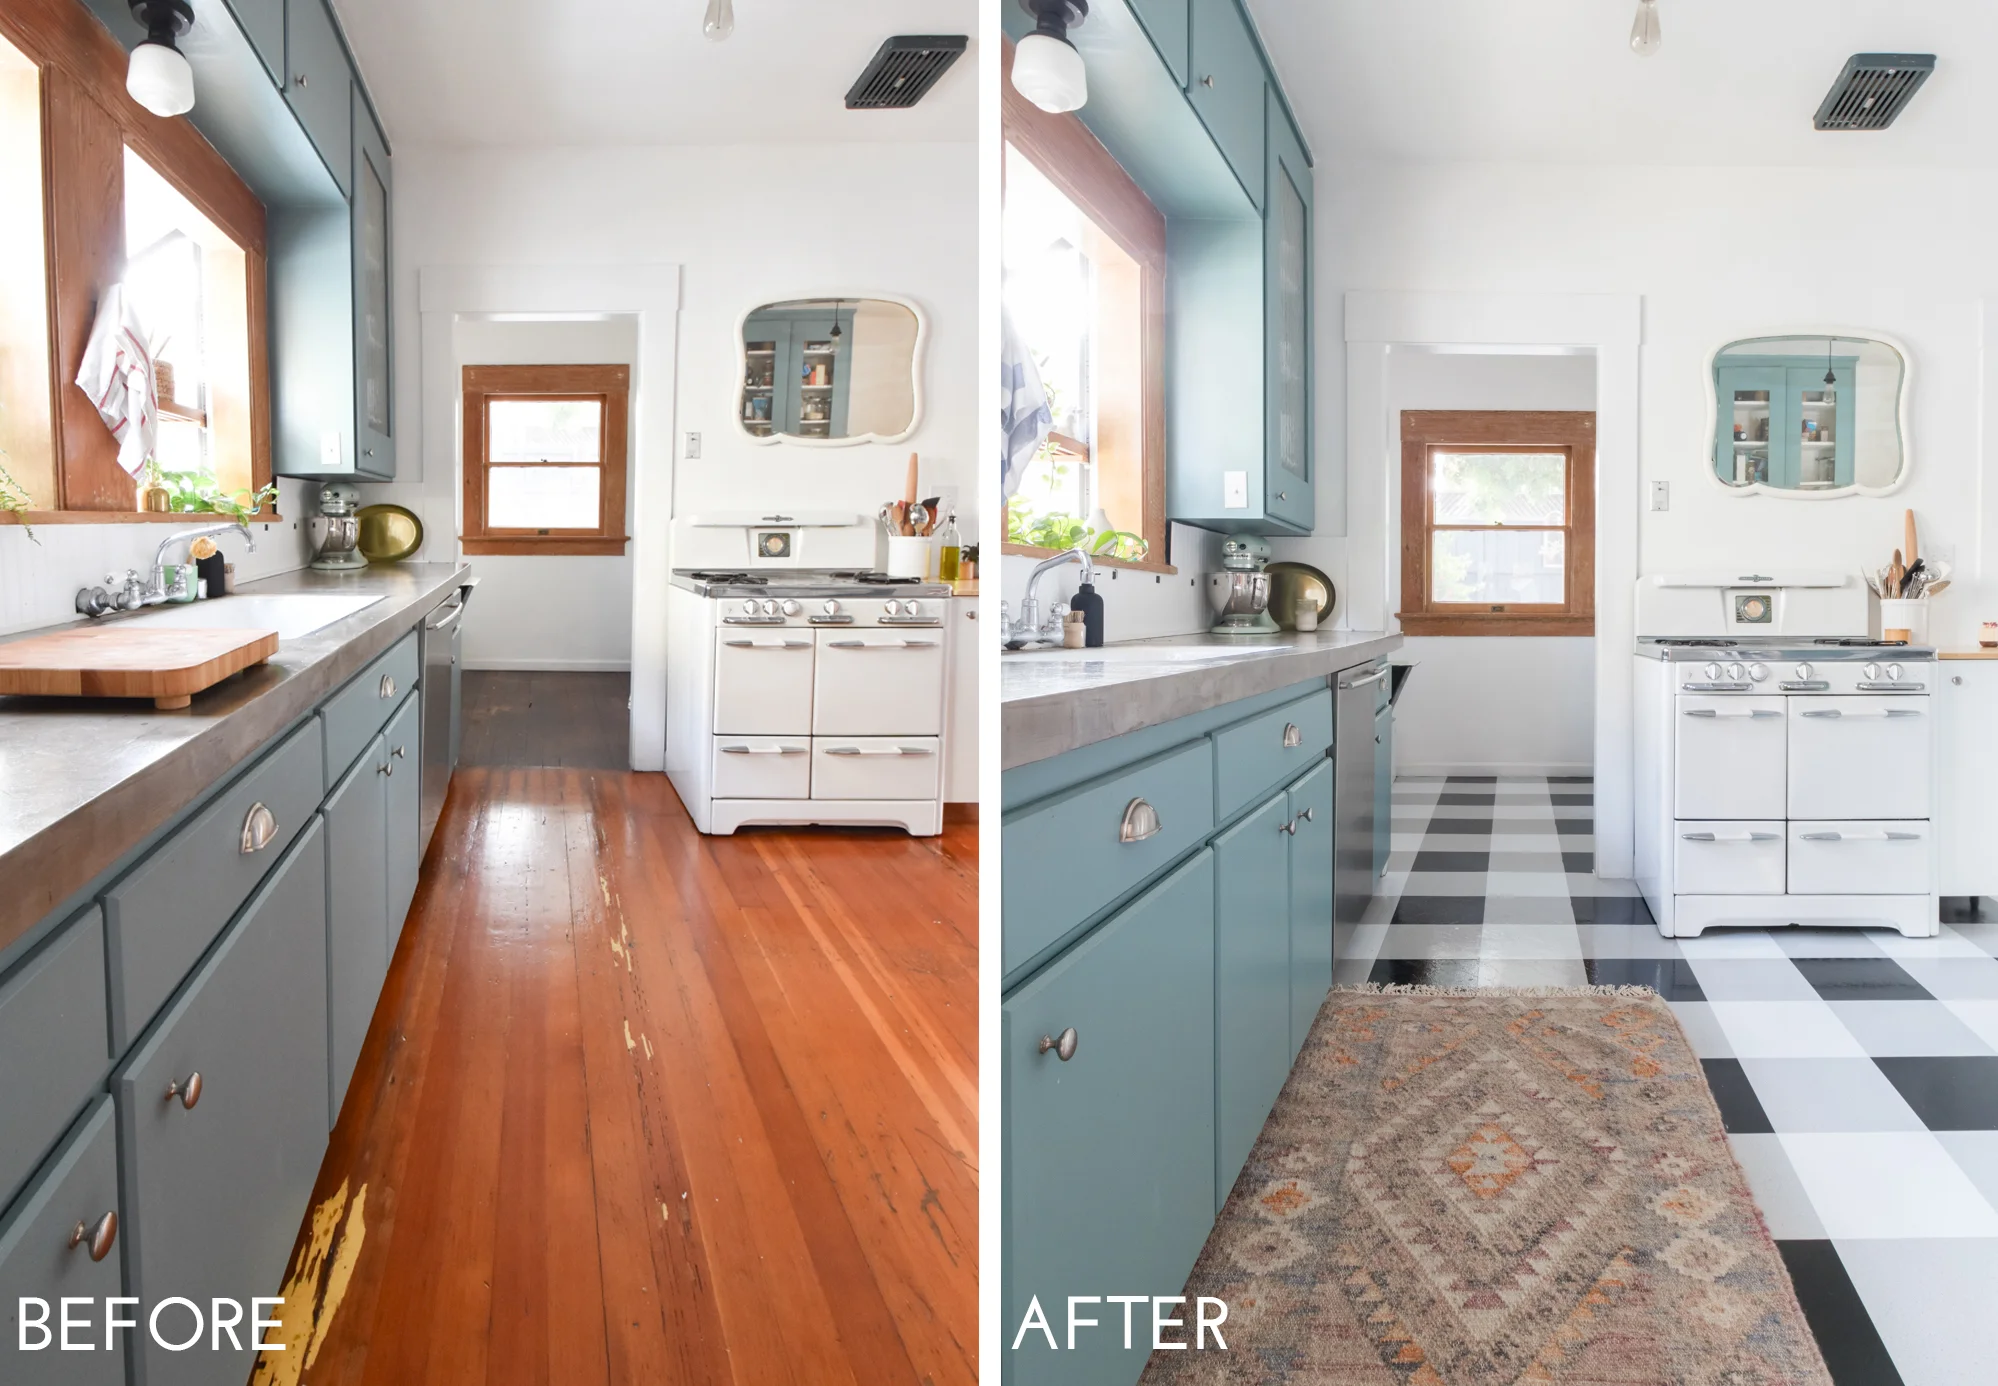
/The kitchen has seen a wild transformation! So far, I've shared the plans, the concrete counter DIY, and three tutorials for adding more work space - check out those posts here. But the floors! The new flooring made the kitchen into a wonderfully different space - a big improvement from the sad termite-filled fir. I couldn't have been more excited to get started on the quick/cheap/transformative project of giving my kitchen floors a fresh buffalo check pattern. This DIY kitchen transformation using vinyl floor tiles is among my favorites yet - and it costs about as much as it does to paint a room!
I made my first-ever video! Check out the video below to see the flooring tutorial which includes an über satisfying time lapse and a favorite song. Then, read below for the detailed step-by-step guide.
Watch the Video:

1. Prep: Simply vacuum and mop. Being sure to get into all of the corners and edges, give your floor a really good cleaning. The vinyl tiles will stick to whatever you put them on and the goal is to stick them to the existing flooring, not the dirt or grease. If your floors are significantly damaged (like chipped, bubbled, or unlevel), I'd recommend taking more time during prep to resolve these issues. You may want to pull up the existing linoleum, scrape off uneven surfaces, or even level your floors. However, if you're doing this cheap and easy project as a stopgap like me, you can probably live with some of these irregularities if you keep in mind that the vinyl tiles aren't magic and you may see traces of your wonky floors.
2. Gather materials: I used Nexus Vinyl Floor Tiles in black, white, and grey. All are 12"x12" and are a thin 1.2mm thick. Any peel-and-stick tile should do the trick, but I chose these because they were the cheapest ($1/sqft!), and came in the colors I wanted for my pattern. Note that there are high-end vinyl floor tiles that can be grouted and have a much sturdier long-lasting finish. Check out the process and incredible transformation that Chris Loves Julia did in their Pittsburg kitchen remodel.
In addition to the tile, you'll need:
- Tape measure
- Speed square
- Straight edge (I used the side of my level)
- Utility knife

3. Measure: Planning exactly where the tiles will go is a critical step. For floors of all the same color, it is less crucial, but with patterned designs, you need to be mindful of how the edges will terminate. I laid out the tiles to do a rough plan of the flooring and instantly noticed that I didn't want full 12"x12" tiles at the edges of the cabinets. It made it look like I plopped the tiles on after the fact (which I was doing!). The solution was to cut them to around 6" wide to give the illusion of the tiles going underneath the cabinets.
In addition to considering how the tiles terminate at the cabinets, the edges where the tile transitions to walls and existing flooring are key. My kitchen had two points of entry where the flooring would transition from hardwoods to the new tile. It was important that these spots didn't have the floating-on-top-of-the-floor look, and even more important that the edges weren't 0.5" slivers of tile. Tiny pieces of tile on a threshold will most certainly get kicked up after lots of treading on them.
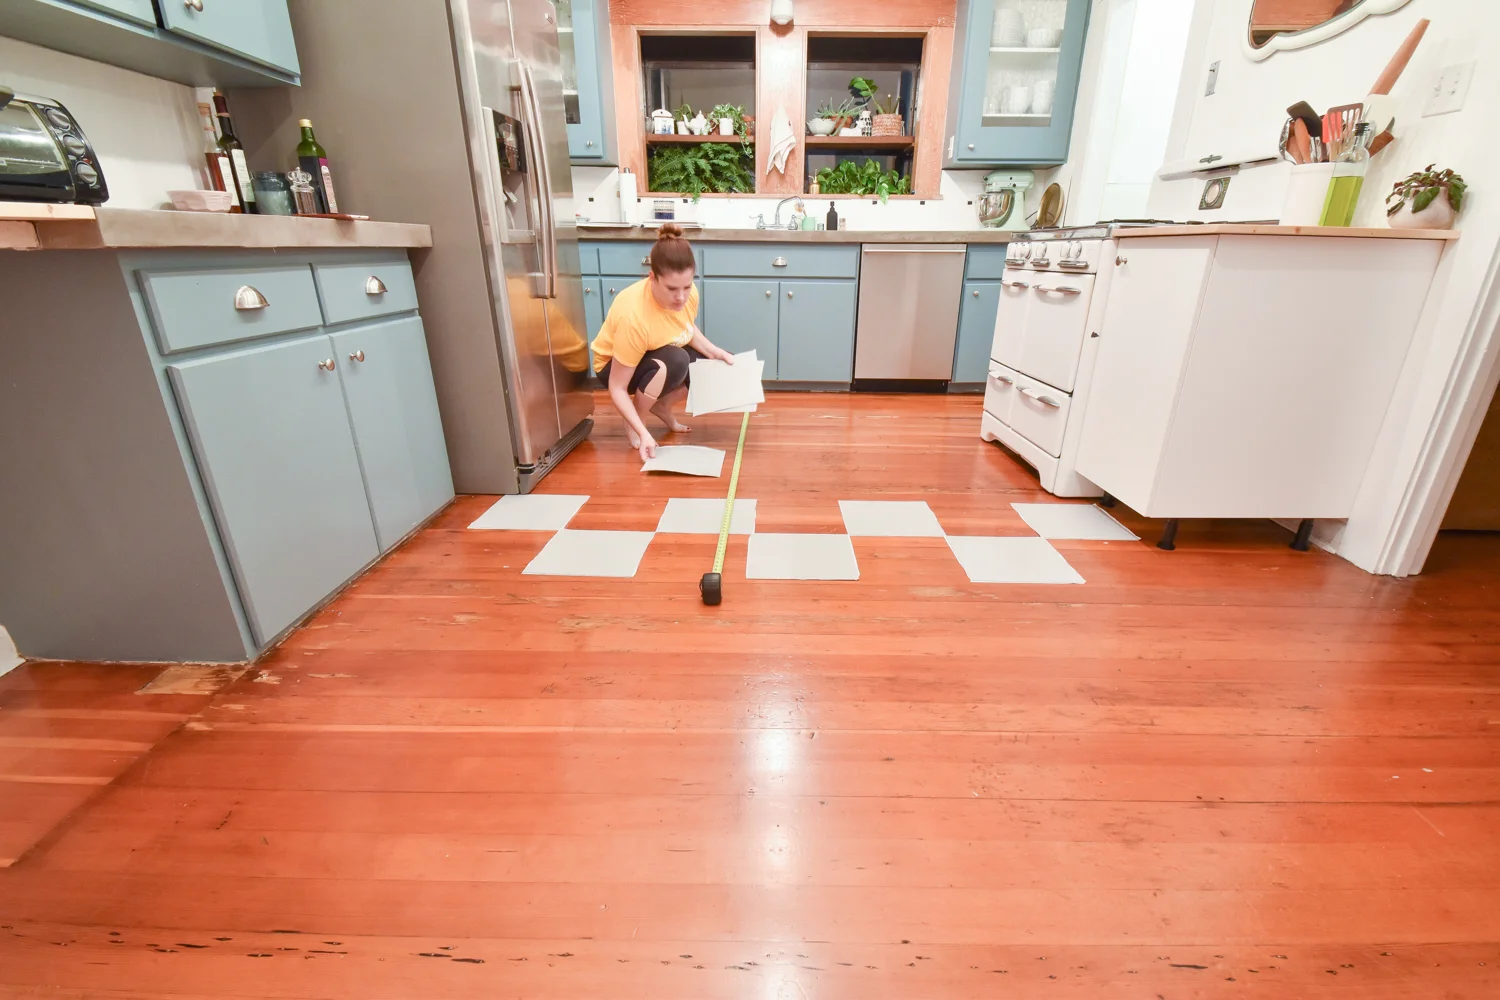
To make sure I avoided the two measuring concerns, I took the length of the kitchen and focused on just the last few inches that didn't make up a full foot. (Since the tiles are each a foot, I subtracted them from the equation.) The length I measured was 14'11", so I took the 11" inches and decided how I could use that amount to create two cuts on either side of the kitchen. Making each side 5.5" inches wide with 14 tiles in the middle was an easy solution. Then, I did this again in the opposite direction.
Once I knew how wide I wanted the edge pieces to be, I measured to find the middle of the kitchen floor. Since I'm a rule follower, I did as the packaging told me and started in the middle and worked my way out. If your kitchen has a different configuration, I fully support you starting at an edge. However, if the edge you butt your tiles up against, or the cut you made for your edge tile isn't perfectly square to the cabinets or prominent walls, you'll have a lopsided flooring pattern by the time you get to the other side.
4. Lay the tile: I placed the first tile in the center of the floor using the existing hardwood floors as my linear guide, since I used my speed square earlier to ensure the floorboards were, in fact, trustworthy. Then, I put the next tile adjacent to that one using the first tile's edges as a guide. I then spiraled out from the center. This provided me with corners as my guides, which maintained the pattern much better than had I gone in a stripe pattern.
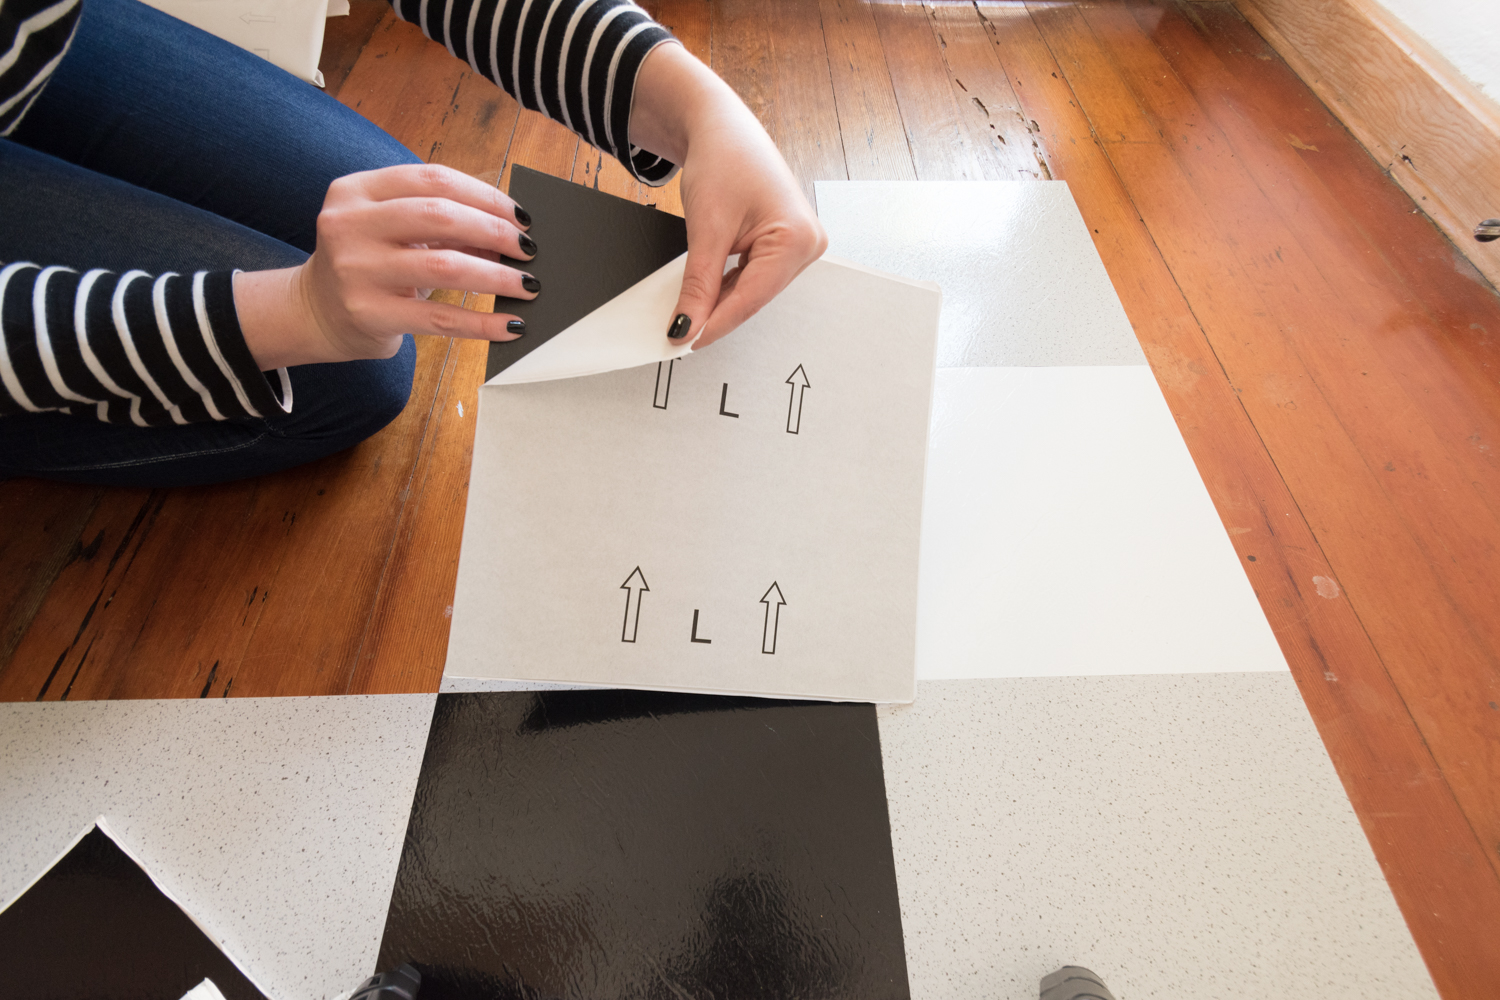
The application was incredibly simple. I just peeled off the back paper and placed the tile on the floor starting with the corner or edge guide, then rolled the rest of the tile down. The adhesive has some give to it, so I could tug on the tile to slide it close to the previous tile for a tight joint.

Being mindful not to mix up the colors in my pattern, I continued the spiral application until I got to an edge that would require a cut piece. I saved all cut pieces until the end primarily because I wanted instant gratification without slowing down for cutting and measuring. Also, I frequently came across tiles with dented corners that wouldn't have worked as full tiles, but I could cut off the damaged part and have a salvageable cut edge piece. I saved these in a pile to use later for cut pieces, which helped preserve the intact tiles for the main attraction. We have a pretty good amount of flooring in the kitchen, but placing the tiles went surprisingly quickly. Since there's no cleanup, I was also able to stop at this point and save cutting the edge pieces for another day.

5. Cut the tile: The vinyl was very easy to cut with a quick score and snap technique. The trickiest part was measuring and ensuring the cuts were square. To do this, I set up my cutting station on the counter and used the edge to line up the tile along with my trusty speed square. Keeping the tile squared to my two tools, I measured the length of tile needed, lined up the edge of my speed square to that mark, then butted up a straight edge to the speed square (since it was too short to go the length of the tile). I pressed firmly so nothing would budge, then gave a single score down the tile with a utility knife. No need to press hard. After scoring the tile, I folded it to snap the tile into two pieces.

When I got to spots needing multiple cuts to account for moulding or other floor obstructions, I followed the same steps as above. The only difference is the measuring is more meticulous, and the scoring/snapping technique is a touch more challenging - but totally doable! Any edges that didn't get a perfect cut can be filled in later with caulking to blend into the cabinets or baseboards.
For extra tricky cuts, I used one of the scrap pieces of paper from the back of a previous tile, then traced the door molding on the paper, then transferred the zig zag shape onto the tile to cut.

6. Get under appliances: Make sure the tile edges go partially under appliances and furniture pieces to give a clean continuous look. To do this, you'll need to move the appliances temporarily out of the way. Ross was out of town, so I used my brute strength to shimmy the fridge and stove out of the way. If you don't have room to slide appliances around, you can lift the appliance up a few inches, then have an assistant tuck a piece of scrap lumber underneath, so you can squeeze in your tile. Be careful when moving appliances that you don't kink any gas or water lines! Also be careful you don’t break your back - lift with your legs, people!

7. Clean up: There's nearly no clean up other than recycling the paper backings and tossing out the scraps. On a few tiles, the adhesive oozed out of the seams a couple of days later. You can use olive oil or goo gone to clean up these spots.
That's pretty much it! Super simple, relatively quick, and cheap!
If you didn't catch the video, you can watch it here. This is my first video tutorial! Tell me what you think of it?