Changing the Floor Plan of the House! + I Want Your Feedback!

I've spent the past three years trying to decide on a new layout for the back of our house. We've come up with lots of ideas, but there is ultimately always a compromise of some sort and we struggle with identifying what we want to give up on. I think we've solidified a plan, but I'm still not 100% so I want your feedback!

The Gold Hive Floor Planning for a Big Remodel

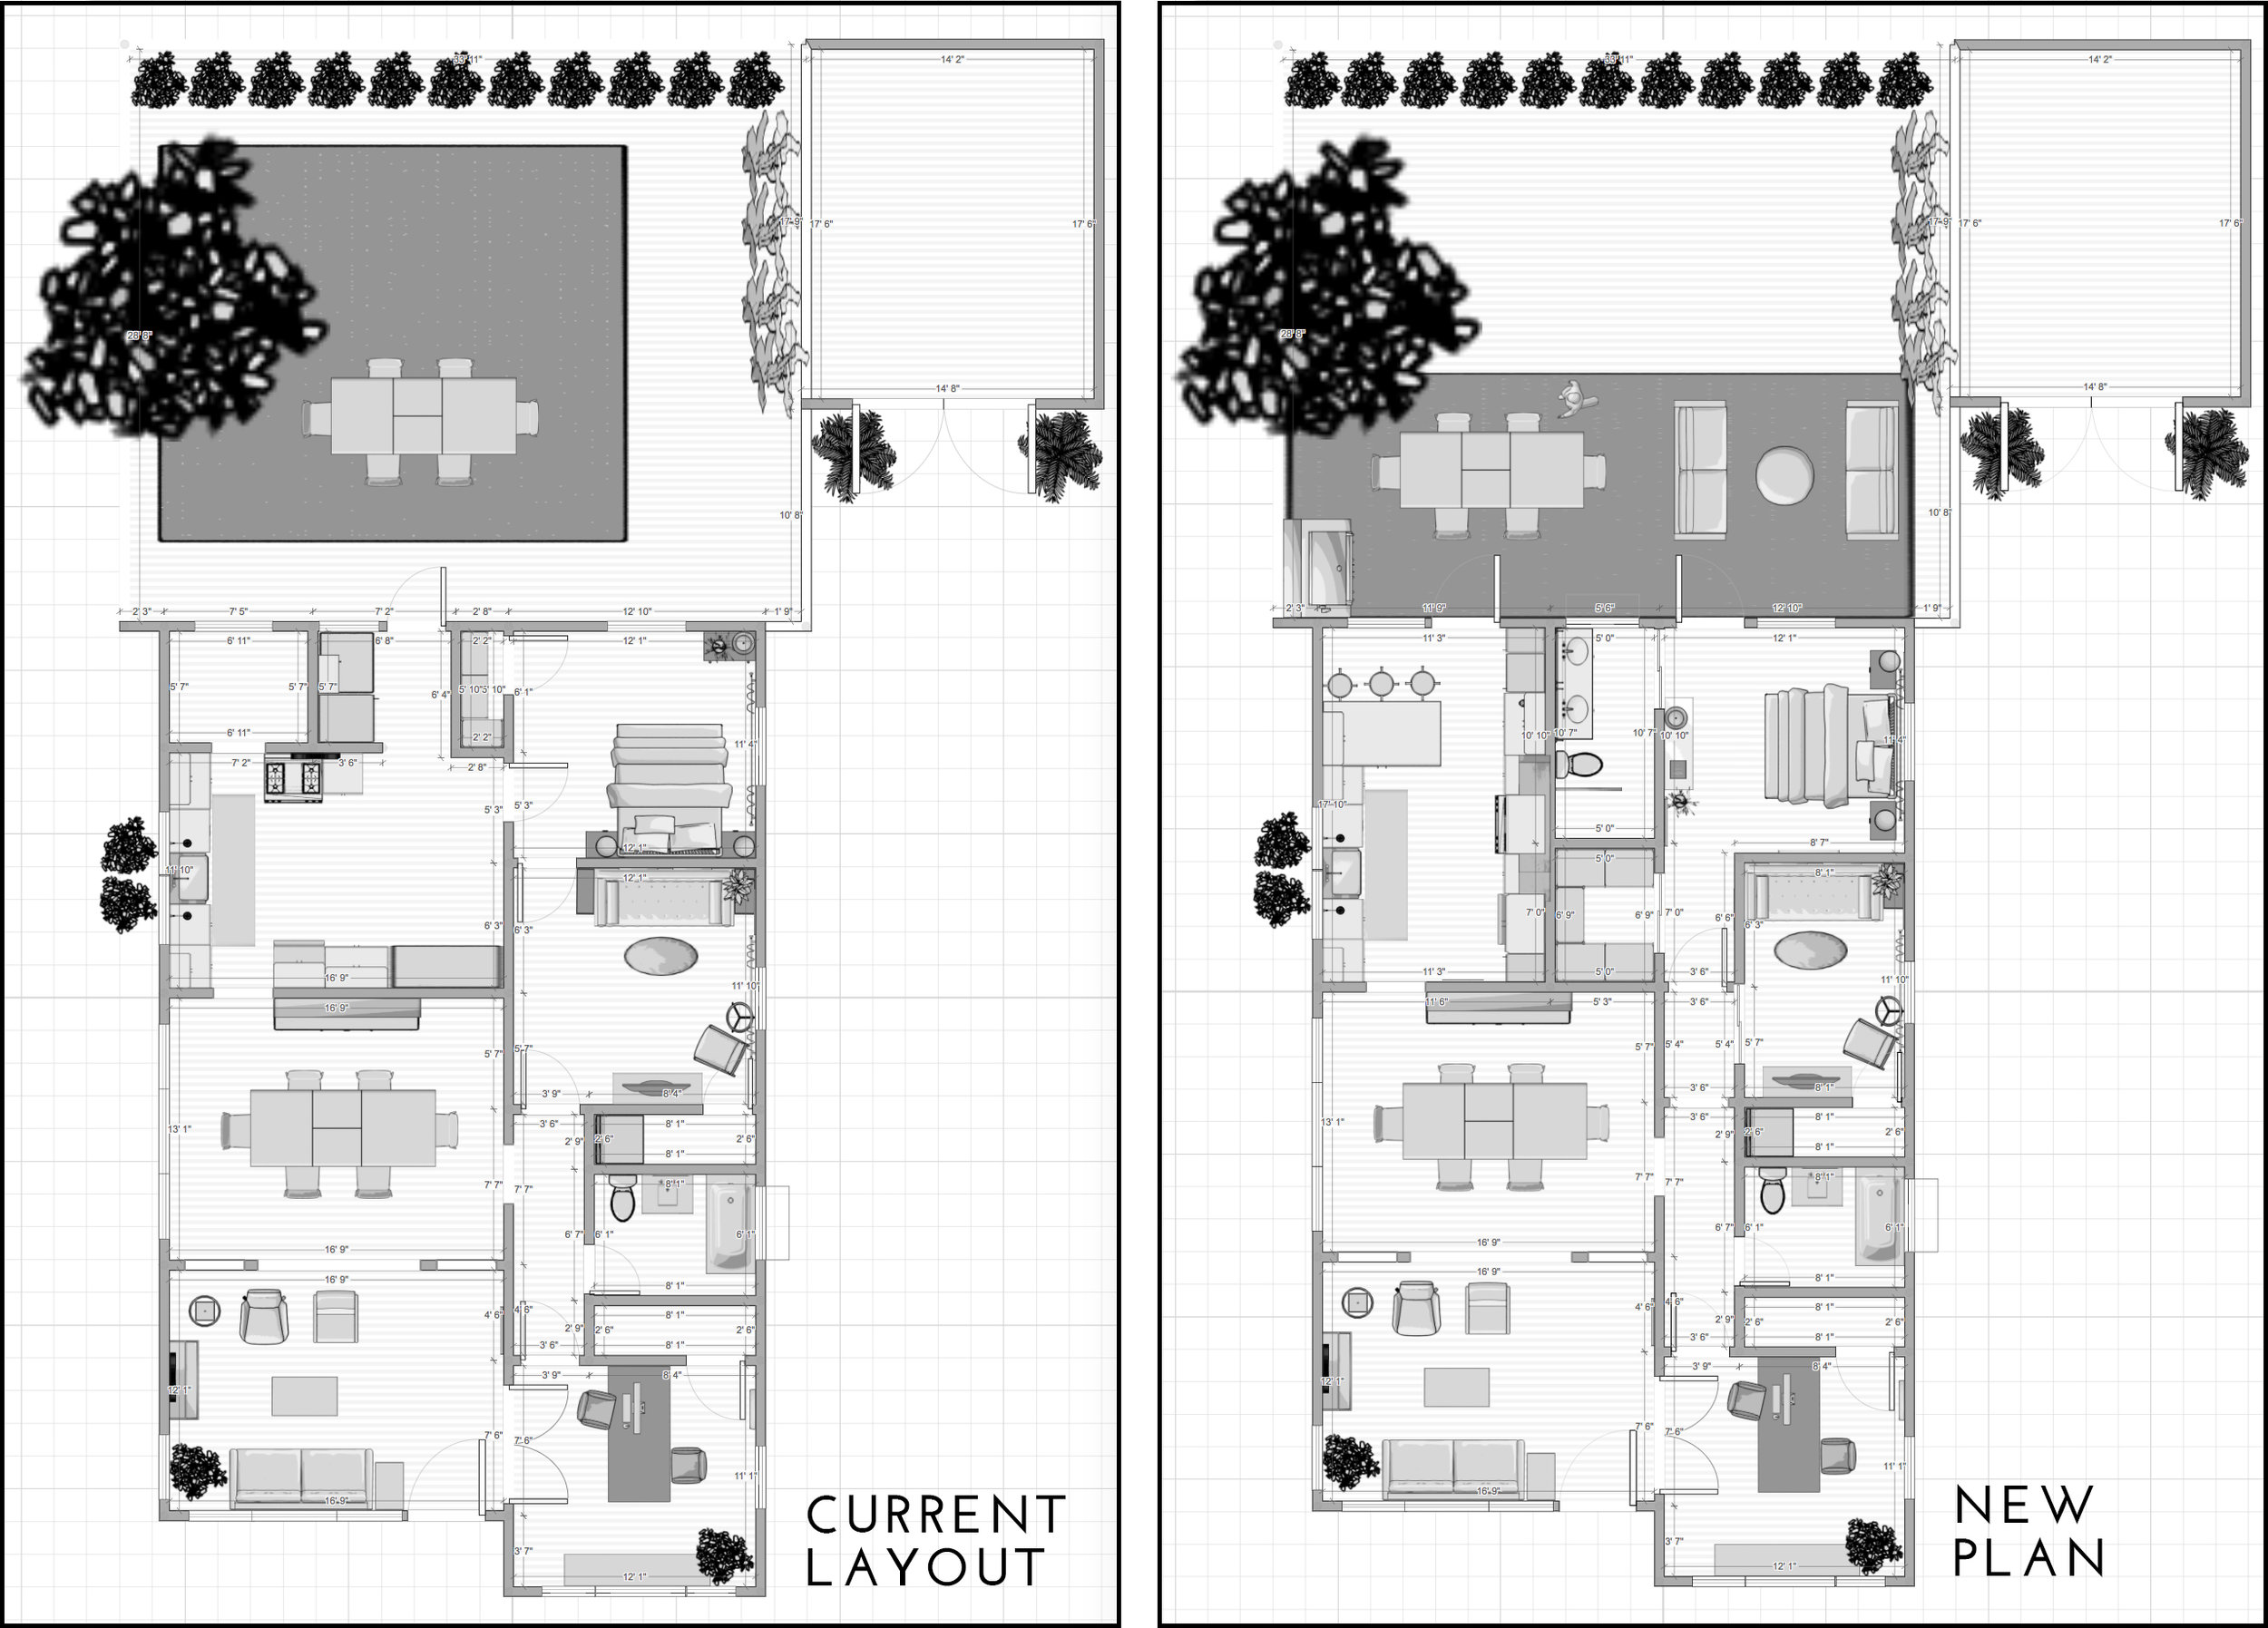
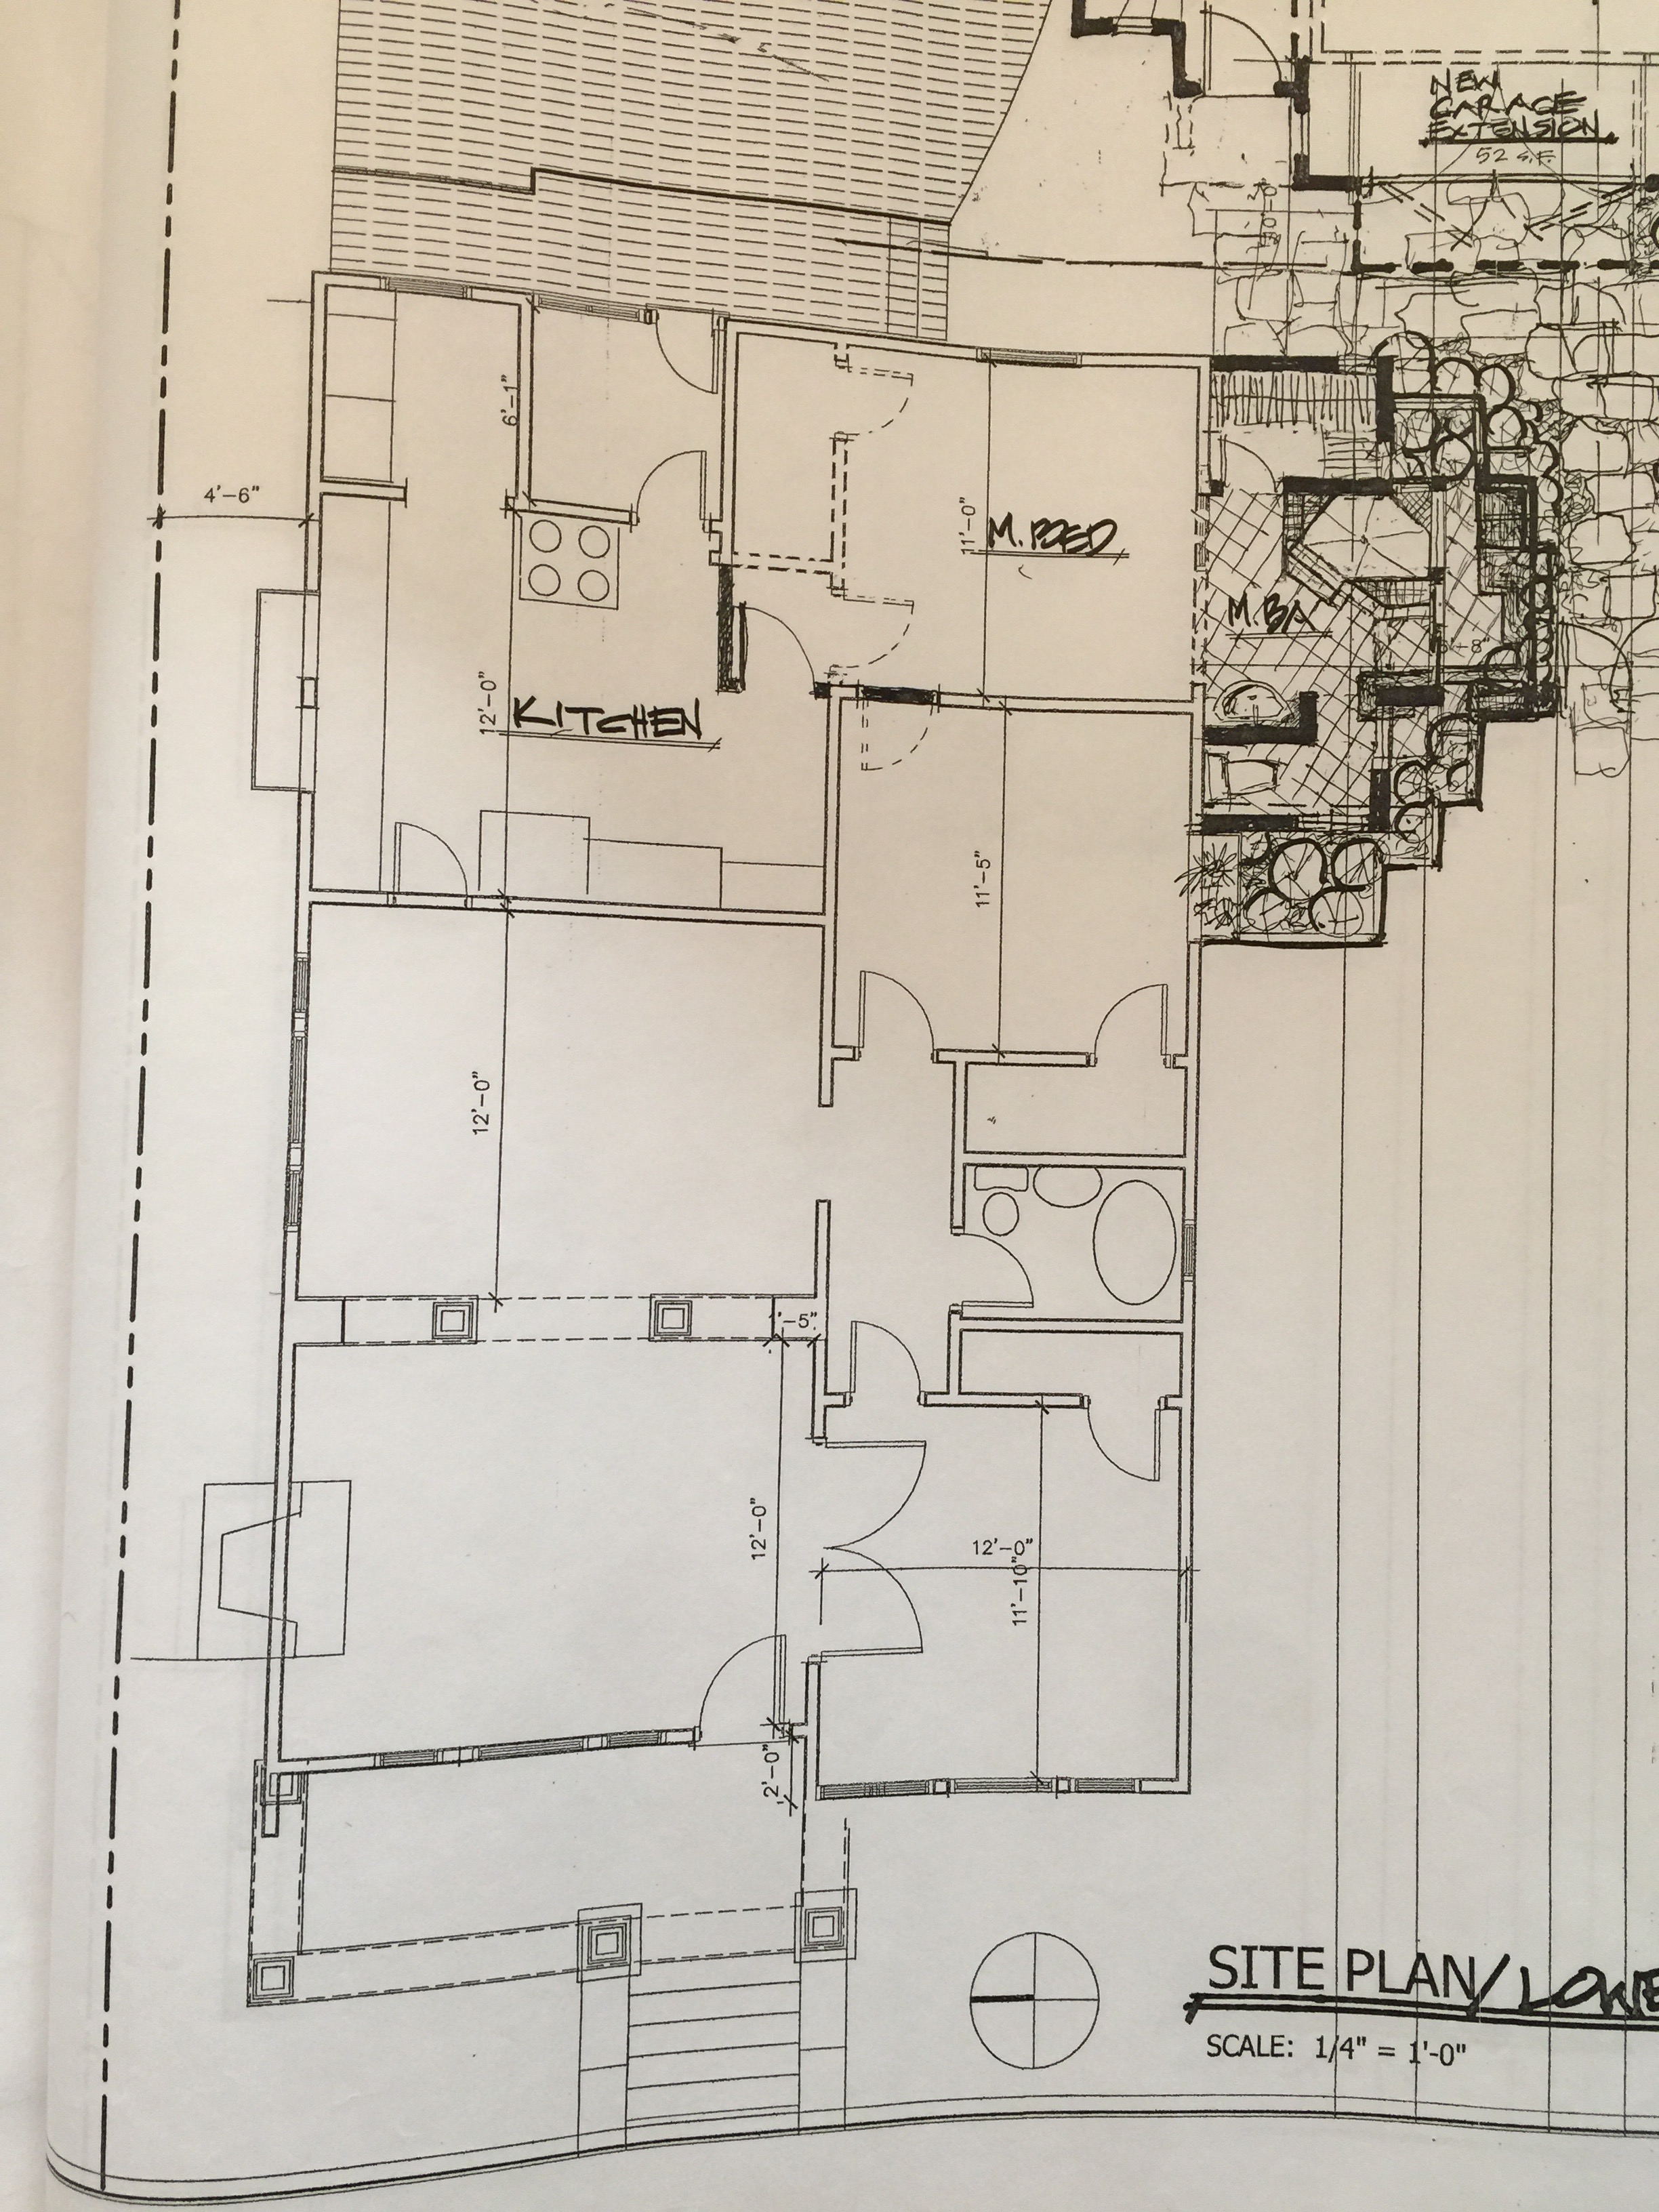
Below is the existing floor plan.

The Gold Hive Floor Plan

We have three bedrooms, one bathroom, and a nice flow between the spaces that makes the house feel airy yet not too open. The ceilings are nine feet tall so even though our house comes in at just under 1,400 square feet, it still feels perfectly spacious. I love this little abode.

But, here's what we don't like.

  1. The master bedroom is accessible only by walking through another bedroom, or the kitchen. It's fine right now when the guest bedroom is actually just a TV room, and access to the kitchen is very convenient for rolling out of bed straight to breakfast. But, I'd like to access the master without tripping over a sleeping house guest or a stove.

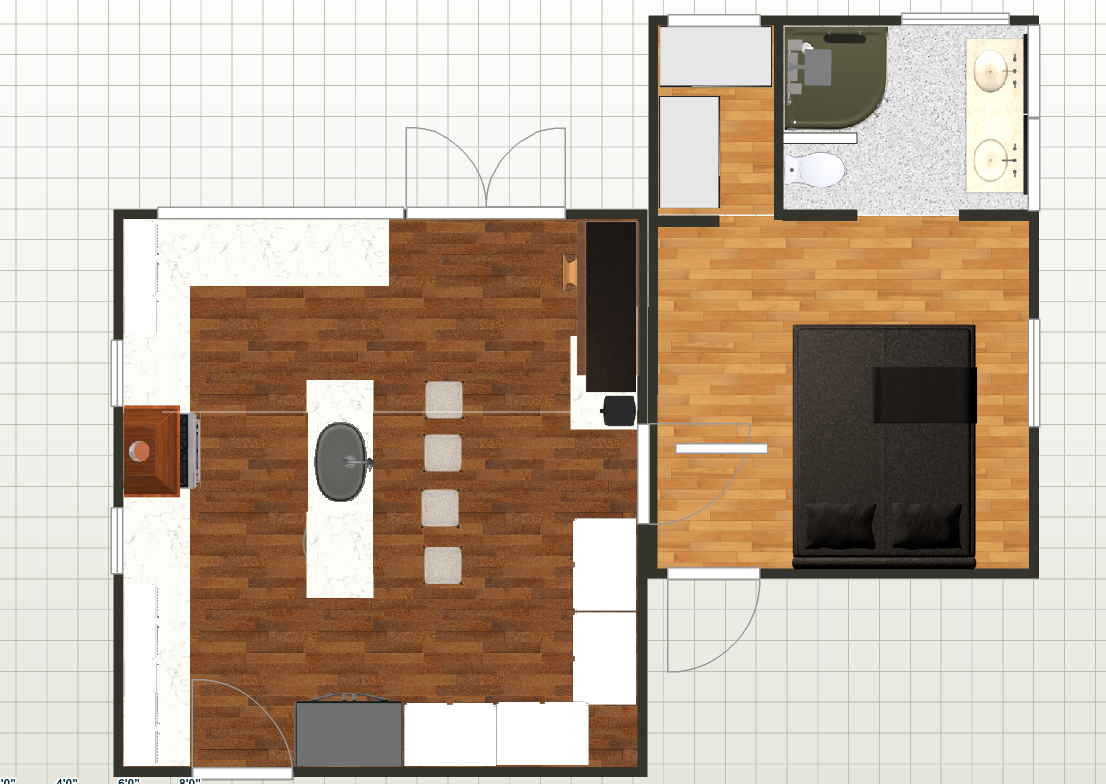
  2. We'd like to have a second bathroom in the house, ideally in the form of an ensuite off the master bedroom.

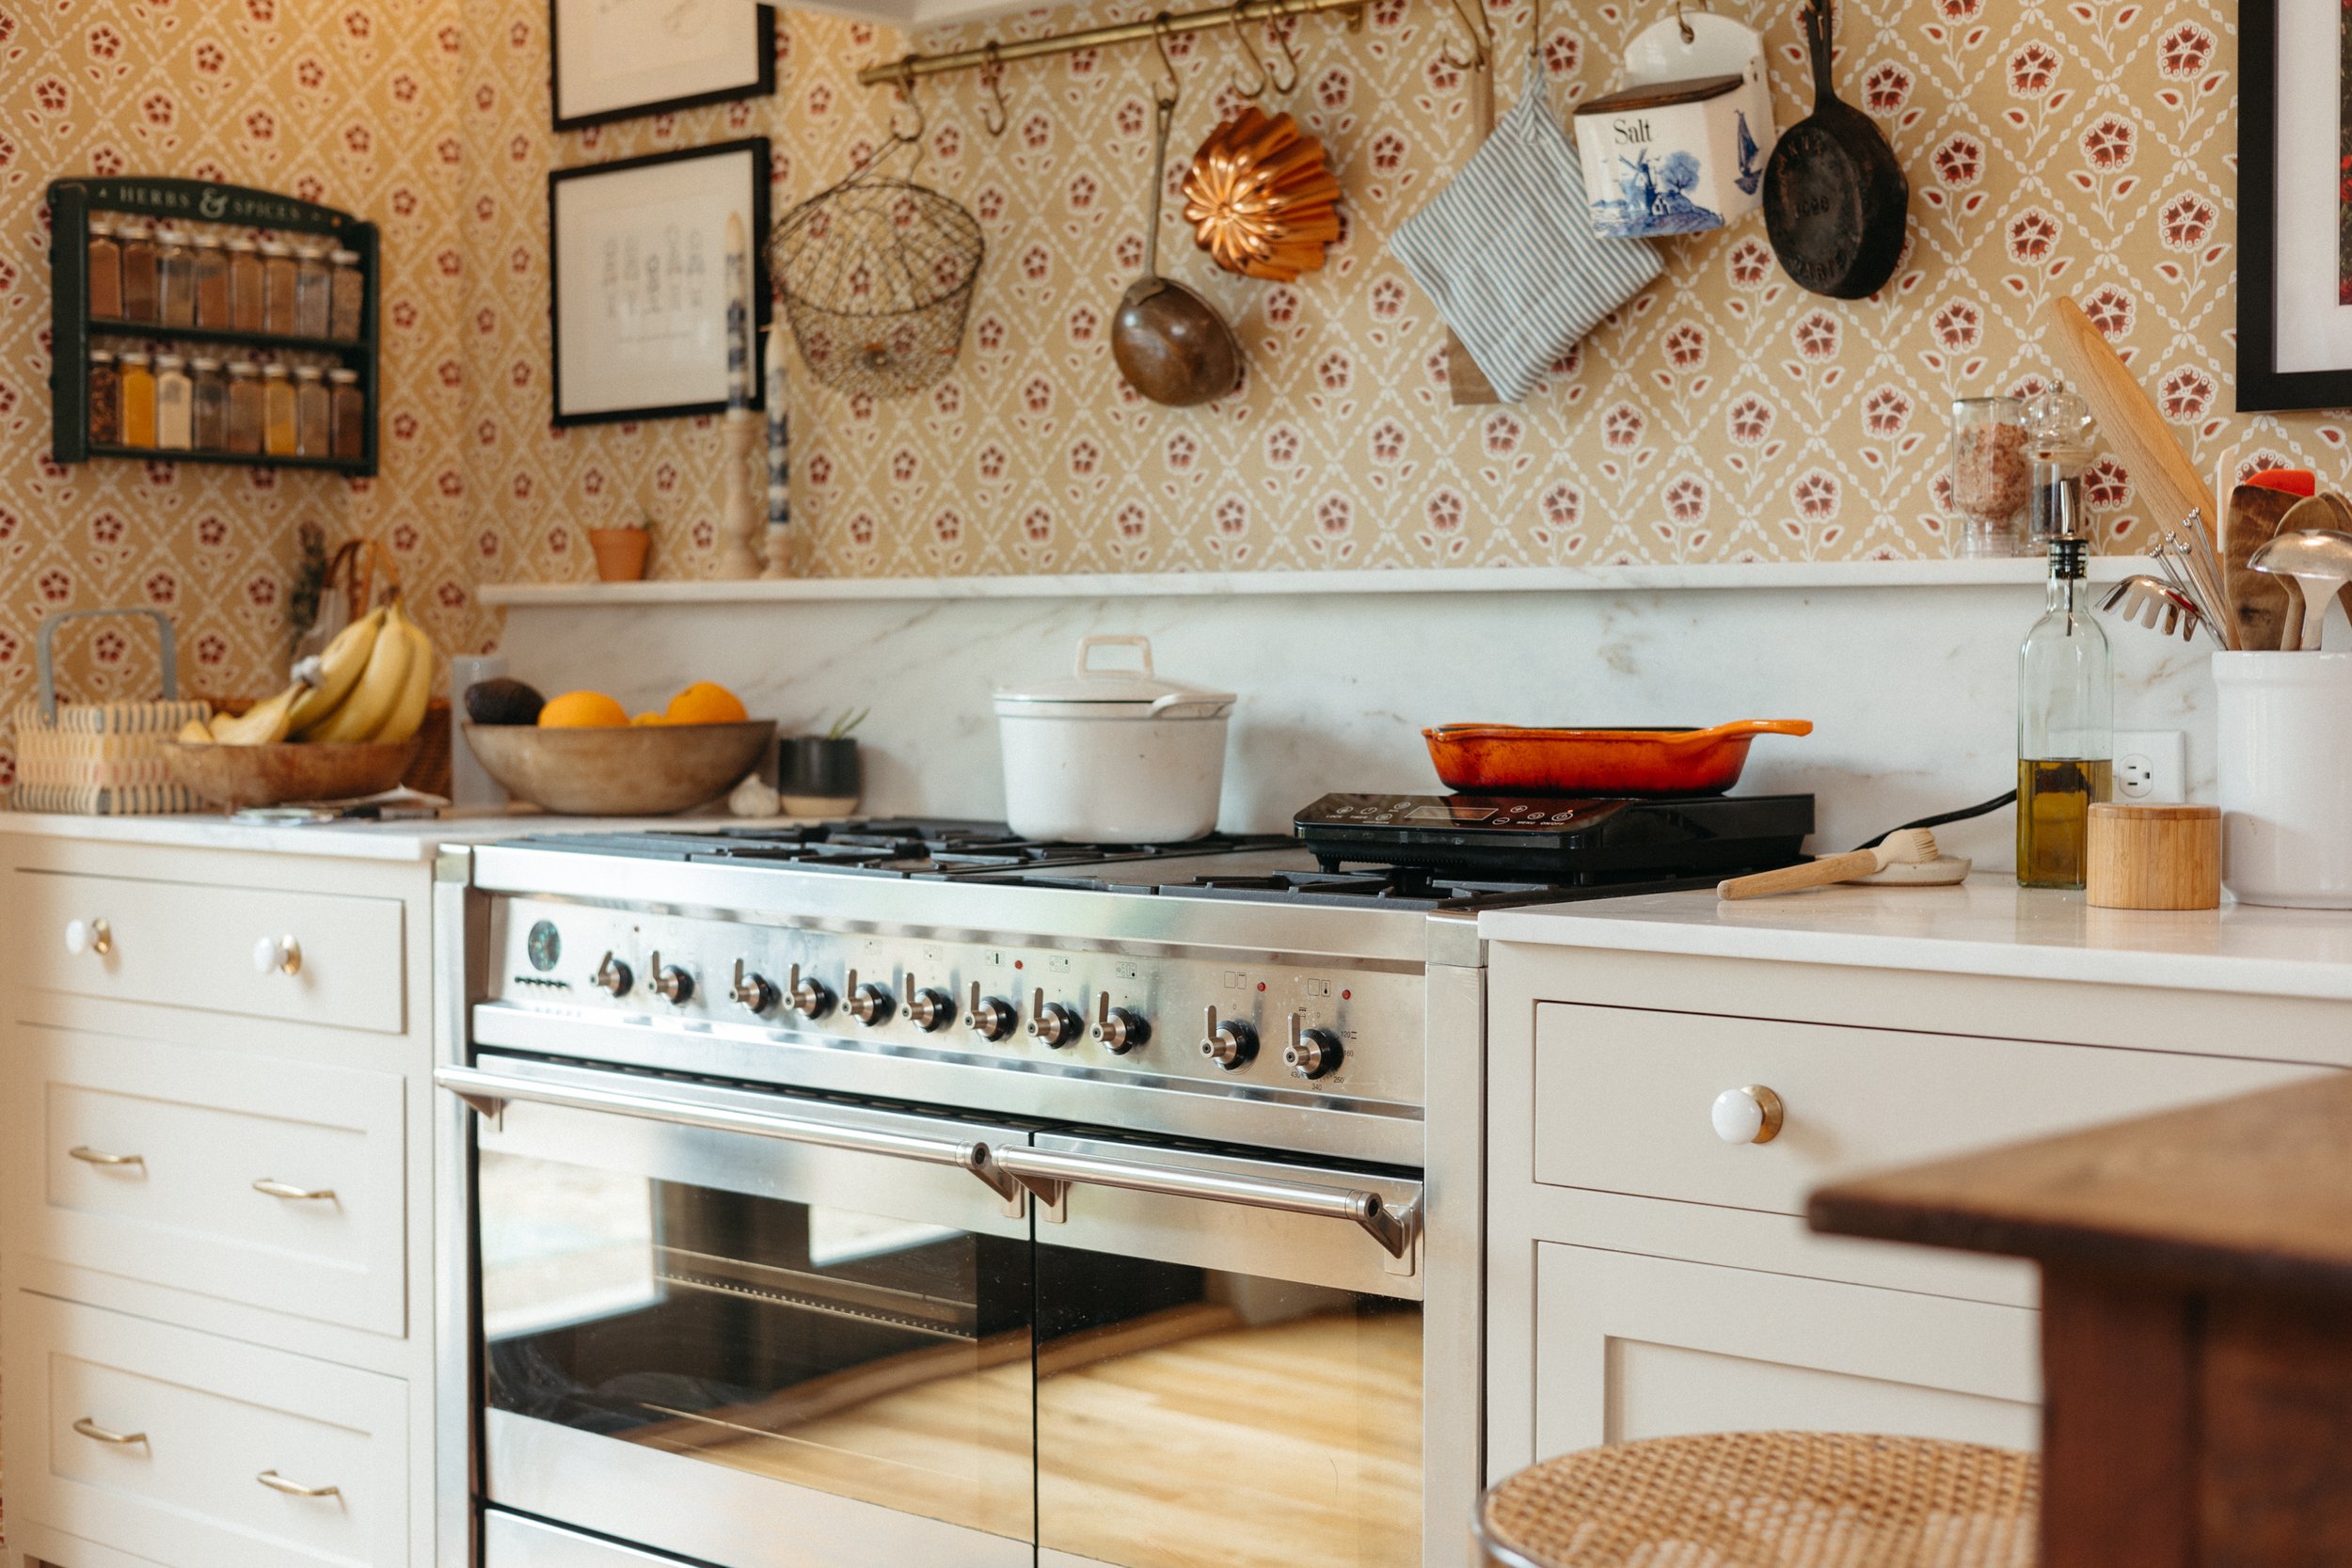
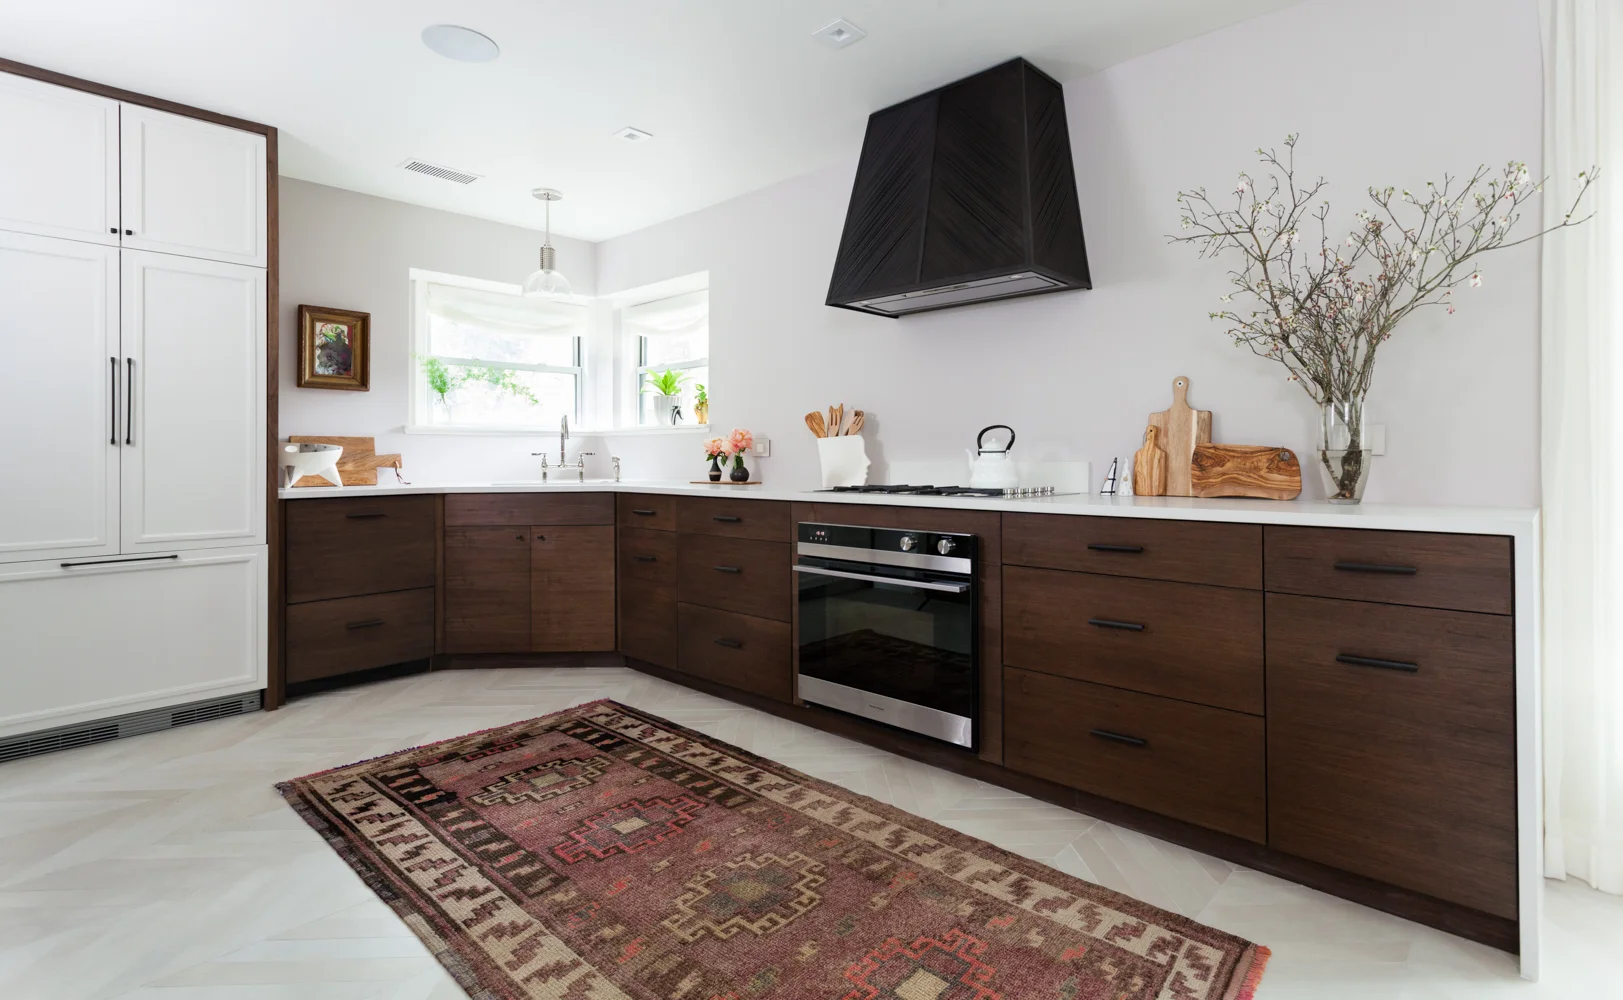
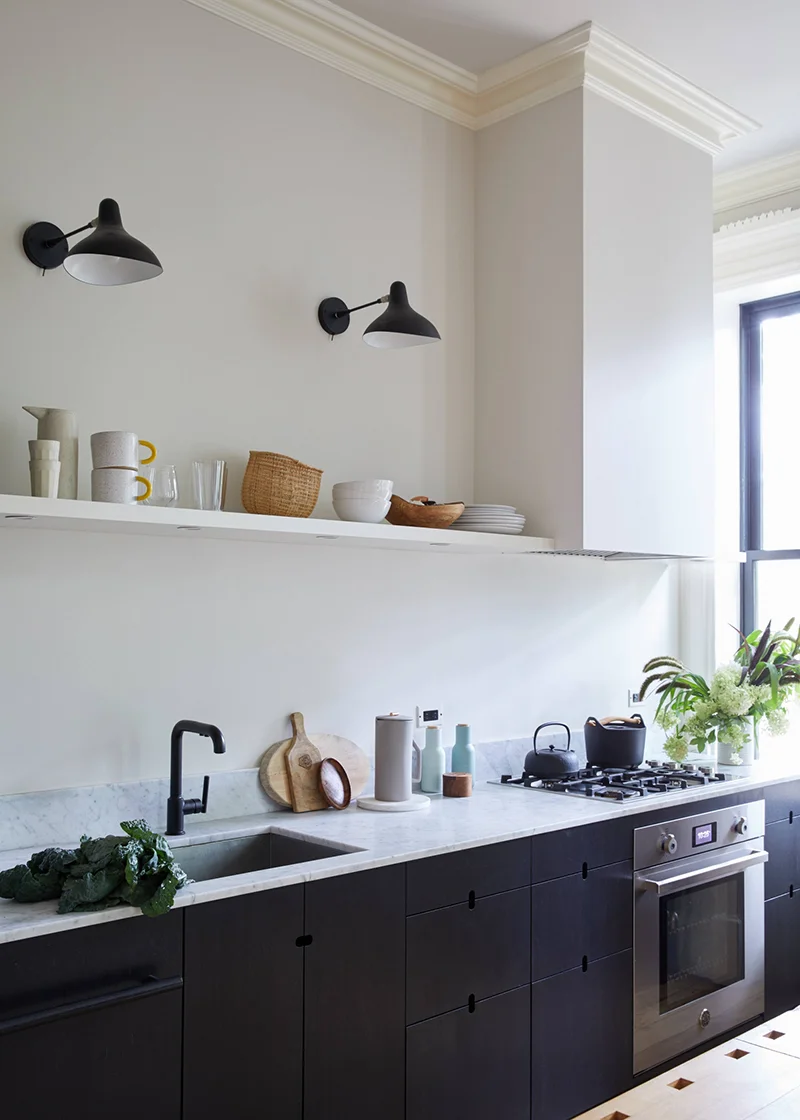
  3. The kitchen layout isn't the most functional. It's decently sized but with wasted space on half of the room and with the two mudrooms. These two little rooms are inefficiently used for storage, and the walls block all of the natural sunlight from the back of the house.

  4. We want a more indoor/outdoor feel. Right now, the only backyard access is through a door that's tucked away in a mudroom. We'd like to see the kitchen and the master extend into the outdoor space.

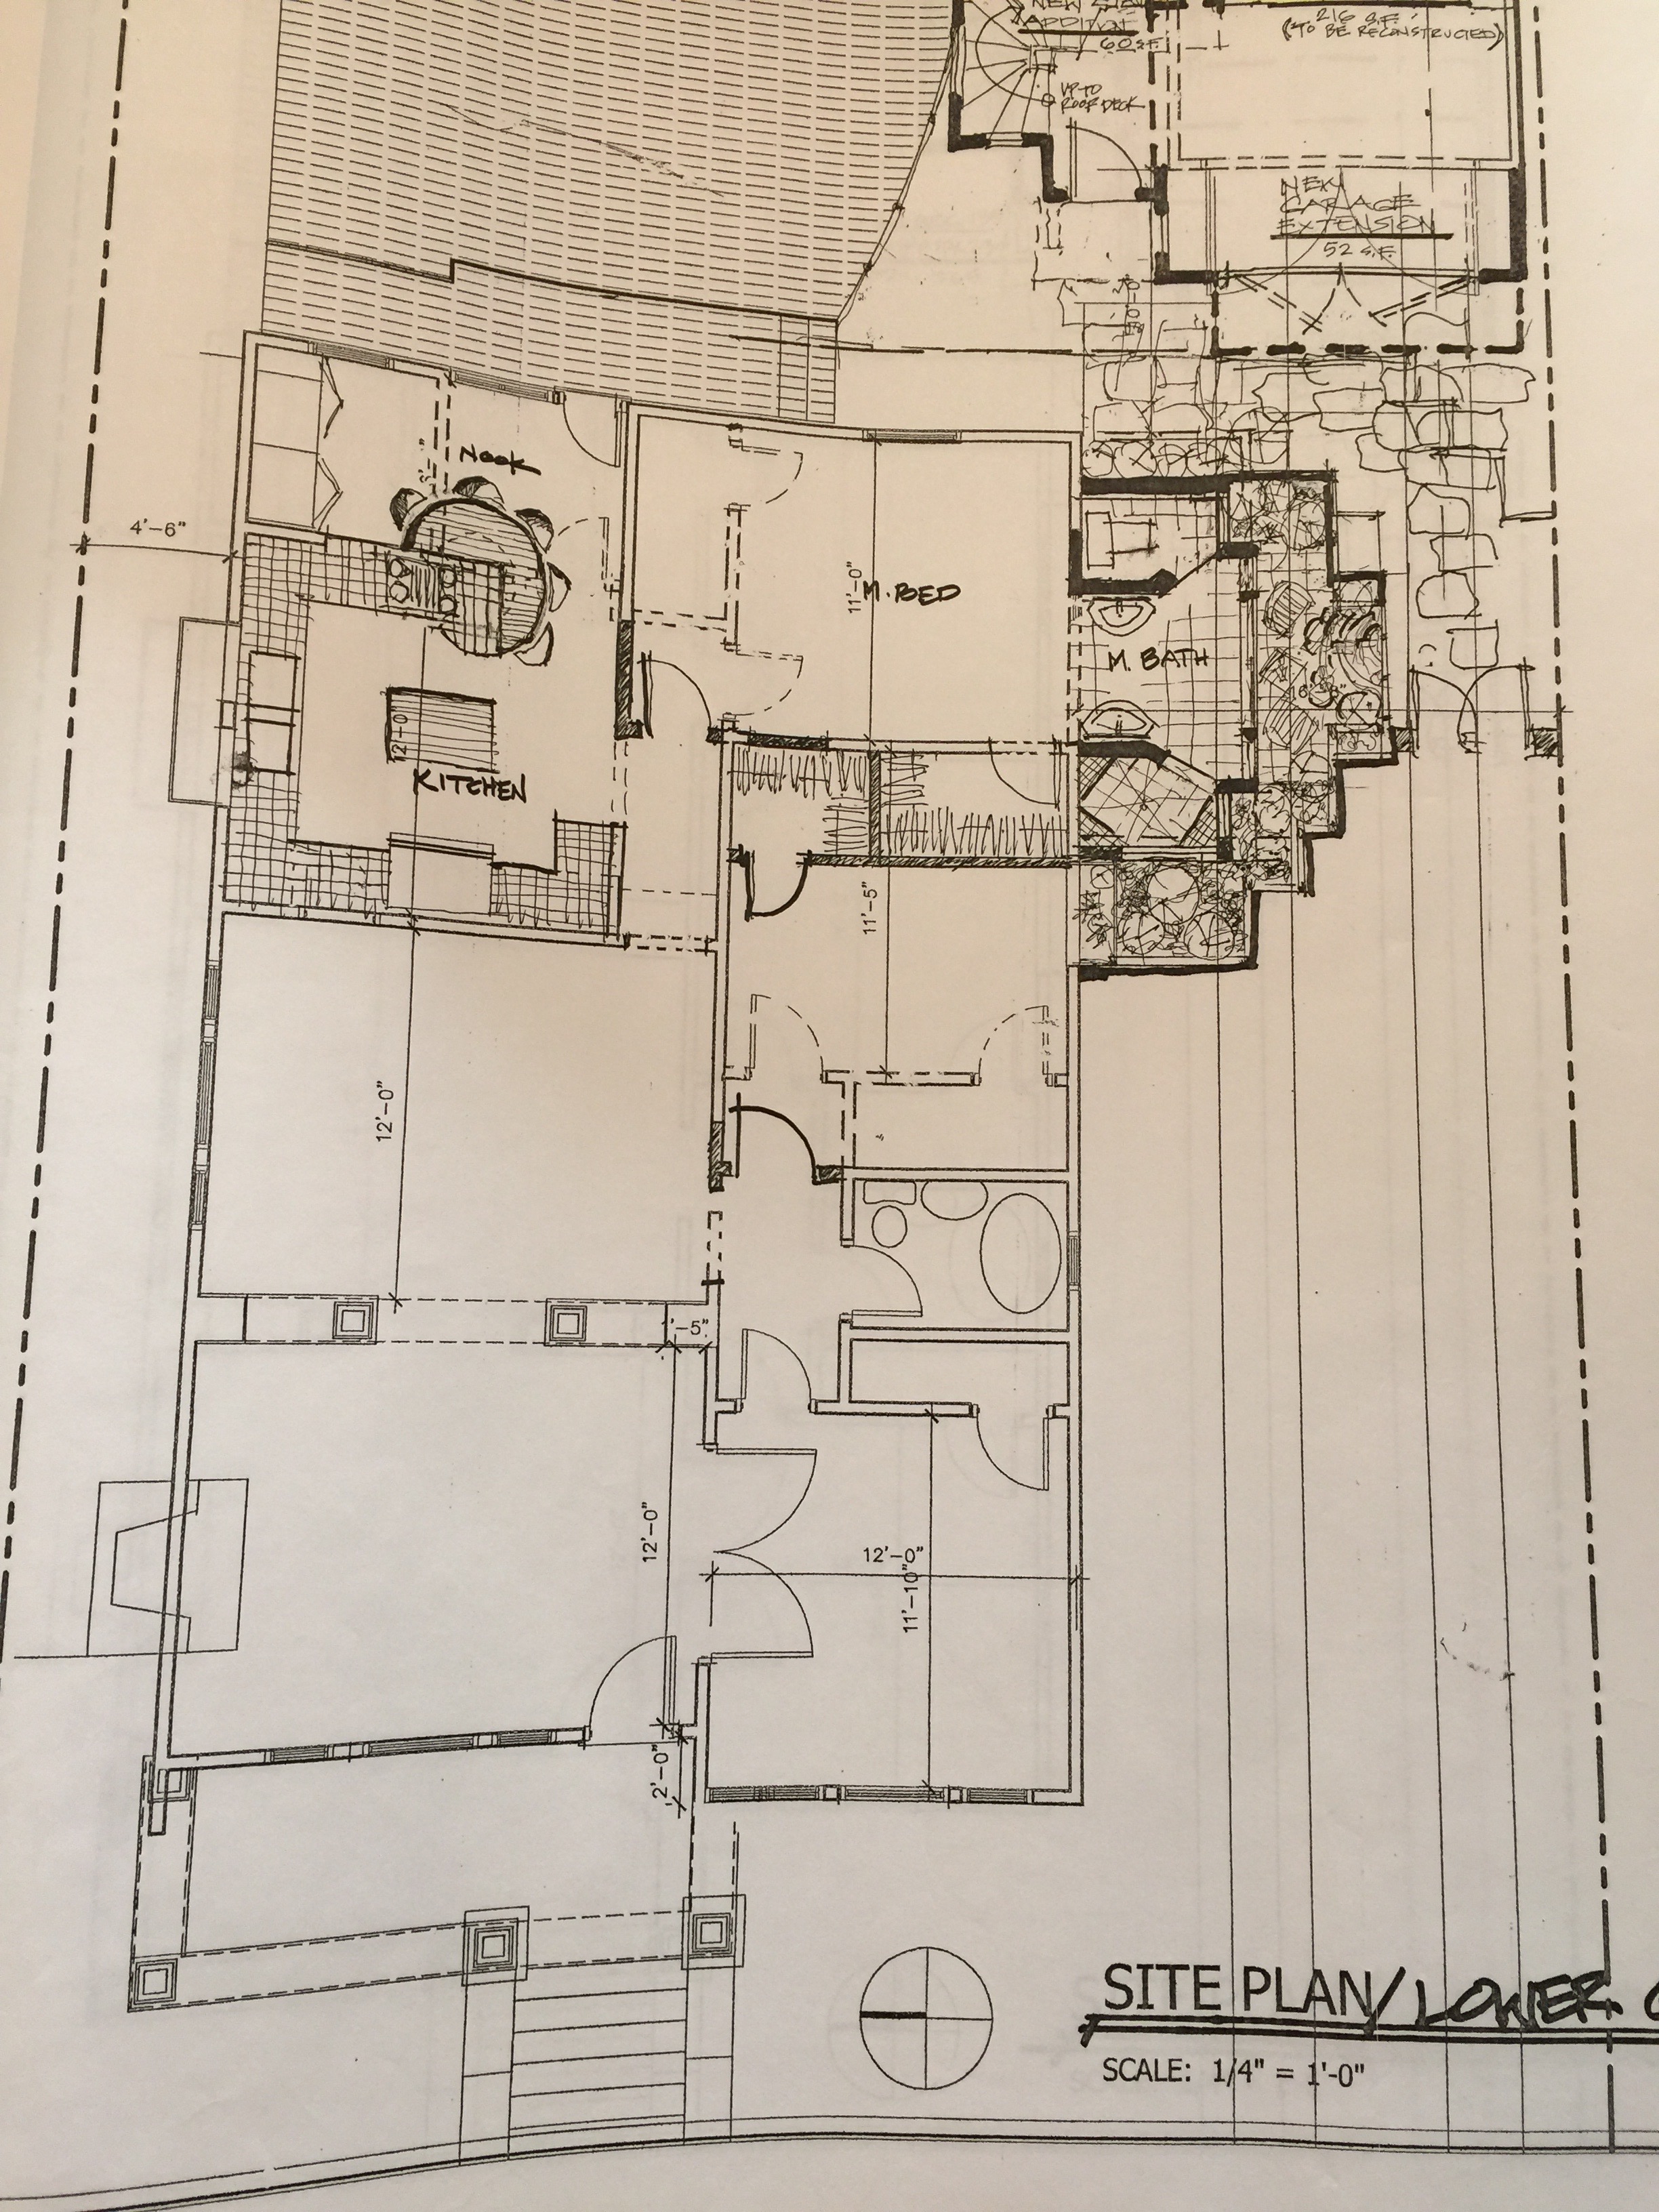
Here's the plan I'm toying with:

Proposed floor plan for house The Gold Hive

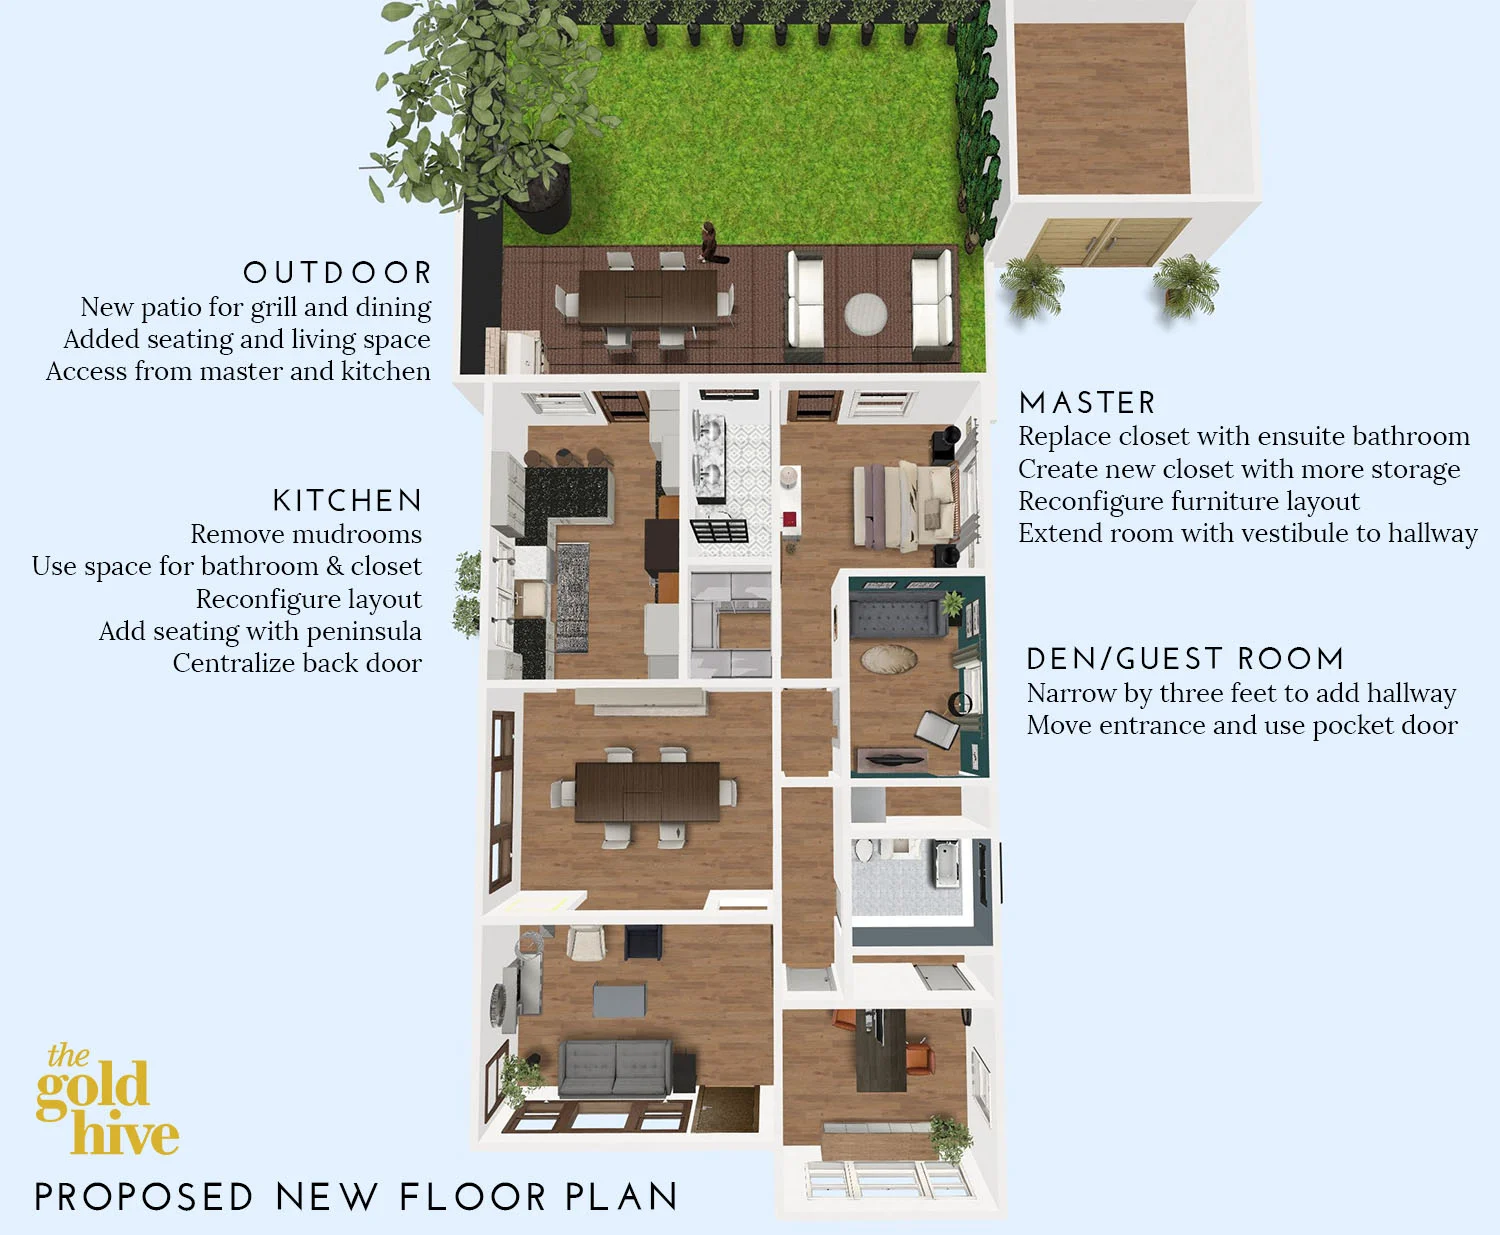
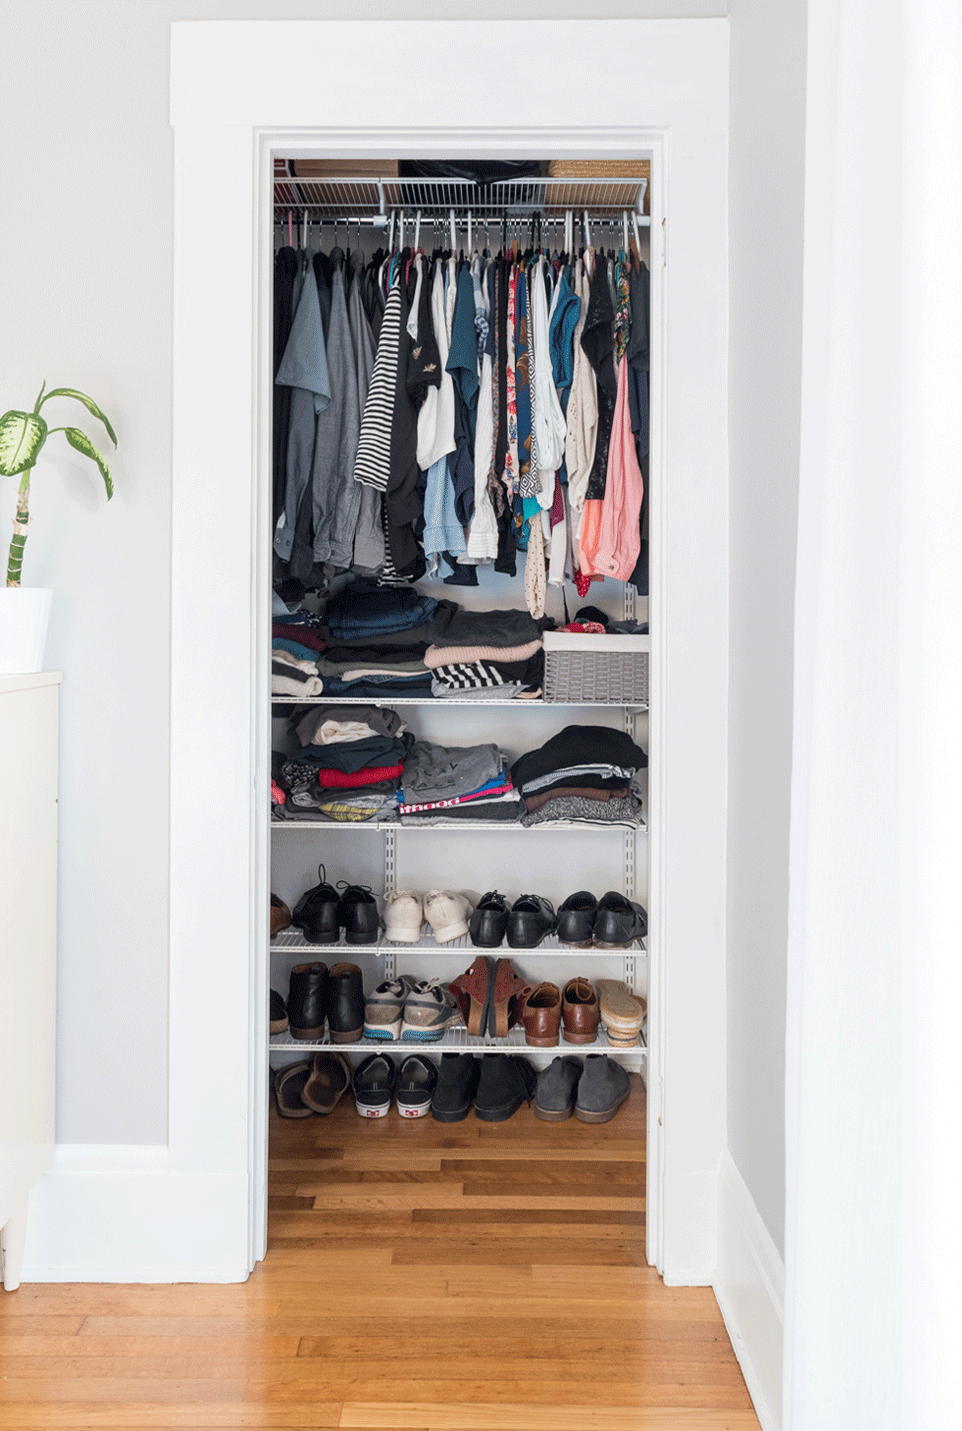
In this new layout, we'd gain a second bathroom, a bigger closet, both the kitchen and the master the would open up to the backyard, and we'd access the master through a hallway instead of another room. YAY! The only compromise is that the guest bedroom would get significantly smaller. To remedy the small space, I'll add transom windows over the guest room and hallway doors so natural light can flow between all the spaces. We will also install pocket doors to gain as much floor space as possible.

Here are each of the floor plans side-by-side so you can see the changes.

side-by-side layout changes.jpg

Since it's hard to visualize a space that you've never set foot in, I put together a video walkthrough using the renderings I created to design the floorplan. Take a look at the 2-minute video below for a better idea of the house will flow.

Reducing the size of a bedroom isn't ideal, I know. But the other options I played with had much bigger compromises. We toyed with adding on into the backyard, making the master accessible from the dining room, by jogging the hallway over to not take away bedroom space, and so many more.

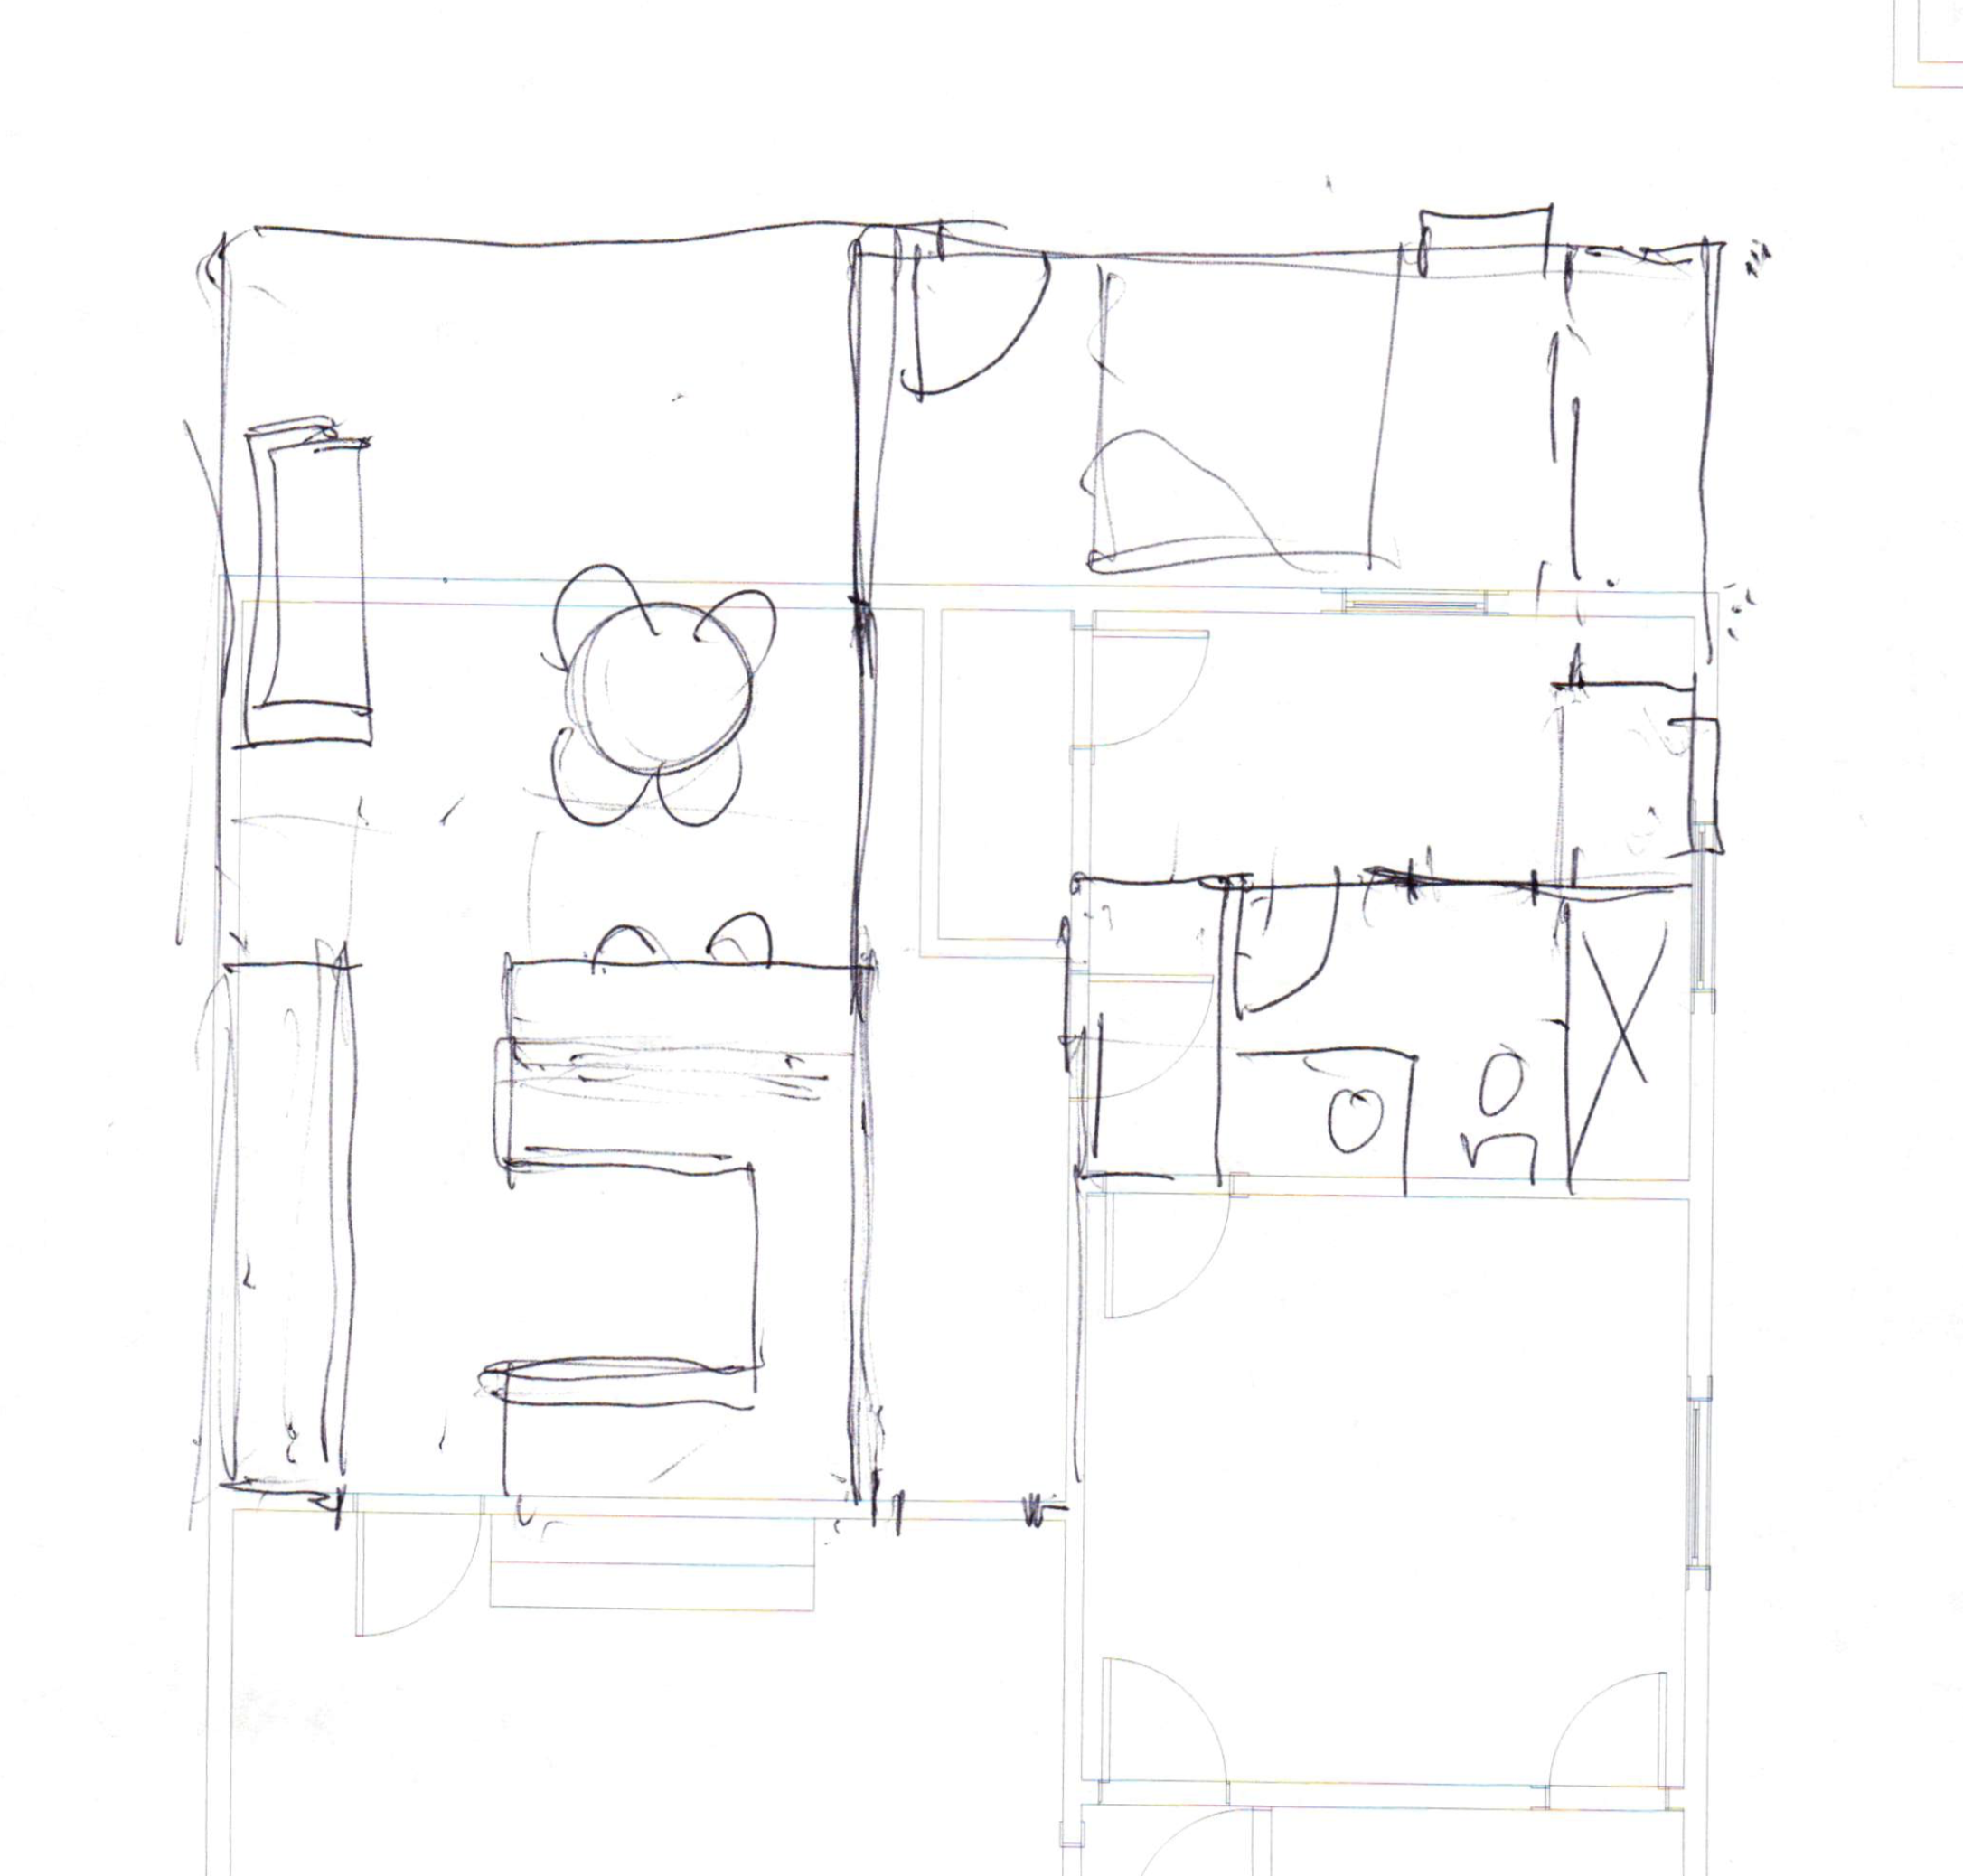
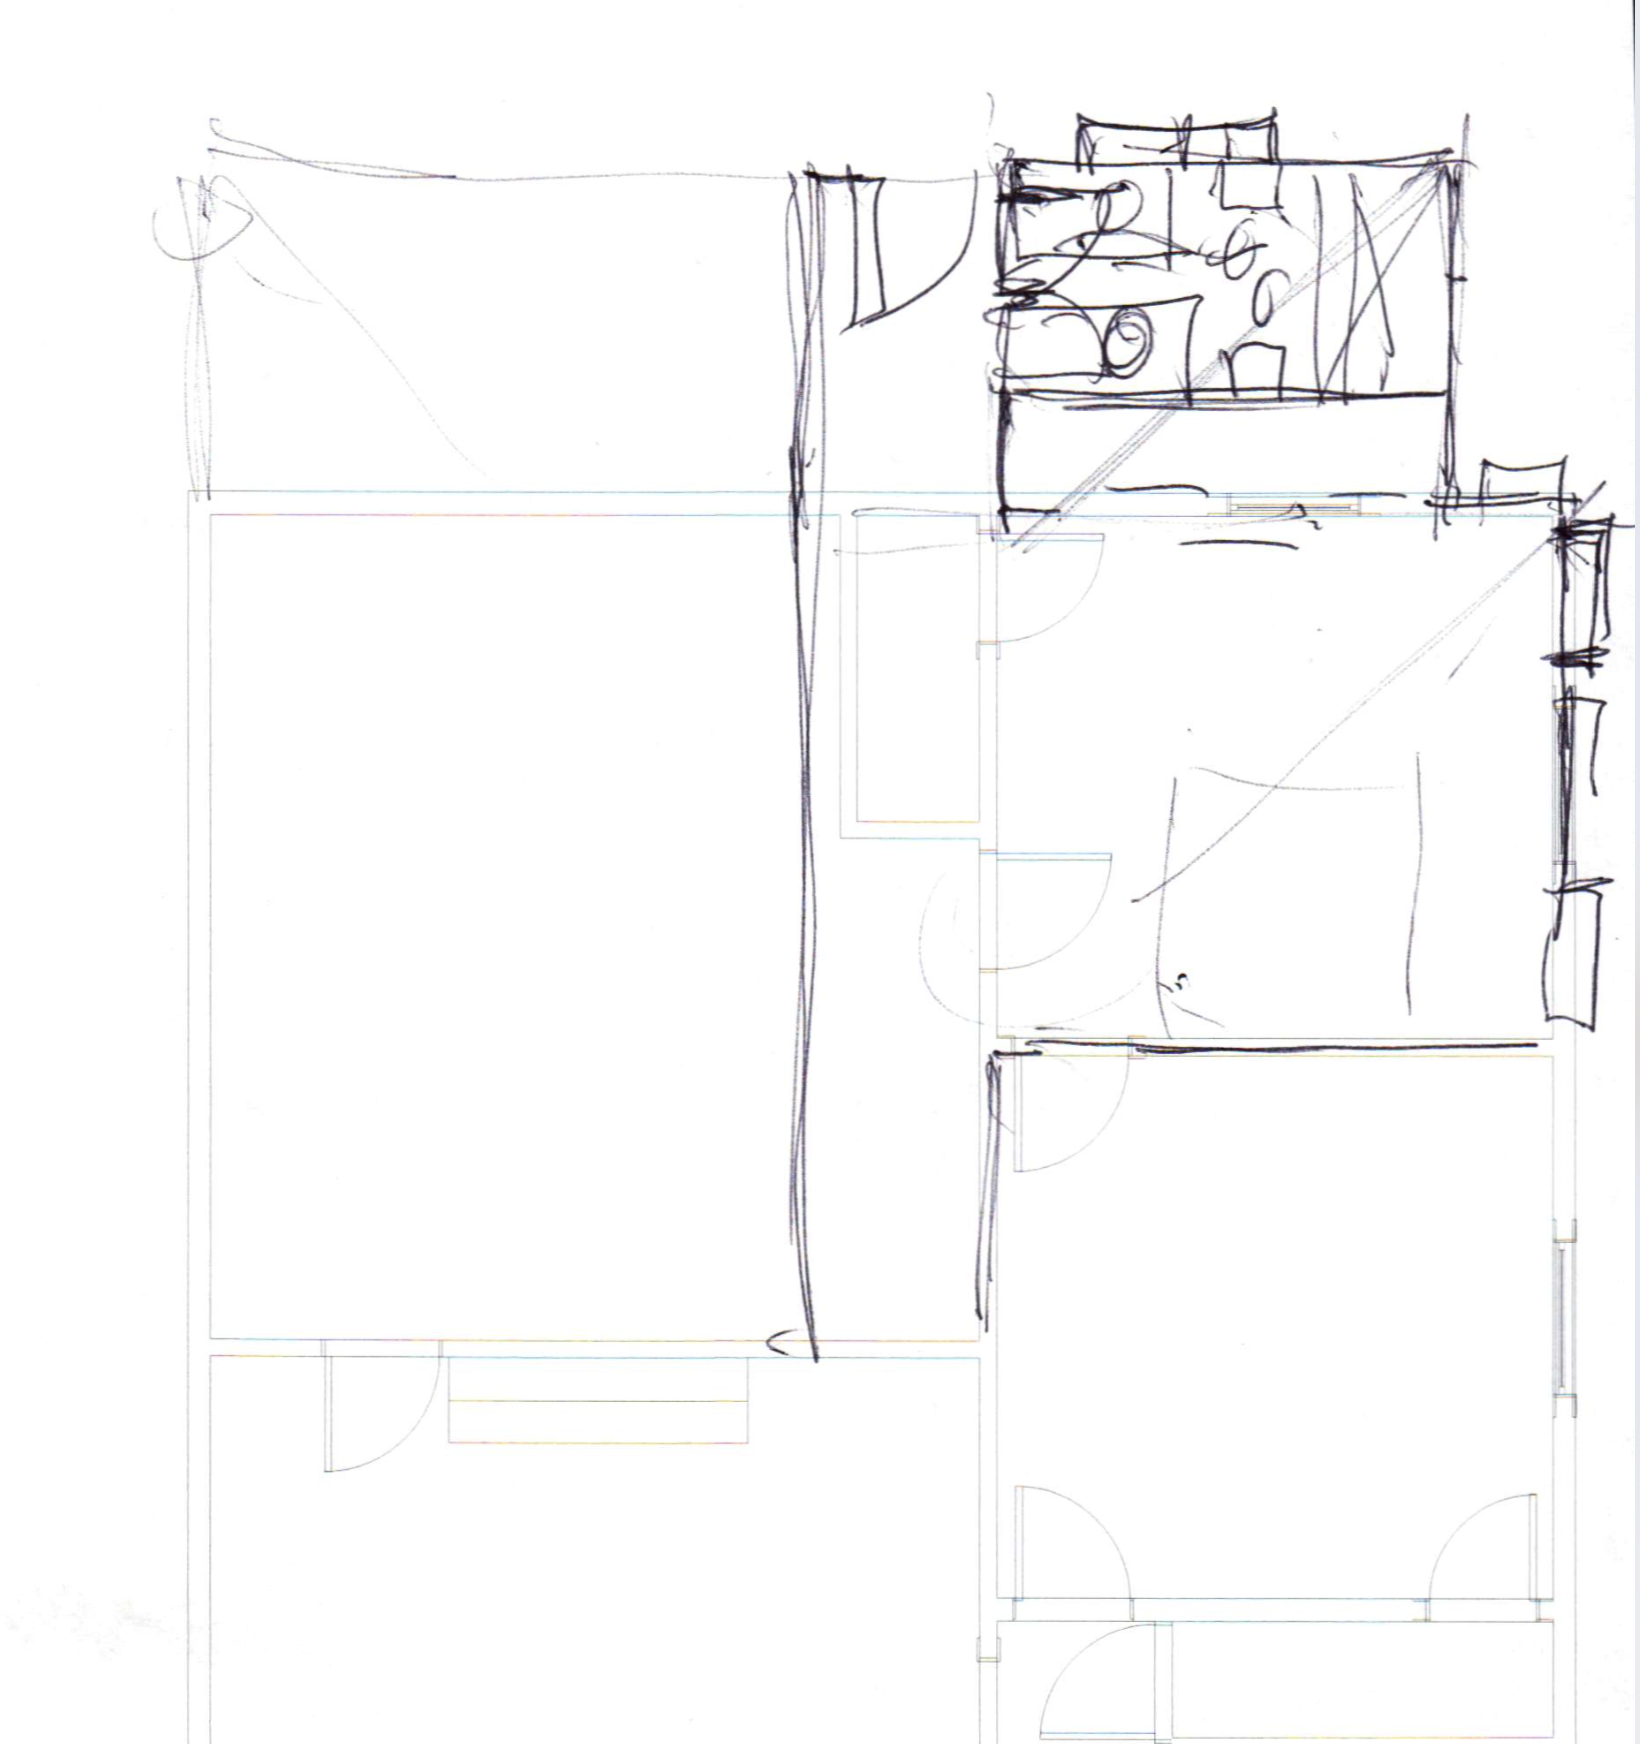
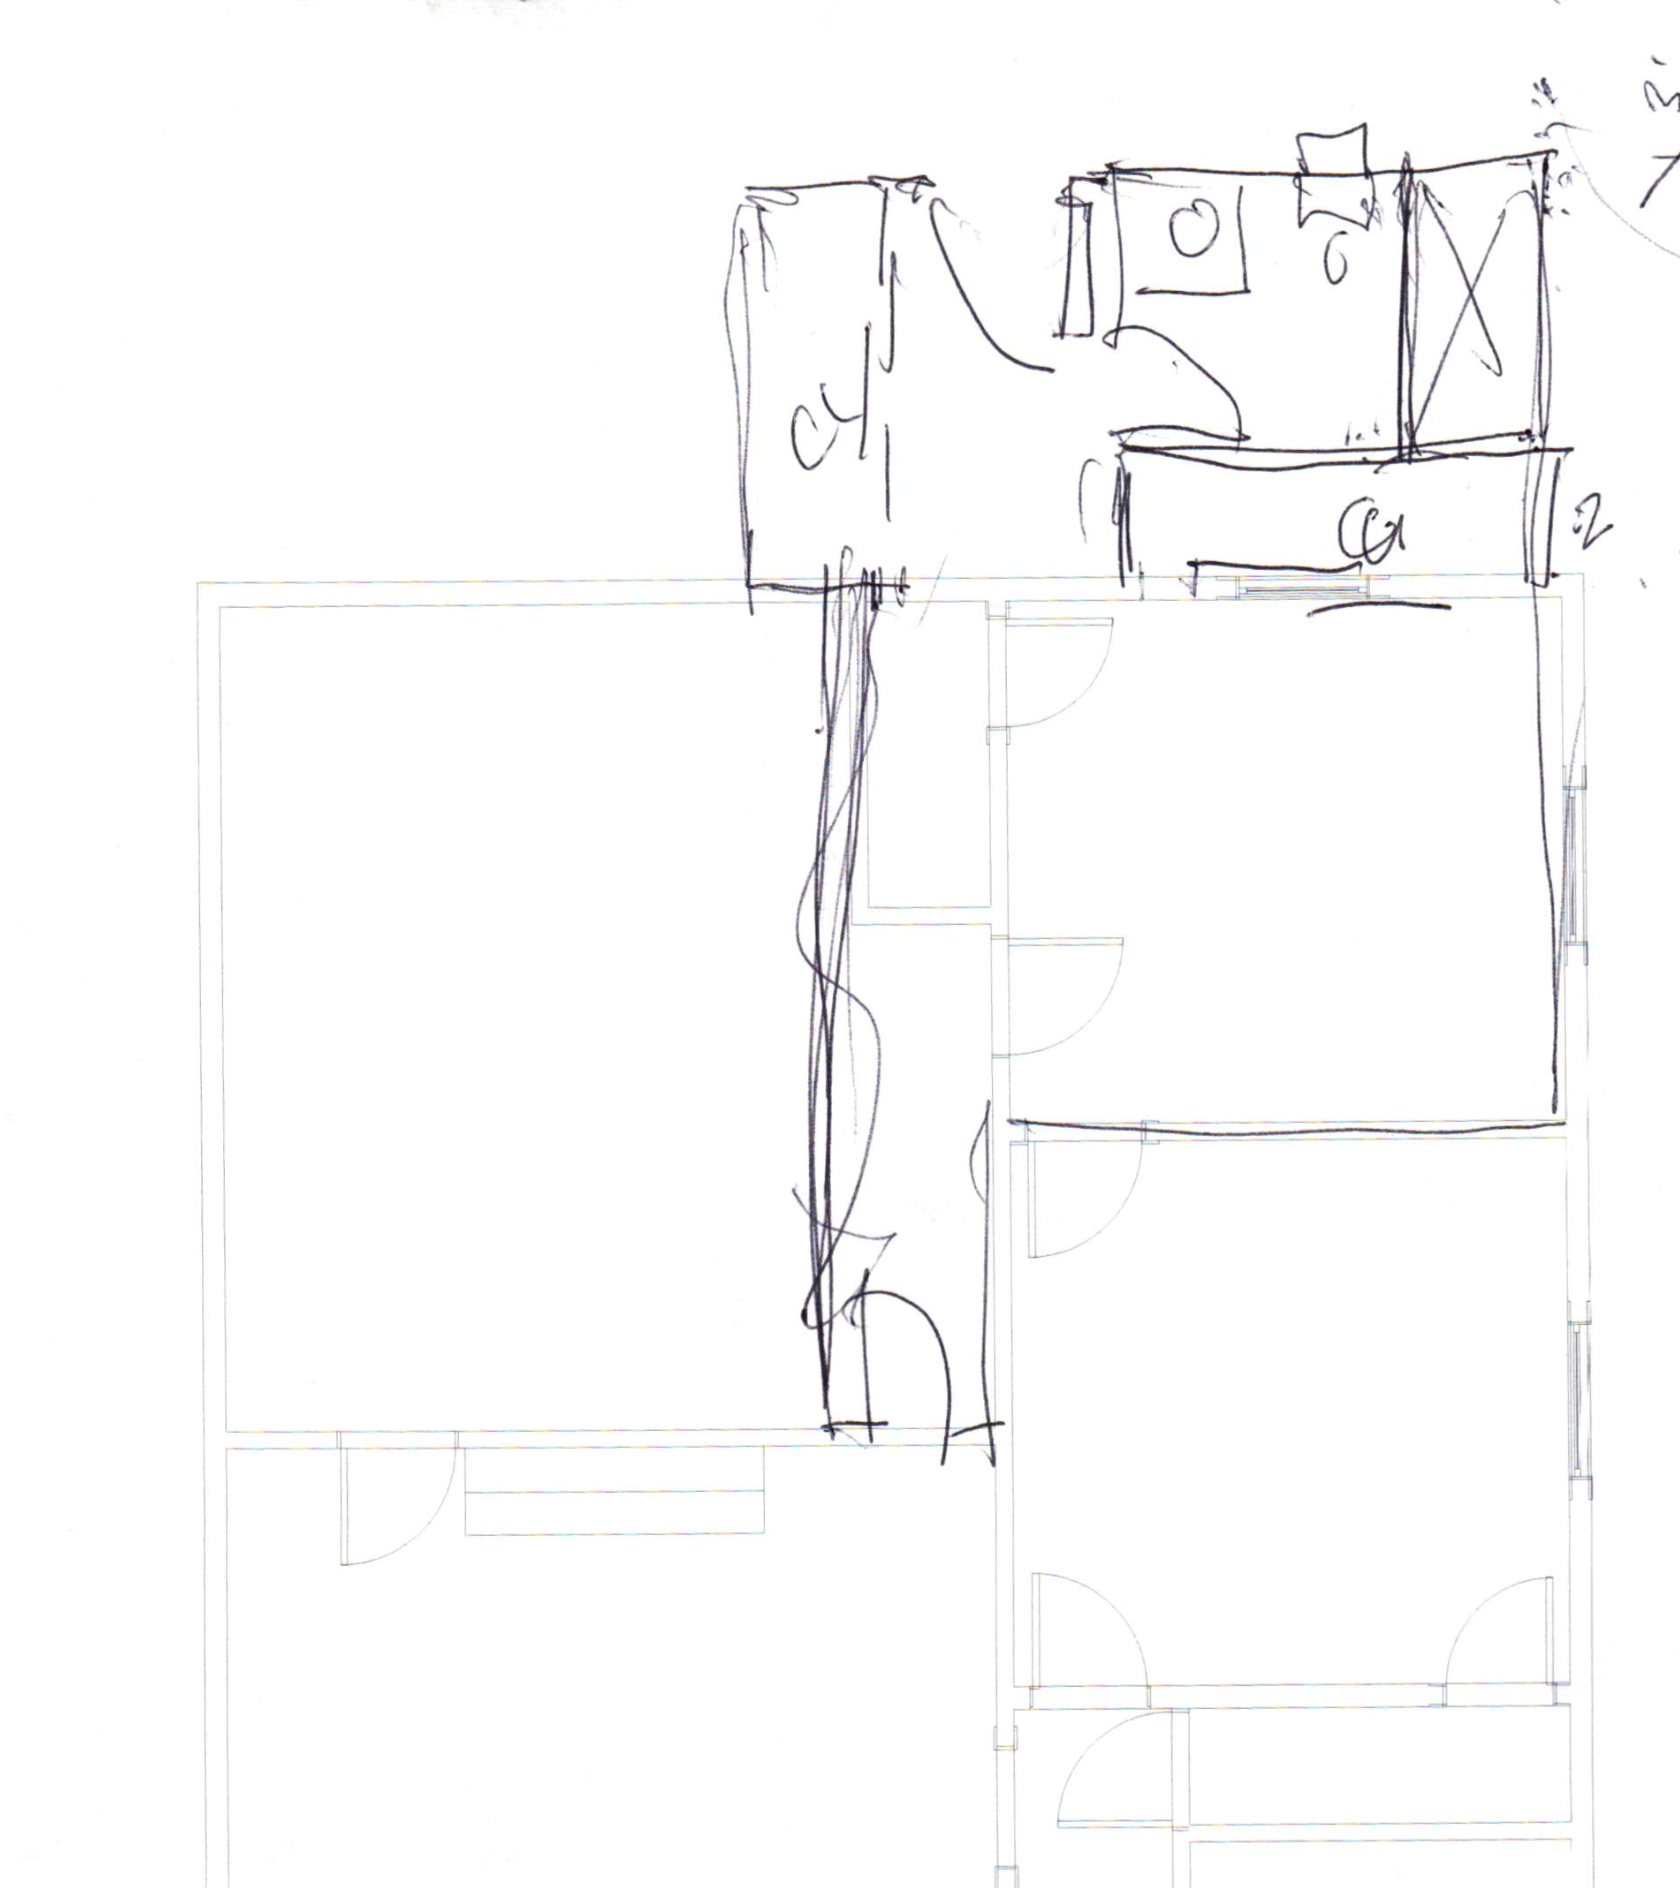
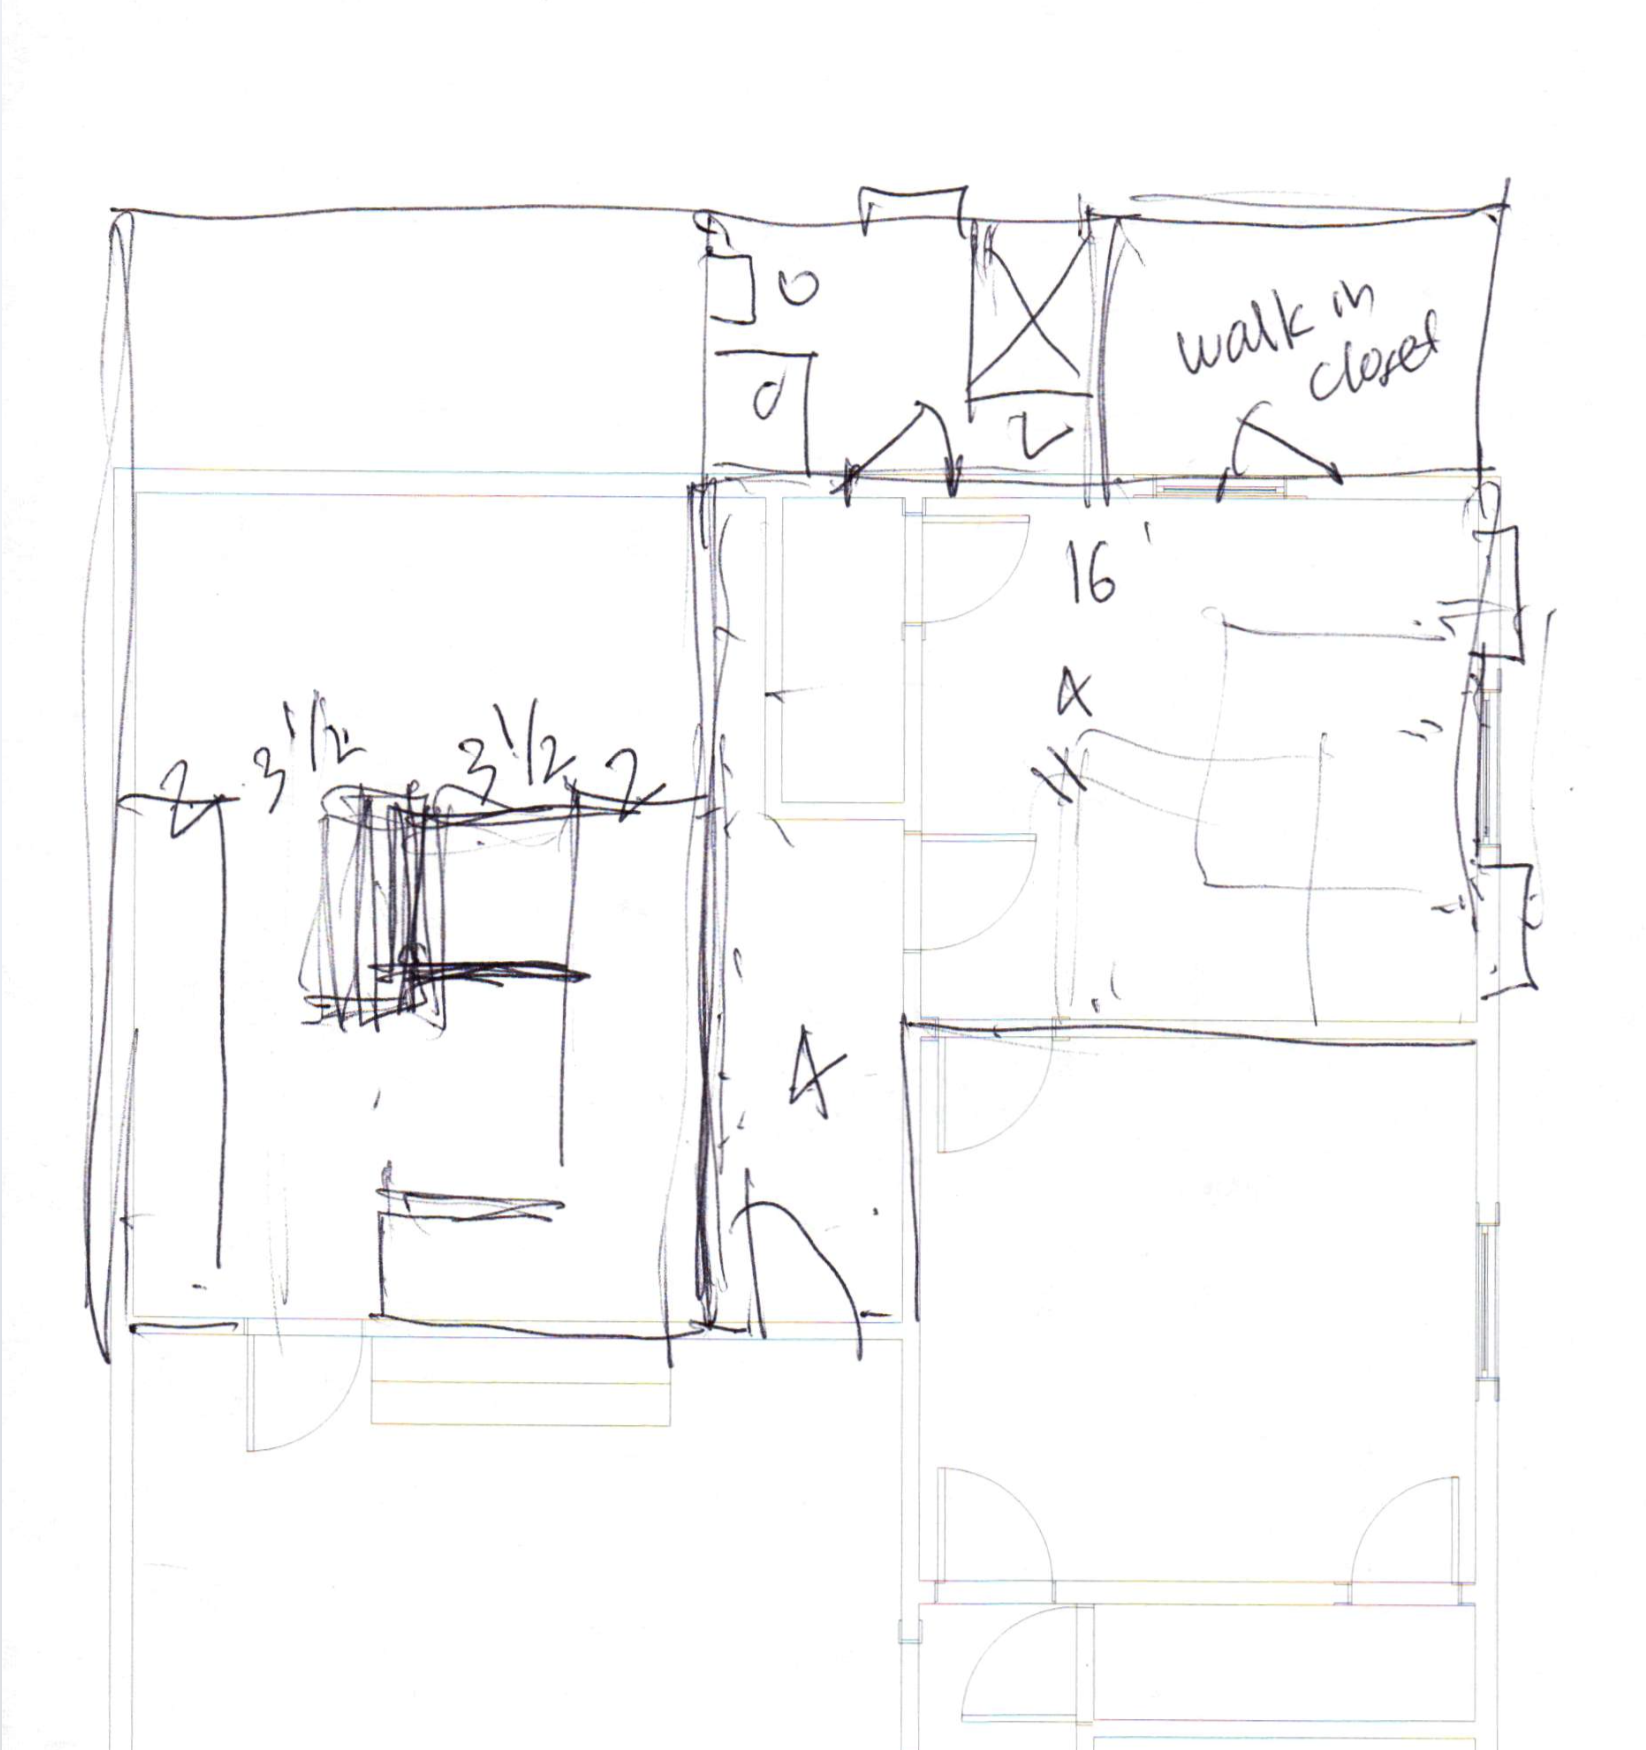
If you're into floor plan configurations, cycle through the ones below. The differing rendering styles are because some are mine, some are from the previous owner's plans to add on, and the others were sketched by Ross' uncle who we cornered at a family reunion to brainstorm a bunch of ideas together. He's a prison architect - yes, prisons - but in a nice rehabilitative way. I have probably 30 other drawings in a notebook, but looking at them is too exhausting. If you're a layout nerd, let me know and maybe I'll upload the rest of them.

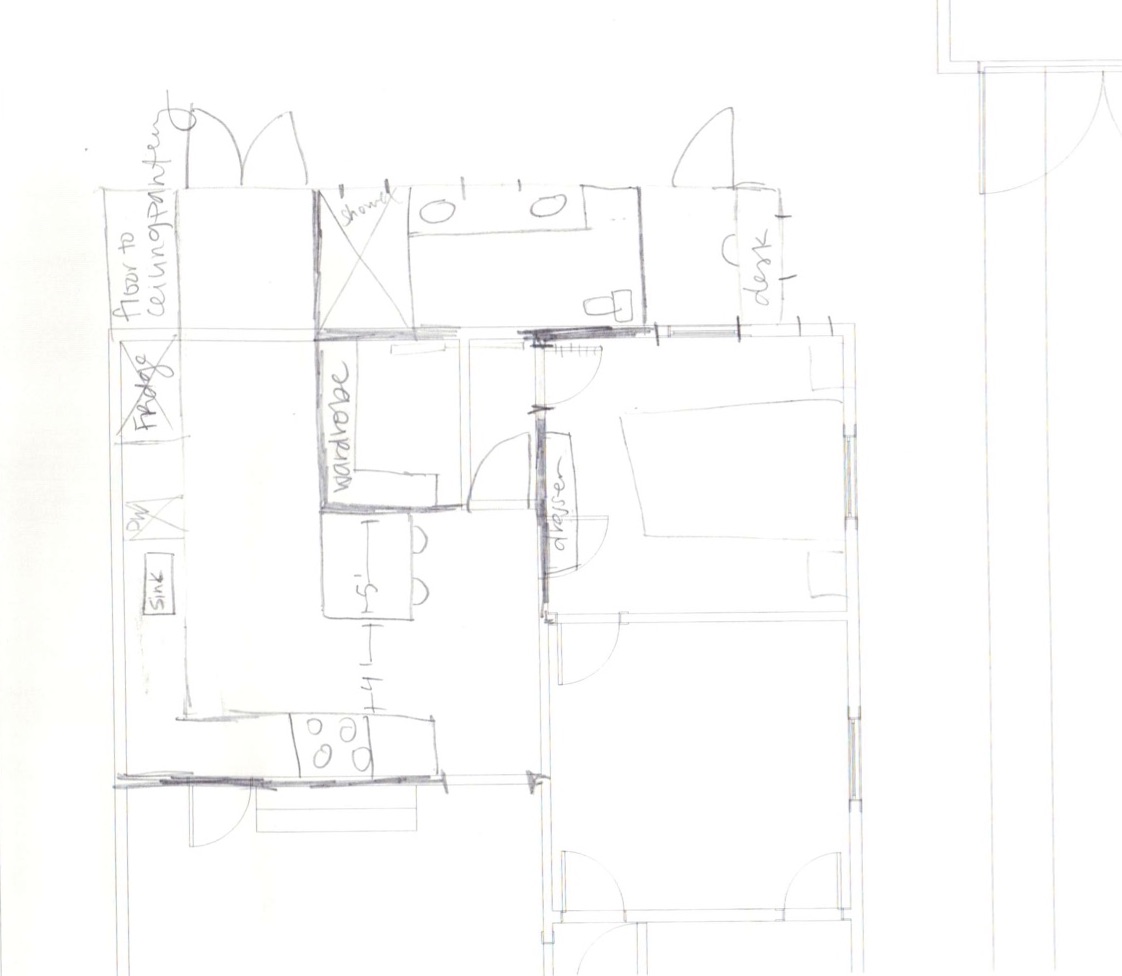
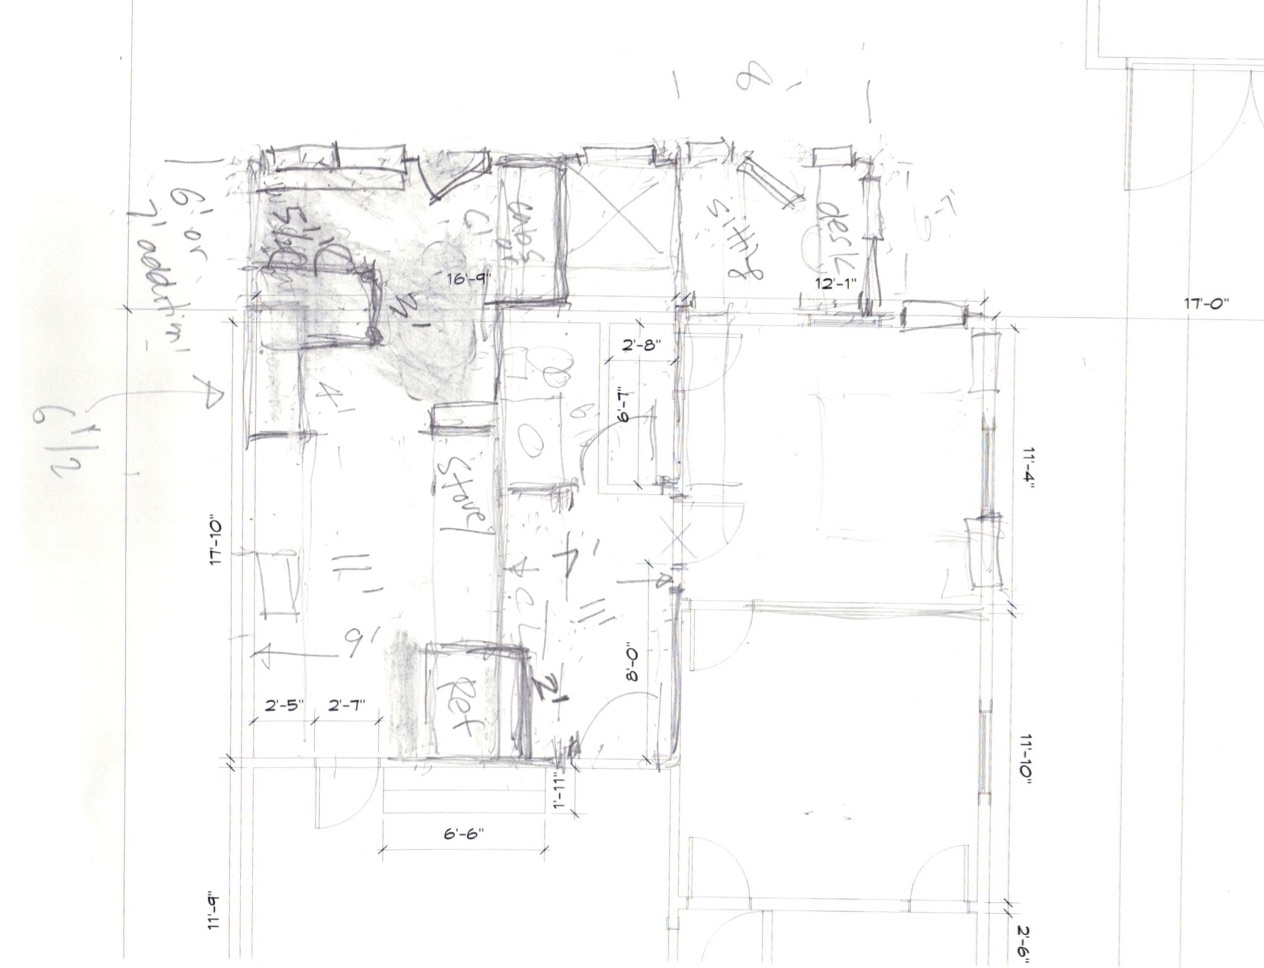
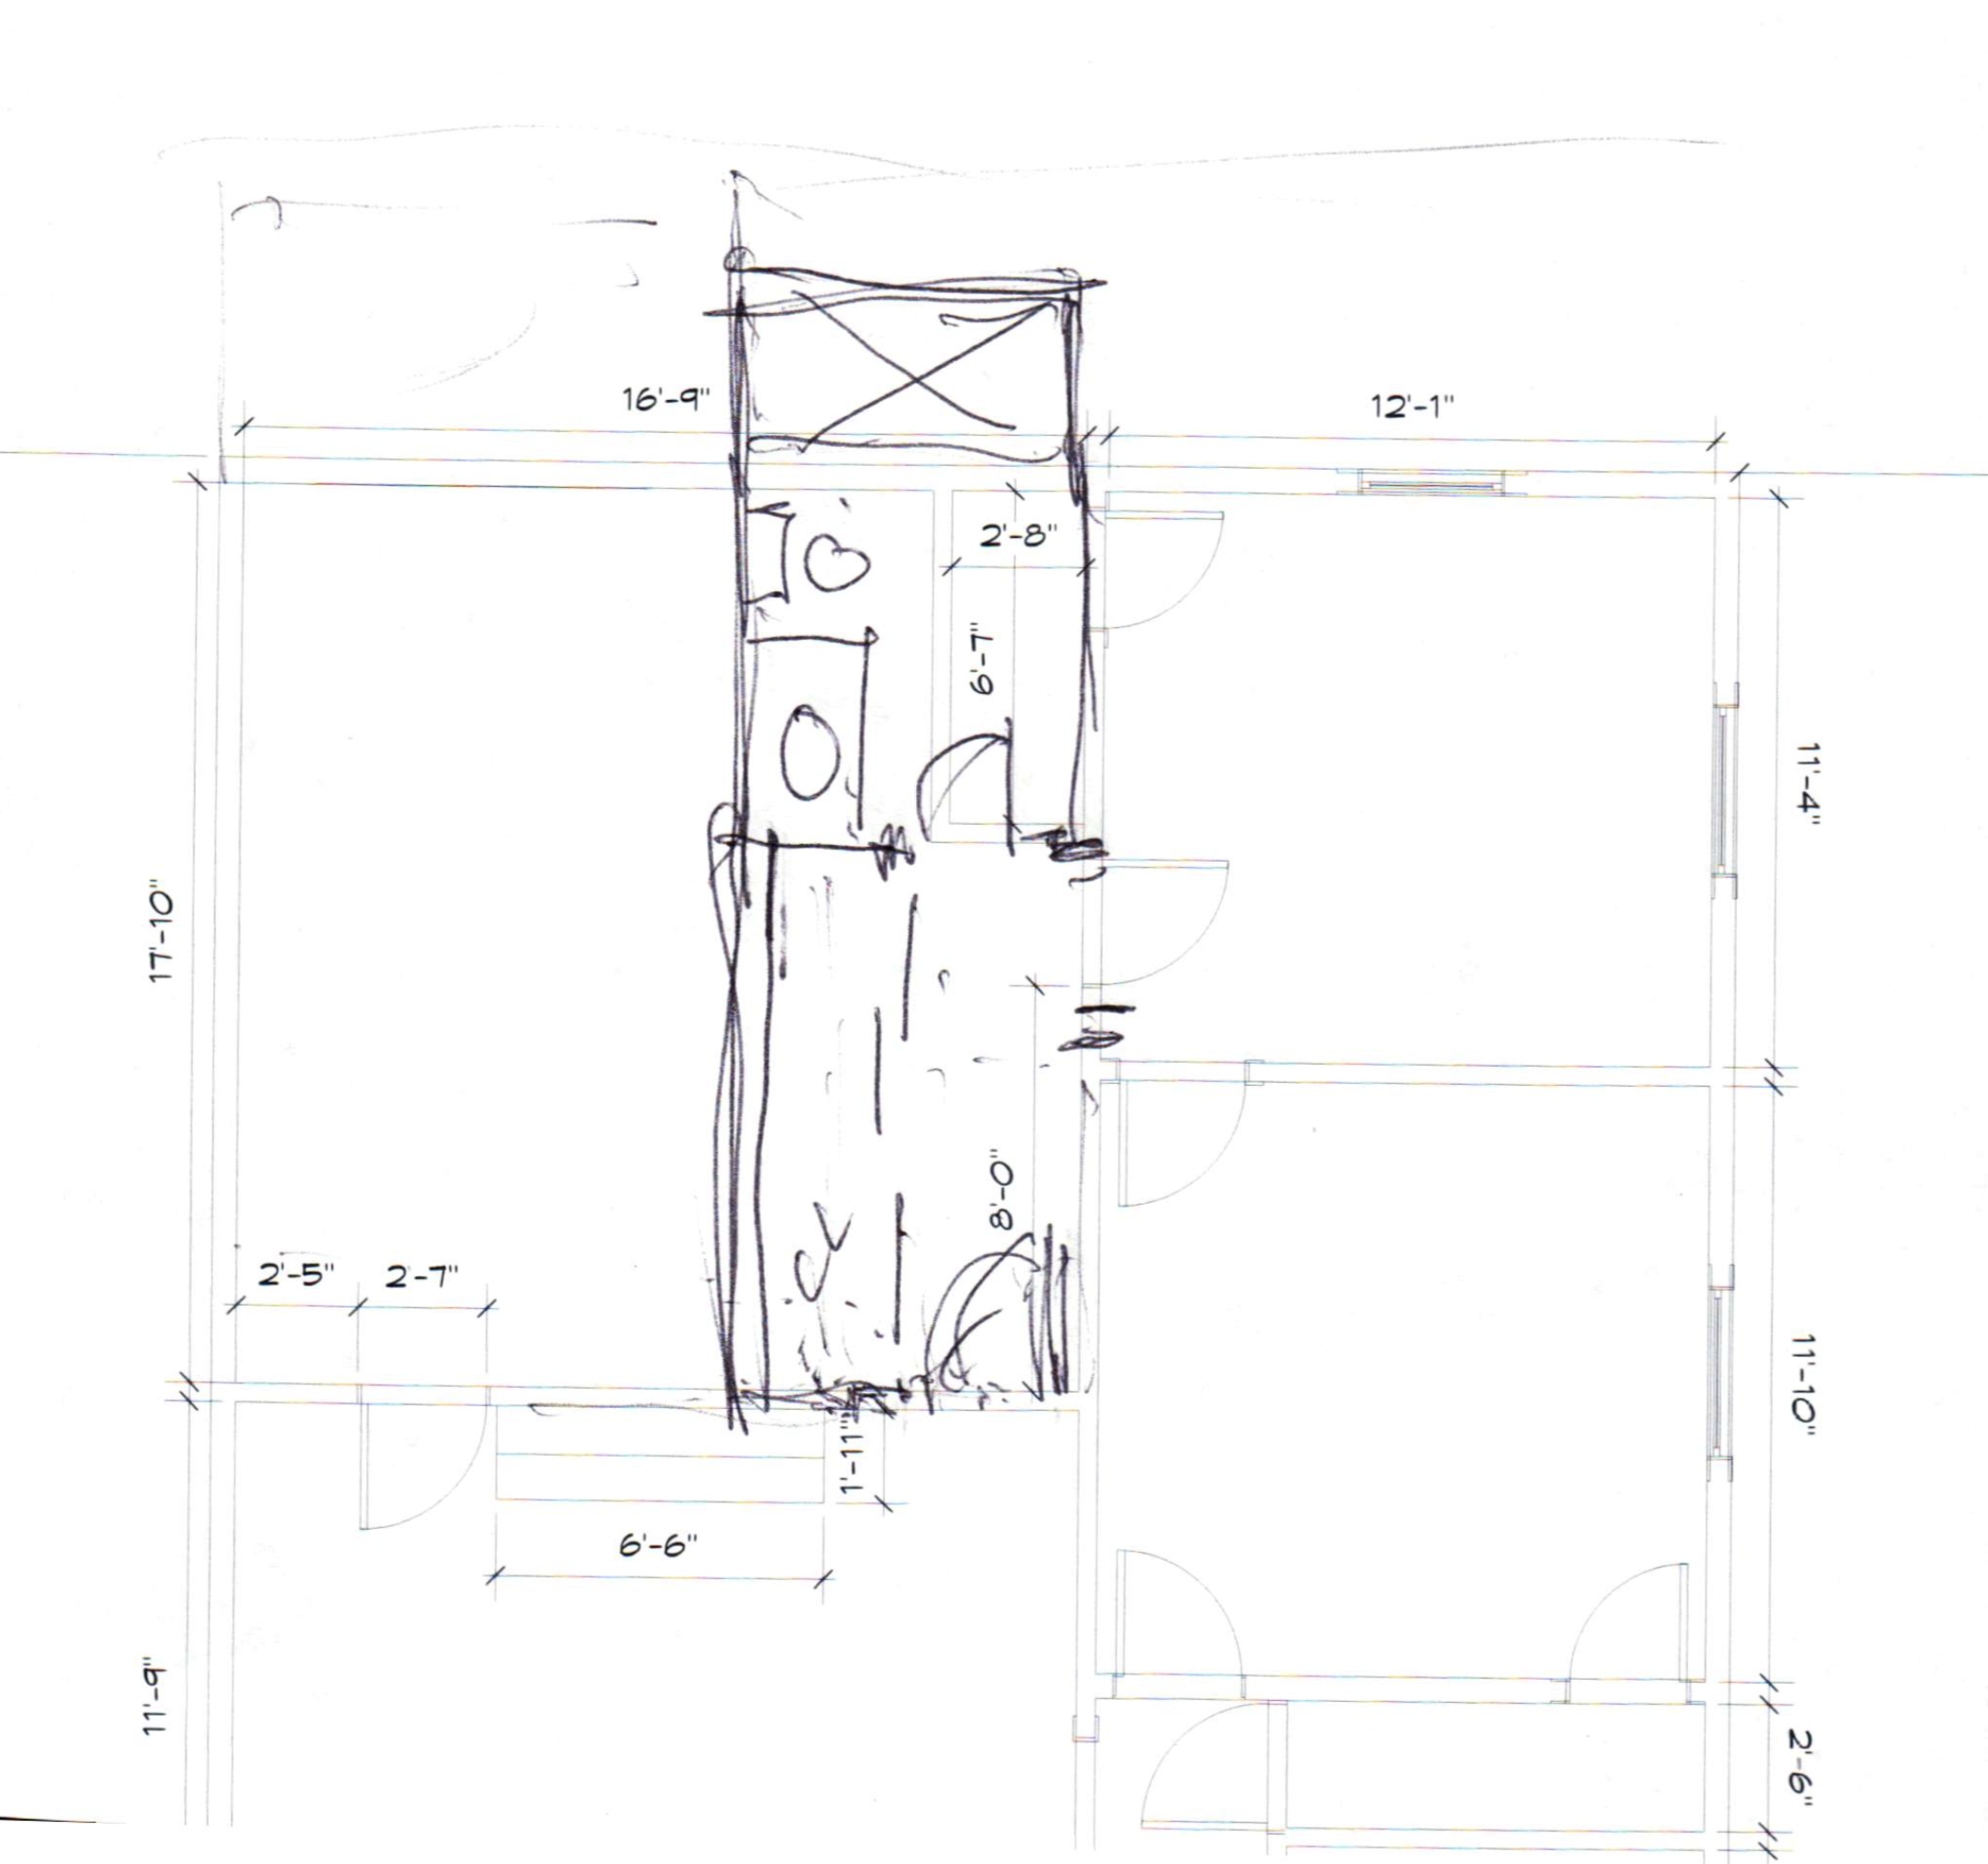
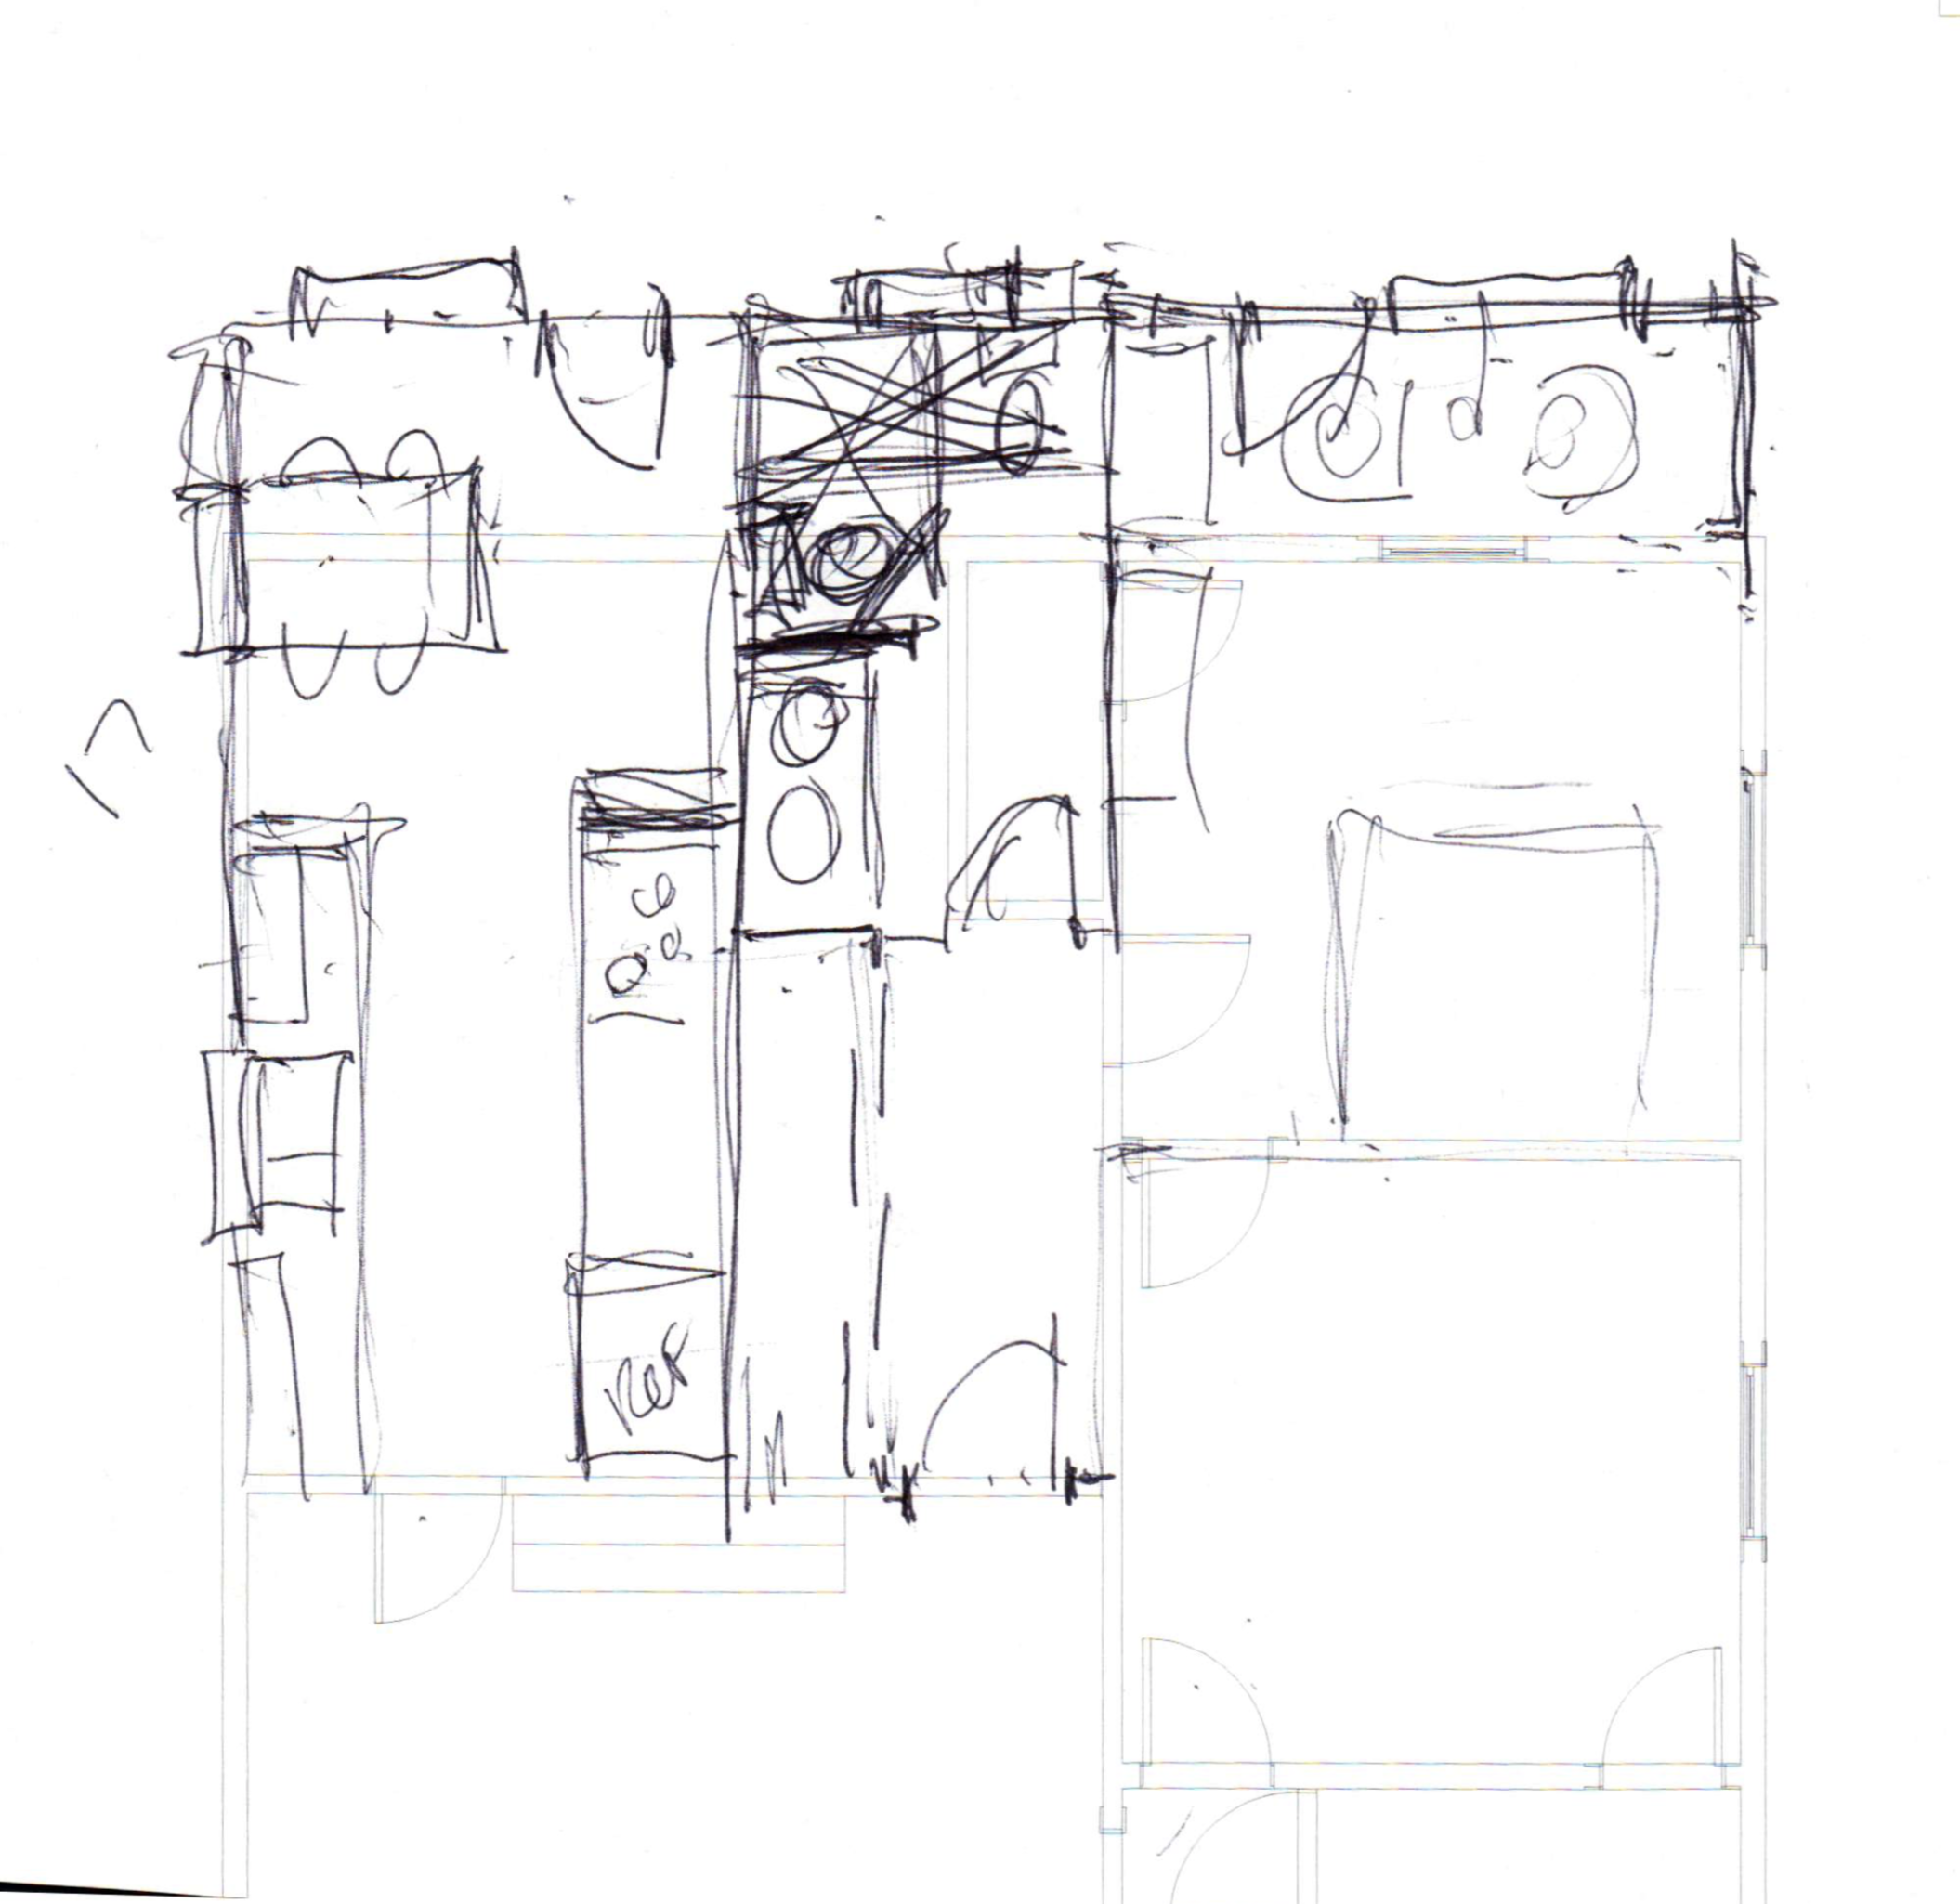
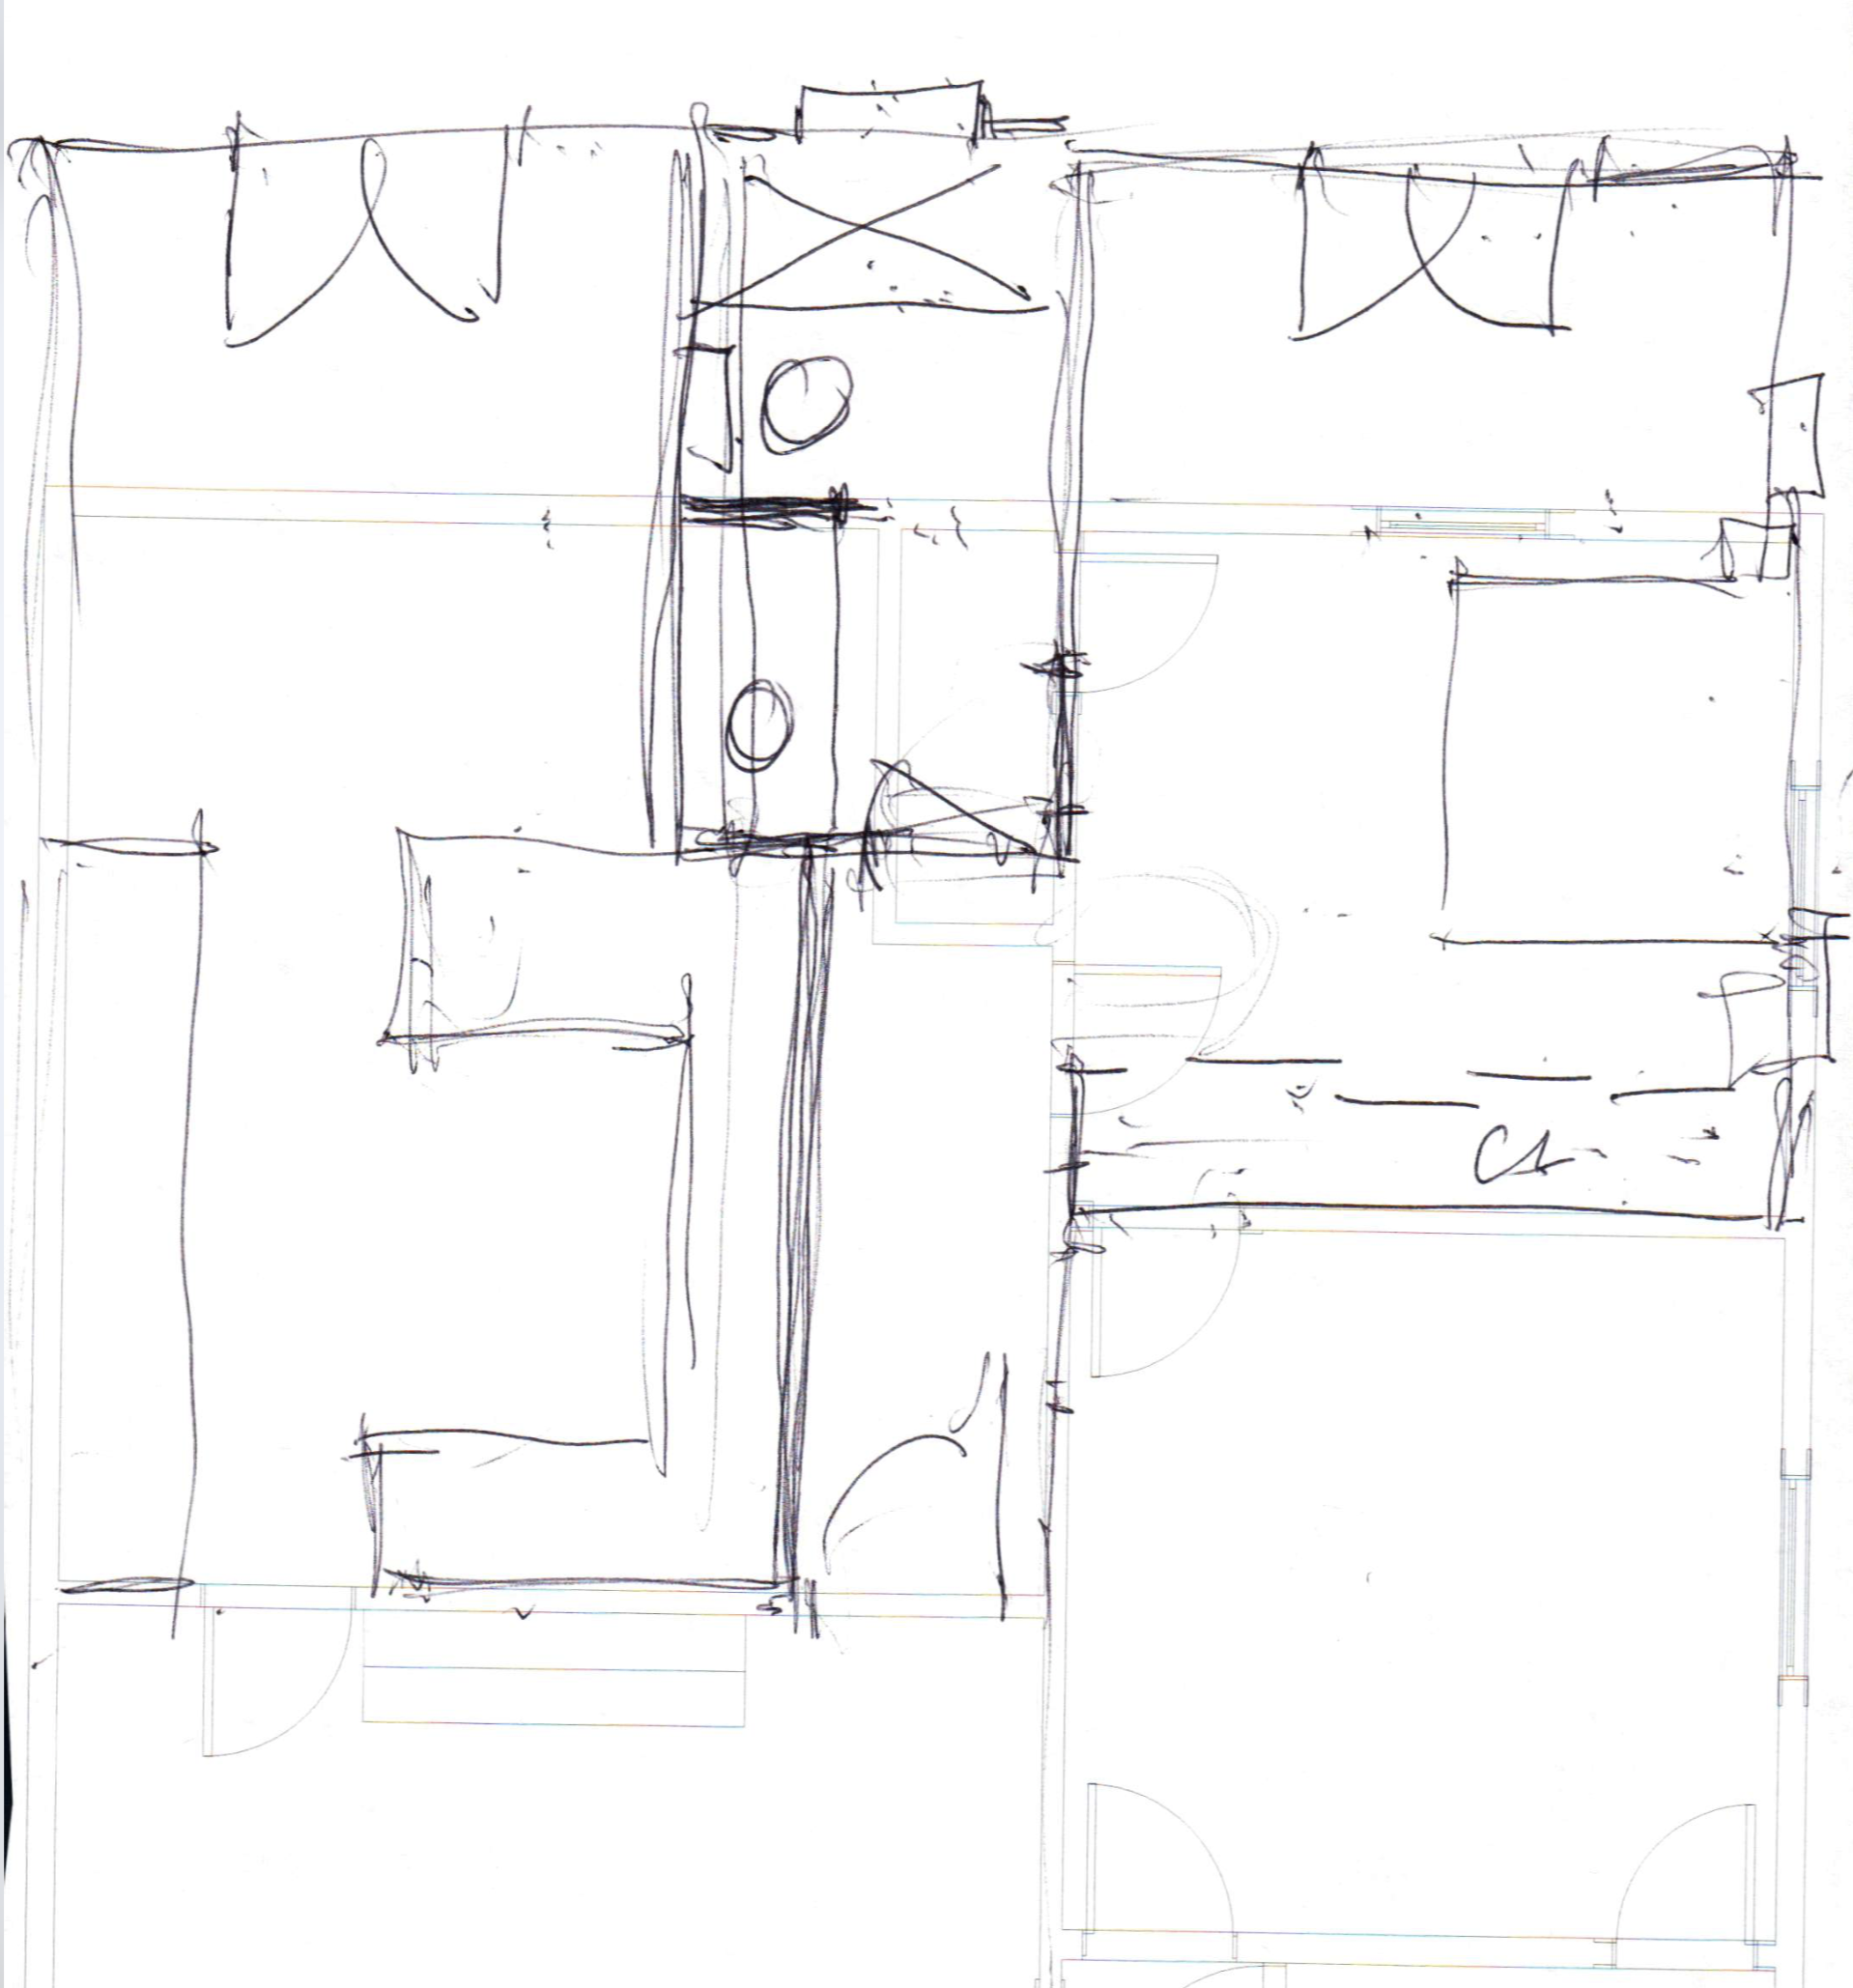
So, tell me! Any thoughts? comments? questions? concerns? I genuinely am interested in what you have to say! I'm not an expert, and I haven't lived in a variety of houses to know how different designs function but I'm taking inspiration from house tours, blogs, online images, books, and asking all the pros I can. Please weigh in - whether you're an expert or not! If you want to sketch up an idea to send my way, here's a pdf of the current floor plan.

We're taking this project on in phases, but phase one starts soon, so speak now or forever hold your peace! Note also that the kitchen isn't fully fleshed out. The renderings are not the final layout and most certainly not the finishes you can expect in the kitchen remodel - so stay tuned for that.

Thanks in advance for your feedback!

See The Latest Kitchen Renovation Posts

My Interview On the Style Matters Podcast! + Audio Recording Tips and Tools

A few weeks back, I sat down to chat with Karen and Zandra of Little Yellow Couch for an interview on their Style Matters podcast. We discussed the latest One Room Challenge (and the mural), my work in museums and its influence on my blogging, taking on stop-gap DIYs in the kitchen, the passion I have for art, where I like to donate when I clean house, seeking inspiration, plans for 2018, and why I think style matters.

Listen to my episode!

Use the player above, or on iTunes, GooglePlay, or Stitcher.

The Gold Hive Home Office Podcast

This is the audio set up Ross put together for my interview. As an audio professional by trade, and as our home's Chief Technology Officer, he's a good resource for all things music/voice recording. He helped me round up tips and tools if you have recording needs yourself!

A few tips for audio recording if you're being interviewed, want to launch your own YouTube show or podcast, are recording vocals to mix your own music, or even if you do lots of conference calls online:

  • Turn off the AC/heater, don't run a load of laundry, and pick a room in the house with sound-absorbing materials (i.e. soft things). Also, remove clattery jewelry and avoid fidgeting with things that can make noises. Even vibrations from working on the table that the mic sits on can be picked up in your recording.

  • Silence your cell phone and put it far away from the mic so there's no cellular interference.

  • Use headphones to listen to the other side of the conversation. If you use your speakers, your microphone will pick up the other person's voice and you'll get an echo.

  • Speak closely to the mic for more direct sound and less room echo.

  • If you're going to laugh or yell, pull away from the microphone a bit.

  • Sit up straight (or even stand) for clear breathing.

  • Avoid drinking milk-based beverages or coffee before talking. Eating an apple before you chat will help clear your voice and a glass of room-temp water will keep you hydrated during your conversation.

  • Use a pop filter to remove the strong "p" and "s" sounds.

  • Lastly, always do a test run before going live!

Using your computer's built-in audio won't get you the best result, so we've rounded up some tools to make you sound your best. Ross recommends the pro gear for long-lasting and high quality audio, but he collected a few cheaper options to play with until you're ready to make a more "pro" plunge. You can also mix and match pro and budget, too!

Pro Gear:

Microphone: A pro mic that works great for speaking or singing. It picks up detail in your voice without picking up unwanted reflections in the room - $159

Mic Stand: It's adjustable and weighted so it won't tip over - $30

Pop Filter: A must have for reducing hard "p" and "s" sounds. This one is made of metal so it will last longer than plastic or DIY versions - $50

Audio Interface: It amplifies a professional microphone and converts it to USB to record directly into your computer. It also has a guitar input if you're a musician - $99

Mic Cable: To connect the interface to the mic - $6

Headphones: These headphones are the priciest of all of the items, but luckily they are the most versatile. I use this pair on flights for my movie watching because they are super comfy and have great audio quality - $222

Budget Gear:

Microphone: This USB mic plugs directly into your computer without needed an additional interface like the pro set up. Plus, it comes in different colors! - $70

Mic Stand: The budget mic has little legs, but if you need more height, a stand will make chatting more comfortable. Plus, it's easier to attach the pop filter to a stand. Note that it doesn't have a boom to bring the mic closer to you like the pro one does - $13

Pop Filter: For less than $10, it makes your voice sound so much better (you can also make your own for pennies) - $9

Headphones: I like over ear headphones, but you can always use the ones that came with your phone - $15

Software:

All of these tools will send your voice to your computer, then you can use any software to record. My podcast interview was hosted on Skype, so I used the built-in Skype Call Test Service to make sure everything was working well. For recording, you can use the native Mac app, GarageBand, or download Audacity for free for PC users. Pro Tools is the industry standard audio workstation but is overkill for simple projects. Ross recommends TwistedWave for someone looking for more than what the free apps provide.

I hope that's helpful for anyone making music, movies, podcasts, or internet calls! Send me any recording questions, or if you want recommendations for pro PRO gear in the thousand dollar range, and I'll pass you along to my in-house audio engineer.

I got carried away talking about recording gear, so don't forget to go listen to my interview on iTunes, GooglePlayStitcher, or the player below!

So, why does style matter to YOU?

Valentine's Day Art That Isn't Cheesy

Ross and I don't really celebrate Valentine's Day, but if we did, I'd probably use it as a reason to buy more artwork. The new piece would be a gift for him, but I'd get to enjoy admiring it on the walls. A win-win! I've rounded up my favorite artworks that aren't super mushy, overly romantic, nor too cutesy. Any would be great to gift or to decorate with during the love holiday - or even throughout the rest of the year.

valentines day art that isn't cheesy.jpg

Click the thumbnails below to shop 'em!

If you want to go for a customized sweet and sentimental gift, here are a few faves. There's Framebridges' Heartstagram which mattes a photo of a loved one in the shape of a heart (get $100 off four of them with code HEARTYOU). They will also frame notes, cards, shirts, buttons, photo strips - you name it! Minted has some custom gift options like maps of a meaningful city and graphic ways to display a special date. One of my favorites is a print of what the sky looked like on an important day.

KonMari Style Closet Organizing with Natasha Habermann + A Video!

I thought my wardrobe was on the slim side until my dear blogger friend Natasha Habermann schooled me on getting rid of the clothes I don't love. And, she knows best, so I have no regrets about purging over half of my wardrobe.

KonMari Style closet organizing

Natasha and I went live on Instagram Stories so she could help me sort through all my clothes and answer your questions about the organization. Did you tune in? If not, that's okay! At the bottom of the post is a video of the key points!

Inspired by the book, The Life-Changing Magic of Tidying Up by Marie Kondo, Natasha has transformed her home (and her life!) using the KonMari method, which, in summary, is owning only the things that bring you joy. Learn more about how Natasha keeps her bedroom organized and how she folds her clothes.

Psst! If you're in an RSS reader, you'll have to click through to see the fun before and after animation.

Psst! If you're in an RSS reader, you'll have to click through to see the fun before and after animation.

I started with a pretty packed closet with mismatched hangers and overly-stacked shelves. But now my wardrobe is a true representation of me. Look at how much more refined my color palette is! I can't believe I owned so many jewel tones even though I know I gravitate towards dark cool colors and neutrals.

KonMari style closet wardrobe organizing

I purged so many pieces that don't bring me joy, and I don't miss them at all. In fact, I have so much more joy knowing that someone else will get to wear each of those garments. Goodwill is definitely my friend, but I like to donate particular items to specific places.

To see how Natasha and I did it, check out the video below. It's a slimmed down version of our live chat plus a time lapse - and who doesn't love those? If you look closely, you'll see a cat taking a bath in the backyard during my purge, and, more importantly, if you listen to Natasha, you'll certainly learn a lot.

See any garments in my closet that you like? You can shop my favorite pieces below. I've been literally living in that grey mock turtleneck for weeks - and I never use the word "literally" lightly.

Check out Natasha's post recapping the process, subscribe to my YouTube channel, and happy organizing!

Where to Donate Items After Cleaning House

January is often when I get the bug to purge the house. Holiday decor starts to get claustrophobic towards the end of December, and winter travel to tidy hotels rooms (like Rivertown Lodge pictured below) gets me excited about minimal living.

24845468_1959986804243573_7424649482865737728_n(1).jpg

There are many more options than your local donation drop-off center to take your unwanted items. In fact - did you know many of the items dropped off at Goodwill just end up in the landfill?? I'm listing my favorite places that put things to the best use - since there’s always a better solution than the landfill and so many go to such a good cause. Please share your favorite alternatives in the comments!

Linens/Towels

I give our unwanted sheets, blankets, and dingy towels to animal rescue centers. They use them to pad the beds for our critter friends during recovery or while they wait for forever homes. In San Diego, I donate to Project Wildlife or the Humane Society.

House Parts and Tools

Habitat for Humanity is my go-to for anything house related. Items from furniture to doors and paint to light fixtures are sold at their ReStore centers and the proceeds support affordable housing projects. Psst! It's also a great place to shop for house parts.

Toiletries/Makeup

San Diego has the largest K-12 school for kids experiencing homelessness. They have an extensive wishlist including school supplies and kids' clothes. Since I don't have either of those at home to give away, I donate toiletries and unwanted makeup. Women’s shelters are also a great option for these items.

Cleaning Products

I’m obsessed with giving things away on my local Buy Nothing Project Facebook group where neighbors can post things to give away. I posted a collection of cleaning supplies that I no longer needed and someone that runs a local nonprofit picked them up to clean her community center. Consider joining a similar giveaway group, or think of a favorite nonprofit when cleaning out the cleaning cabinet.

Electronics

When I upgraded computers last year, I donated my old iMac to a favorite local nonprofit, Include Autism, but many community centers, nonprofits, or schools would be more than happy to receive old computers, iPads, and electronic toys. If your electronics are broken, they need to go to e-waste recycling. Look up a local recycling event in your neighborhood or check earth911.com.

Books

Local libraries will take your used books, but you can also take subject-specific ones to places that will read them more. Consider kids' books for a local YMCA and coffee table books for a retirement home. Also, your neighborhood may have a Little Free Library where you can drop off a book and pick up another one in exchange.

Magazines

Glossy pages filled with colorful images are great for collage art projects. Consider taking a stack of catalogs, magazines, maps, and scrapbook paper to a children's museum, art center, after-school program, or school.

Art Supplies & Paint Samples

Schools, art museums, and youth programs can put unwanted paints, brushes, and craft paper to use. Before dropping it off, check to be sure they can use what you want to give - oil paints are toxic and won't be put to good use with young kids, so gift them to older artists.

Furniture

Salvation Army will pick up big furniture items that you'd normally have to pay someone to move, so it's a win-win. Smaller furniture items can go to Habitat for Humanity or your local donation center. If it's too small to have Salvation Army pick up, but too big to fit in the car, I put it on the curb with a free sign, post it on my Buy Nothing Group, and/or post it on Craigslist. It's often gone in an hour.

Light Bulbs

Do you have any of those pesky incandescent bulbs laying around but don’t have a need for them because you switched everything to LED? My local animal wildlife rehabilitation center, Project Wildlife, uses them in incubators for baby animals without their parents because those old bulbs emit heat. Consider finding a similar organization near you!

Office Supplies

If you ended up with too many Sharpies (guilty) or you're changing out your office chair, consider giving to your favorite community organization. You may be used to donating dog food to the animal shelter, but the administrative staff that support the pups could benefit from your extra office accessories.

Eyeglasses

There are thousands of people without access to vision care so giving your old glasses can help someone have the ability to read for the first time. When I upgrade to new frames, I mail in my old ones to Lion's Club where they redistribute them.

Food

Feeding America will accept unopened non-perishable food items at their distribution centers. It's a great place to give when you do a major pantry clean out, but when I have a couple of items we don't need, I keep them in my car and pass out to folks on the street that are hungry.

Clothes and Housewares

Donation centers are an easy option for dropping off clothes and housewares, but your community likely has organizations that can give directly to folks in need. Refugee families can benefit from clothes and basic housewares as they settle into a new country. Women's shelters are in need of child and adult clothing in addition to basic home items as they transition housing. Consider donating old suits and business attire to an organization offering job training for underserved individuals. This is a good one for women’s clothes. If your clothes are so worn that they can’t be reused (think a sock with a hole in the toe or very worn undergarments) take them to a textile recycler - H&M happens to be a drop-off center for textile recycling.

Houseplants

I haven't done this one myself, but I'm sure any retirement home would appreciate houseplants that no longer fit your space, or those you need to give up when you move. I’ve also listed nearly dead plants on my Buy Nothing Group and had a few neighbors pick them up to try to revive them. 

Kids Toys and Clothes

If you receive kid toys or clothes for your little ones that you don't want, you can donate brand new ones to children's hospitals. Gently used toys and clothes can help kids at a shelter where they may be displaced due to housing, domestic violence, behavioral challenges, and more. Refugee families and women and children’s shelters would also love these items.

Camping Gear

That tent you never use can be put to great use for someone living on the street. You can walk up to someone that is struggling with housing and hand it to them directly or work with a local organization that serves folks that are displaced.

Gift Cards

I've received $5 gift cards to places I don't frequent then they end up in a pile, or clogging my wallet. Many nonprofits will use these to give to their volunteers as gifts. Local children's centers will use them when they go on outings with kids that are living on the center's campus.

Pet Food

When we changed Mabel's diet, we ended up with a bunch of open bags of treats and kibble. I found an organization that takes these snacks to animals in Tijuana. Unopened items can go to your local animal shelter.

Random Odds and Ends

There’s always that something that you’re sure nobody wants. But I’ll bet you someone will take it. When you take a weird item that doesn’t have a specific purpose or needs explaining to a major donation center, it’s likely to get trashed. For items like this, I turn to my Buy Nothing Group and post it to my neighborhood where they can get a description as to what it is. I have given away twist ties, canvas photos of me as a child (not kidding), nearly dead plants, coupons, an open container of milk, and so so much more.

Save the Wishlists of Your Community Organizations

Many nonprofits share wishlists on their website. Some are like Monarch School's list of needs and others are shop-able Amazon wishlists like the Humane Society where you can purchase items online to be mailed directly to the center. The wishlists can often inspire cleaning you didn't even think of (I now know to take the wrong-sized batteries I accidentally bought to the Humane Society). I also like to keep my local non-profits in mind when I see BOGO deals at the store. I can buy a tube of toothpaste for myself, and drop off the free one at Monarch School. Also, many organizations will take your recycling off your hands, too - our local children's museum is always looking for toilet paper tubes.

The list above is just what I do in my city with links to San Diego organizations, but here is a list of national organizations to support. Please share the ways you clean out your house for a good cause!

If you’re in the giving spirit and want to make monetary donations, here’s a list of my favorite non-profits to support.

2018 Project Preview

2017 was a record year for launching the blog, doing two One Room Challenges, and sharing the renovation progress of the bathroom and kitchen. But, 2018 is going to be the year of major remodels! Here's to hoping we can tackle each of the projects outlined below.

If you missed my 2017 recap, be sure to look through it to see how far we've come already.

The Gold Hive Annual Preview

1. The Kitchen

This will definitely be the biggest project of the year because it’s an entire gut job for a pretty big footprint - plus, it's a kitchen. I’m still in the planning stages but I’m getting oh-so-anxious about a more efficient layout and cabinets that aren’t falling apart. Our current kitchen takes up a roughly 18’x17’ space (including the two mudrooms) which we'll demo, then reconfigure to fit a bathroom and closet for the nearby master bedroom. Which brings me to item number two.

2. The Master Bath

Have I mentioned we have one bathroom? We want to add an ensuite off the master bedroom. It will use some of the footprint of the existing kitchen and we’ll build it all from scratch with new plumbing and everything. We’ll do a nice sized shower, a window to the backyard, and a vanity with oodles of storage. I can’t wait!

3. The Master Closet

Along with the kitchen and bathroom configuration, we’ll carve out some room for the master closet. Our current closet is quite petite. It works for our needs because we aren’t big clothes people, but considering we store suitcases and linens in another closet, and accessing 1/3 of our clothes is a struggle, we could definitely use room to spread out and get more appropriately arranged storage. We hope to create a 5’x7’ walk-in closet that will also house drawers so we can do away with the dresser in the bedroom.

4. The Master Bedroom

Since we’re messing with the master closet and master bathroom, we might as well do the master bedroom, too, right?? The current room has mismatched Craigslist furniture that I bought when we lived in our apartment five years ago. If you recall from Instagram, we moved our bed as a test for the new layout and we ended up having weird dreams for a couple of weeks. That better not be a permanent.

5. The Backyard

When the kitchen configuration changes, the door to the backyard will move. This one small change to the layout has been the primary reason we haven’t tackled the backyard. We wouldn’t know where the kitchen door would lead, and we still don’t know if we’ll add backyard access from the master. So, we haven’t relandscaped in fear of putting a door directly in front of a shrub. Once the kitchen layout is 100% finalized, I’m going to be ready to rip off the temporary deck, haul away (or cut into pieces) the 8-person jacuzzi that we never use, and add some fresh plantings.

6. The One Room Challenge

I’m so honored to have won the One Room Challenge along with my friend Natasha. House Beautiful magazine selected us as the top two room transformations, so we have automatically been added to the list of featured designers in the spring 2018 event! I still don’t entirely know what room I’m going to do or what my plans will be, so stay tuned!

7. Share The Front Yard Landscape

Last year, we upgraded the front elevation of the house with some cosmetic exterior changes and a garden in the front yard. We’ve enjoyed this exterior space for awhile now but I haven’t shared it on the blog, so stay tuned for posts on how I repaired the stucco on the house and designed a low-water garden.

8. Share The Laundry Move

Did you notice that the laundry used to live in the kitchen? Last year, we hid it in a secret spot. Maybe I'll tell you where we put it.

Blog Preview

I have a few goals for the blog itself, too!

Open an online shop: I have some cool vintage finds that I'd love to give to a new home, and I'd be happy to put my art school degree to work by selling some of my own pieces. Perhaps art prints of the mural I hand-painted?

Create videos: I published my first-ever video last year and want to keep experimenting with the medium in 2018. Click that red subscribe button to follow my YouTube channel.

Post more: This year I've posted 2-3 posts a week, and I hope to maintain that schedule if not increase to 4+ times a week.

Share the messy stuff: I plan to show more behind-the-scenes, the struggles of fixing up an old house, and the minutia of maintaining a home.

Support artists: I want to buy more original art for my home and promote the creators that inspire me.

FOLLOW ALONG!

Don't miss out on what I have coming up in the new year!

  • Subscribe to emails (get an email each time I post, or once a week)

  • Read on Bloglovin' (get all the posts, but in the app)

  • Admire on Instagram (see photos that never make it to the blog and watch my Stories)

  • Follow on Facebook (pretty much the same as Instagram and blog posts, but no Stories)

  • Subscribe on YouTube (I hope to do more than one video in 2018!)

  • Pin with me on Pinterest (see what inspires me before I implement the design in my home)

To see before and afters of each room, click here and to shop the house, click here. Fingers crossed I can accomplish everything I hope to tackle in the new year!

2017 - A Year In Review

We're a week into the new year, and I'm still reflecting on 2017. I started the blog early last year (it's still an infant!) so 2017 was a milestone. Want to walk down memory lane and revisit the blog post highlights from the past year? Let's go backward in time, shall we?

1. The Office and A Mural - One Room Challenge, Fall Edition

I nearly didn't participate in the latest ORC and decided to do it only a couple of days before I wrote the week one post - but boy, am I glad I took the risk! I painted a mural and reconfigured the whole room with a dining table for a desk, and a hacked IKEA unit for custom office storage. After all that, I'm honored to have been selected by the Editor in Chief of House Beautiful Magazine as one of the top two winning guest participants out of over 200! Here are each of those posts:

We updated the bathroom before moving in, because it's the only one in the house. So, we technically didn't do this space in 2017, but I recapped it and shared it with you last year, then continued to make updates up until a few months ago. The bathroom was gutted and rebuilt to have a classic look to match the style of our 1915 home. Now, I'm smitten with it.

I've always taken a slow decorating approach, letting a room evolve as I find individual pieces over time. So, being challenged to transform a room from start to finish in 6 weeks was totally new to me. During my first One Room Challenge experience, I gave our second bedroom a bold wall color, added picture rail molding and new art, and reupholstered a chair. Now it's the perfect room for viewing all of my favorite shows.

I updated the kitchen with new paint, hardware, and concrete countertops before moving in. Then, in early 2017 I installed new flooring (and made my first ever video!) just in time to plan demolishing all of it in 2018. Stay tuned for what's to come during phase 2!

5. The Living Room

The living room isn't done but it's slowly getting better. We added new chairs and I refinished the bookcases in 2017 - small changes but they make such a big difference.

5. The House

26070515_368024403608724_1427472053438513152_n.jpg

We bought the house in early 2015, but since the blog didn't exist at the time, I revisited it in 2017. I reflected on the house buying process from our experience hunting to my recommendation to tour 100 houses. Then, I laid out each of the rooms of the house in the full before tour. I can't believe how far it's come! Before moving in, we refinished the floors, retextured the walls, and got rid of the stench. Now it's the perfect canvas to keep tweaking for years to come.

Follow Along!

Well, those were the majority of the projects from 2017. I have SO much more coming in the new year, so follow with any (or all) of the following ways:

  • Subscribe to emails (get an email each time I post, once a week, or once a month)

  • Read on Bloglovin' (get all the posts, but in the app)

  • Admire on Instagram (see photos that never make it to the blog and watch my Stories)

  • Follow on Facebook (pretty much the same as Instagram and blog posts, but no Stories)

  • Subscribe on YouTube (I hope to do more than one video in 2018!)

  • Pin with me on Pinterest (see what inspires me before I implement the design in my home)

To see before and afters of each room, click here and to shop the house, click here. Later this week I'll be sharing what I have planned for 2018. See ya then.